![[Updated] Strategies for YouTube Music Fusions](https://thmb.techidaily.com/4d13682289fd093707f3e488098e8b68b405e6325695bb2b5c751424b8cb1104.jpeg)
[Updated] Strategies for YouTube Music Fusions
Strategies for YouTube Music Fusions
YouTube Music has become a popular go-to platform for music lovers to find new songs and artists to enjoy. The content is uploaded regularly, so there’s always something new to discover.
But with so much music content on YouTube Music, finding the right mix for you can take time and effort. That’s why we’ve put together this guide on how to find my playlists on YouTube.
We’ll also answer some frequently asked questions to help you find solutions regarding the YouTube Mix queries. So, without wasting time, let’s get on with the guide!
 OtsAV Radio Webcaster
Basic Information of YouTube Mix
Before starting, let’s learn some basic information about the YouTube Music Mix playlists:
Three Ways Of YouTube Music Mix
YouTube has popularized three personalized mixes to keep you up-to-date on newly released music and introduce more artists to you:
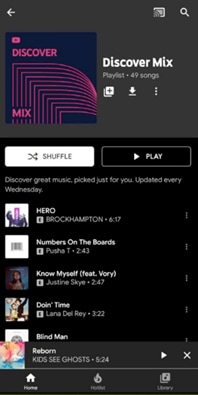
Discover Mix: Discover Mix introduces you to 50 new tracks every week, expanding your musical horizons and introducing you to contemporary artists. This playlist mix provides new updates every Wednesday, making it a go-to playlist for discovering new music to your taste.
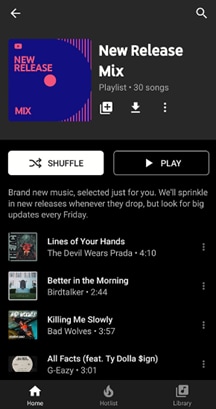
New Release Mix: In the New Release Mix playlist, you can find all the newest tracks from your favorite artists, and some music is recommended. New updates are provided every Friday (when most new releases come out), and mid-week releases the entire week to ensure you’re always up-to-date on the latest music.
Your Mix: Your Mix is a playlist full of songs by popular and well-known artists, as well as some new tunes and performers you’ve never discovered before, which are recommended based on your preferences, making it ideal for unwinding and listening to something you’re guaranteed to love. The playlist is updated regularly, so the music never gets dull, and there’s always something new to listen to.

What Is YouTube Music Replay Mix?
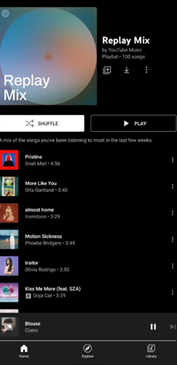
YouTube Music Replay Mix is a feature of YouTube Music that is automatically generated via the YouTube algorithm and contains a personalized mix of tracks based on your listening history. The mix is updated daily and includes up to 100 songs.
You can access it by tapping the “Replay Mix” option on the YouTube app’s main screen or the YouTube Music website. This feature is perfect for those who want a continuously updated mix of their favorite songs.
So, if you’re always on the go and need more time to create your playlist, YouTube Music Replay Mix is a great option. Since it’s based on your listening history, you can be sure that you’ll always hear songs that you love.
The Things You Want To Know About YouTube Mix
Now that you’ve what YouTube Mix is, you might have some queries in mind. To help you resolve them, we’ve provided solutions to the most frequently asked questions:

1. How Do I Save My Mix Playlist On YouTube?
To save My Mix playlist on YouTube, launch the YouTube app, tap “More” on the app’s main interface, and tap “Add to Library.” You can also save the playlist by going to the Mix page and tapping “Save” below the description.
2. How Do I Find My Playlist On YouTube?
The YouTube Music Replay Mix playlist is located on the home screen of the YouTube Music app and website under the “Mixed for you” header. Here you can also find other playlists, including “Your likes,” “New Release Mix,” “My Supermix,” and “Discover Mix.”
3. How Do I Add Songs To The Replay Mix Playlist?
You can’t manually add songs to the Replay Mix because YouTube Music automatically adds tracks that you listen to more than once.
The more often you hear a soundtrack, the higher it will appear on the YouTube list. Conversely, songs you’ve only played once or twice will appear lower on the list.
4. How Do I Delete A Mix Playlist On YouTube?
To delete a saved YouTube playlist from the Music library:
- Launch YouTube Music app on your mobile device or head to its website on your computer.
- Tap “Library” on the home screen or homepage and tap the “Mix” you want to delete.
- Tap the**”More”** option on the playlist panel and tap “Remove Playlist From Library.”
5. How Do I Turn Off YouTube Mixes?
To turn off YouTube Mixes, you can use Google extensions or create one yourself if you are an expert in coding.
6. Are YouTube Mixes Endless?
YouTube Music offers an endless personalized music playlist called “My Mixes.” Every time you click or tap the playlist, a new queue of your most listened or favorite tracks is generated for you.
The playlist contains about 100 songs with an endless auto-play feature once you reach the end of the list.
A Bonus Tip: How To Make a Music Video?
Hopefully, you have got the information you need about YouTube Mixes. Supposing you are YouTube music lover, we wonder, do you want to create YouTube videos for your channel or add music to your clips? In that case, we prepared a video tutorial for you - How To Make a Music Video. If you have any interests, you can watch it and learn about how to use the user-friendly video editor to make it:
Here’s why Wondershare Filmora is an excellent option for making YouTube videos or adding music to them:
- Huge royalty-free music library
- Easy to use, even for novice users
- Record videos from your webcam and screen simultaneously
- Multiple advanced video editing features, such as green screen, background blur, keyframe, split screen, motion tracking, and preset templates
- Adds effects, filters, transitions, and animations to your video footage to make it more eye-catching
- Quick “export to YouTube” feature to help you instantly share your final project on your channel
Free Download For Win 7 or later(64-bit)
Free Download For macOS 10.14 or later
If you want additional guidance on adding YouTube Music to your videos using Filmora,click here to learn everything you need to know!

Conclusion
This comprehensive guide explored some basic information about YouTube Music Mix and discussed how to find My Playlist on YouTube Music quickly. We’ve also provided solutions to help you save, find, delete, or turn off YouTube Mix playlists.
In addition, we’ve provided a bonus tip to use Filmora to add music to your YouTube videos and discussed its key features.
Hopefully, you’ve found this article helpful and can now locate your YouTube Music Mix playlist without issues.
Here’s why Wondershare Filmora is an excellent option for making YouTube videos or adding music to them:
- Huge royalty-free music library
- Easy to use, even for novice users
- Record videos from your webcam and screen simultaneously
- Multiple advanced video editing features, such as green screen, background blur, keyframe, split screen, motion tracking, and preset templates
- Adds effects, filters, transitions, and animations to your video footage to make it more eye-catching
- Quick “export to YouTube” feature to help you instantly share your final project on your channel
Free Download For Win 7 or later(64-bit)
Free Download For macOS 10.14 or later
If you want additional guidance on adding YouTube Music to your videos using Filmora,click here to learn everything you need to know!
Conclusion
This comprehensive guide explored some basic information about YouTube Music Mix and discussed how to find My Playlist on YouTube Music quickly. We’ve also provided solutions to help you save, find, delete, or turn off YouTube Mix playlists.
In addition, we’ve provided a bonus tip to use Filmora to add music to your YouTube videos and discussed its key features.
Hopefully, you’ve found this article helpful and can now locate your YouTube Music Mix playlist without issues.
Comprehensive iTunes Update: Upload YouTube Videos Guide
Create High-Quality Video - Wondershare Filmora
An easy and powerful YouTube video editor
Numerous video and audio effects to choose from
Detailed tutorials provided by the official channel
Initially, iOS users had the option to load videos directly to YouTube via the tap-to-upload feature. However, this option is missing in the recent iOS devices versions. Therefore, many users search for possible ways to post a video on YouTube from iPhone. For this, you have to put some considerations into place before moving on. The video title length should not exceed 100 characters, while the description is maintained at 5,000 characters. Also, ensure the video length doesn’t exceed 15 minutes. Let’s roll out the best ways to upload your videos and make that big catch on subscribers.

In this article
01 [ How to upload a video to YouTube from iPhone or iPad](#Part 1)
02 [Why your phone doesn’t post videos to YouTube](#Part 2)
03 [Make your YouTube video better with Filmora](#Part 3)
How to upload a video to YouTube from iPhone or iPad
Are you ready to start on that big adventure and share your videos on YouTube? Follow these steps to learn how to upload a video to YouTube from your iPhone.
Method 1: Upload using the YouTube iOS app
Using the YouTube app is the simplest way to upload your YouTube videos. The YouTube app should be installed on your iOS device.
Step 1. Launch the YouTube app on your device, then sign in to your account. If you don’t have an account yet, you will need to “Sign up” for a new one before continuing the upload process.
Step 2. Click on the “+” icon found at the bottom of the screen.
Step 3. Then choose the “Upload a video” option from the populated list of options.
Step 4. Check out the pop-up that appears and “Allow access” to it.
Step 5. Edit your video to your preference by trimming or cropping as you desire. Then click on the “Next” option.
 Power Tools add-on for Google Sheets, 12-month subscription

Step 6. Add “title and description” to your video. Remember, the title should contain less than 100 characters and the description no more than 500 characters.
Step 7. Then set the visibility mode as “Public” to enable you to share your video over the internet.
Step 8. Click on the “Upload” button to finally upload your video to YouTube.

Method 2: Upload using Photo App
The Photo App has a “Share” option that you can use to upload your videos to YouTube. Here is the guide.
Step 1. Go to your iOS device and tap on the “Photos” app.
Step 2. Then tap on the “Videos Folder” to locate the video you wish to upload to YouTube.

Step 3. Next, tap on the video that you want to upload.
Step 4. Then tap on the “Share” icon located at the bottom left of your iOS device screen.
Step 5. You’ll then access a “Share” menu from where you have various share options for your video.
Step 6. Choose the “YouTube” option to continue to share your video there. At this juncture, ensure you have logged in to your Google Account.

Step 7. You need to provide a “Title” and “Description” of your video. Then go to the “Privacy” Options and make your video “Public.”
Step 8. Finally, tap on the “Publish” tab found at the top-right corner of your screen to make your video viewable by the public.


Method 3: Upload video to YouTube using Safari
Safari is another alternative method to upload a video to YouTube.
Step 1. First, go to “youtube.com” on Safari and sign in.

Step 2. Then tap on the “account” icon at the top right side of the screen.
Step 3. Hit on the “Upload” icon and wait to be redirected to the YouTube Studio desktop site.
Step 4. Click on the “Select Files” option.
Step 5. Choose the video you wish to add to YouTube from the “Photo” library and tap on the “Add” button.

Step 6. Add your video’s “title and description” and hit the “Next” button.
Step 7. Tap on the “Next” button once more to go to the “Visibility” page.
Step 8. Select the “Public” option to upload your video to the public.
Why your phone doesn’t post videos to YouTube
Despite learning how to upload to YouTube from iPhone, you may be perplexed to realize that your phone refuses to post videos to YouTube. What could be the reason?
1) YouTube issues
In most cases, the problem doesn’t arise from your phone but from YouTube. This streaming app may also experience some hitches along the way. Remember that even if your phone sync with your YouTube account to upload videos from the “Camera Roll,” YouTube isn’t managed from the Camera Roll but the YouTube app directly. You can solve the issue by signing out of your YouTube account and signing back in.
2) Connection Strength
Some videos may appear quite large and cause a time-out during the upload process. Check your Wi-Fi or internet connection strength to determine if it needs a boost or wait until the streaming strength is strong for a quick upload. Test your internet speed by searching “internet test speed” on Google. Then click the “Run Speed Test” in the search box. A window will open and give you an estimate of the Mbps that your connection is operating at. If too low, switch to other alternatives.
3) Verify your YouTube account
Verifying your account will help you to enjoy YouTube’s full features. It’s then that you’ll manage to upload videos without any drawbacks. Also, that’s when you’ll manage to upload longer videos that go beyond the 15-minute duration.
4) Pay attention to the video size
There is a limit for videos to post to YouTube. If it is too large or long, the upload will cancel before completion.
5) Be patient
YouTube can save your partial upload for 24 hours. So, you can continue to upload from where you left. Learn to be patient as there could be a surge of user traffic, especially during evenings.
Make your YouTube video better with Filmora
Good video quality will make you go miles ahead of your marketing gig. You can use Filmora mobile application to make your videos look better before uploading them to YouTube. This intuitive video editing app has advanced features and several ways to compose creative videos.
- Stunning video effects that let you add animated text to video
- Easily record your voice-overs with its perfect sound effects
- Split functionality that allows you to slice your video footage into two or more separate video clips
- Playback your clips in reverse and adjust the speed for fast or slow motion
- Select the best aspect ratio for your video
- Advanced camera to create emoji selfies and other video beautification
- Directly share your videos to social media sites like YouTube and Facebook.
Check out the steps to edit your video with Filmora on your iOS device
Step 1. Download and install Filmora
For iOS devices, go to the “Apple Store” to download and install the app. Also, allow it to access your videos, camera, and pictures in the process.
Step 2. Import video
You may already have a video in your library that you wish to upload to YouTube. Nonetheless, you can shoot a video afresh to add. To shoot one, you need to settle on a topic before recording and downloading other images you may need. Ensure you watch what you are filming and use adequate lighting during the shooting process.
Next, begin to import your video file. Just open the application and select the “Create new video” option. Then choose the “Video” icon and select a folder that contains the video to be added. Hit the “Add” button from the bottom right corner.
Step 3. Edit video
Filmora has several editing features to make your video better. Use the “Edit tools” feature to turn your video into an impeccable piece. Easily add filters, adjust the speed, or create subtitles, among other functions. You can also split, trim, or delete the unwanted clip parts.
It is important to add a title and description to your video. Just use the “Titles” button to add the title. Other precepts that you can add include transitions, sound like voice-over,
Step 4. Export and share
You’ve just finished creating and editing your video. Click on the “Save” tab and let the application export your video. Then select the “Save to Camera Roll” option to save the video to your iPhone. Finally, you can upload and share the video directly to your YouTube account.
Conclusion
● However, it appears to be a difficult task; you must have found relief after going through these procedures. You don’t need prior knowledge on how to upload a video to YouTube from your iPhone. Several options are at your disposal. You can use the Safari, YouTube app, or the Photo app to upload your videos. The better part is that you can create top-notch videos with Filmora. This mobile video editing app has a lot to offer, ensuring quality content.
Initially, iOS users had the option to load videos directly to YouTube via the tap-to-upload feature. However, this option is missing in the recent iOS devices versions. Therefore, many users search for possible ways to post a video on YouTube from iPhone. For this, you have to put some considerations into place before moving on. The video title length should not exceed 100 characters, while the description is maintained at 5,000 characters. Also, ensure the video length doesn’t exceed 15 minutes. Let’s roll out the best ways to upload your videos and make that big catch on subscribers.
In this article
01 [ How to upload a video to YouTube from iPhone or iPad](#Part 1)
02 [Why your phone doesn’t post videos to YouTube](#Part 2)
03 [Make your YouTube video better with Filmora](#Part 3)
![]() FX PRO (Gold Robot + Silver Robot(Basic Package))
FX PRO (Gold Robot + Silver Robot(Basic Package))
How to upload a video to YouTube from iPhone or iPad
Are you ready to start on that big adventure and share your videos on YouTube? Follow these steps to learn how to upload a video to YouTube from your iPhone.
Method 1: Upload using the YouTube iOS app
Using the YouTube app is the simplest way to upload your YouTube videos. The YouTube app should be installed on your iOS device.
Step 1. Launch the YouTube app on your device, then sign in to your account. If you don’t have an account yet, you will need to “Sign up” for a new one before continuing the upload process.
Step 2. Click on the “+” icon found at the bottom of the screen.
Step 3. Then choose the “Upload a video” option from the populated list of options.
Step 4. Check out the pop-up that appears and “Allow access” to it.
Step 5. Edit your video to your preference by trimming or cropping as you desire. Then click on the “Next” option.
Step 6. Add “title and description” to your video. Remember, the title should contain less than 100 characters and the description no more than 500 characters.
Step 7. Then set the visibility mode as “Public” to enable you to share your video over the internet.
Step 8. Click on the “Upload” button to finally upload your video to YouTube.
Method 2: Upload using Photo App
The Photo App has a “Share” option that you can use to upload your videos to YouTube. Here is the guide.
Step 1. Go to your iOS device and tap on the “Photos” app.
Step 2. Then tap on the “Videos Folder” to locate the video you wish to upload to YouTube.

Step 3. Next, tap on the video that you want to upload.
Step 4. Then tap on the “Share” icon located at the bottom left of your iOS device screen.
Step 5. You’ll then access a “Share” menu from where you have various share options for your video.
Step 6. Choose the “YouTube” option to continue to share your video there. At this juncture, ensure you have logged in to your Google Account.
Step 7. You need to provide a “Title” and “Description” of your video. Then go to the “Privacy” Options and make your video “Public.”
Step 8. Finally, tap on the “Publish” tab found at the top-right corner of your screen to make your video viewable by the public.
Method 3: Upload video to YouTube using Safari
Safari is another alternative method to upload a video to YouTube.
Step 1. First, go to “youtube.com” on Safari and sign in.
Step 2. Then tap on the “account” icon at the top right side of the screen.
Step 3. Hit on the “Upload” icon and wait to be redirected to the YouTube Studio desktop site.
Step 4. Click on the “Select Files” option.
Step 5. Choose the video you wish to add to YouTube from the “Photo” library and tap on the “Add” button.
Step 6. Add your video’s “title and description” and hit the “Next” button.
Step 7. Tap on the “Next” button once more to go to the “Visibility” page.
Step 8. Select the “Public” option to upload your video to the public.
Why your phone doesn’t post videos to YouTube
Despite learning how to upload to YouTube from iPhone, you may be perplexed to realize that your phone refuses to post videos to YouTube. What could be the reason?
1) YouTube issues
In most cases, the problem doesn’t arise from your phone but from YouTube. This streaming app may also experience some hitches along the way. Remember that even if your phone sync with your YouTube account to upload videos from the “Camera Roll,” YouTube isn’t managed from the Camera Roll but the YouTube app directly. You can solve the issue by signing out of your YouTube account and signing back in.
2) Connection Strength
Some videos may appear quite large and cause a time-out during the upload process. Check your Wi-Fi or internet connection strength to determine if it needs a boost or wait until the streaming strength is strong for a quick upload. Test your internet speed by searching “internet test speed” on Google. Then click the “Run Speed Test” in the search box. A window will open and give you an estimate of the Mbps that your connection is operating at. If too low, switch to other alternatives.
3) Verify your YouTube account
Verifying your account will help you to enjoy YouTube’s full features. It’s then that you’ll manage to upload videos without any drawbacks. Also, that’s when you’ll manage to upload longer videos that go beyond the 15-minute duration.
4) Pay attention to the video size
There is a limit for videos to post to YouTube. If it is too large or long, the upload will cancel before completion.
5) Be patient
YouTube can save your partial upload for 24 hours. So, you can continue to upload from where you left. Learn to be patient as there could be a surge of user traffic, especially during evenings.
Make your YouTube video better with Filmora
Good video quality will make you go miles ahead of your marketing gig. You can use Filmora mobile application to make your videos look better before uploading them to YouTube. This intuitive video editing app has advanced features and several ways to compose creative videos.
- Stunning video effects that let you add animated text to video
- Easily record your voice-overs with its perfect sound effects
- Split functionality that allows you to slice your video footage into two or more separate video clips
- Playback your clips in reverse and adjust the speed for fast or slow motion
- Select the best aspect ratio for your video
- Advanced camera to create emoji selfies and other video beautification
- Directly share your videos to social media sites like YouTube and Facebook.
Check out the steps to edit your video with Filmora on your iOS device
Step 1. Download and install Filmora
For iOS devices, go to the “Apple Store” to download and install the app. Also, allow it to access your videos, camera, and pictures in the process.
Step 2. Import video
You may already have a video in your library that you wish to upload to YouTube. Nonetheless, you can shoot a video afresh to add. To shoot one, you need to settle on a topic before recording and downloading other images you may need. Ensure you watch what you are filming and use adequate lighting during the shooting process.
Next, begin to import your video file. Just open the application and select the “Create new video” option. Then choose the “Video” icon and select a folder that contains the video to be added. Hit the “Add” button from the bottom right corner.
Step 3. Edit video
Filmora has several editing features to make your video better. Use the “Edit tools” feature to turn your video into an impeccable piece. Easily add filters, adjust the speed, or create subtitles, among other functions. You can also split, trim, or delete the unwanted clip parts.
It is important to add a title and description to your video. Just use the “Titles” button to add the title. Other precepts that you can add include transitions, sound like voice-over,
Step 4. Export and share
You’ve just finished creating and editing your video. Click on the “Save” tab and let the application export your video. Then select the “Save to Camera Roll” option to save the video to your iPhone. Finally, you can upload and share the video directly to your YouTube account.
Conclusion
● However, it appears to be a difficult task; you must have found relief after going through these procedures. You don’t need prior knowledge on how to upload a video to YouTube from your iPhone. Several options are at your disposal. You can use the Safari, YouTube app, or the Photo app to upload your videos. The better part is that you can create top-notch videos with Filmora. This mobile video editing app has a lot to offer, ensuring quality content.
Initially, iOS users had the option to load videos directly to YouTube via the tap-to-upload feature. However, this option is missing in the recent iOS devices versions. Therefore, many users search for possible ways to post a video on YouTube from iPhone. For this, you have to put some considerations into place before moving on. The video title length should not exceed 100 characters, while the description is maintained at 5,000 characters. Also, ensure the video length doesn’t exceed 15 minutes. Let’s roll out the best ways to upload your videos and make that big catch on subscribers.
In this article
01 [ How to upload a video to YouTube from iPhone or iPad](#Part 1)
02 [Why your phone doesn’t post videos to YouTube](#Part 2)
03 [Make your YouTube video better with Filmora](#Part 3)
How to upload a video to YouTube from iPhone or iPad
Are you ready to start on that big adventure and share your videos on YouTube? Follow these steps to learn how to upload a video to YouTube from your iPhone.
Method 1: Upload using the YouTube iOS app
Using the YouTube app is the simplest way to upload your YouTube videos. The YouTube app should be installed on your iOS device.
Step 1. Launch the YouTube app on your device, then sign in to your account. If you don’t have an account yet, you will need to “Sign up” for a new one before continuing the upload process.
Step 2. Click on the “+” icon found at the bottom of the screen.
Step 3. Then choose the “Upload a video” option from the populated list of options.
Step 4. Check out the pop-up that appears and “Allow access” to it.
Step 5. Edit your video to your preference by trimming or cropping as you desire. Then click on the “Next” option.
Step 6. Add “title and description” to your video. Remember, the title should contain less than 100 characters and the description no more than 500 characters.
Step 7. Then set the visibility mode as “Public” to enable you to share your video over the internet.
Step 8. Click on the “Upload” button to finally upload your video to YouTube.
Method 2: Upload using Photo App
The Photo App has a “Share” option that you can use to upload your videos to YouTube. Here is the guide.
Step 1. Go to your iOS device and tap on the “Photos” app.
Step 2. Then tap on the “Videos Folder” to locate the video you wish to upload to YouTube.

Step 3. Next, tap on the video that you want to upload.
Step 4. Then tap on the “Share” icon located at the bottom left of your iOS device screen.
Step 5. You’ll then access a “Share” menu from where you have various share options for your video.
Step 6. Choose the “YouTube” option to continue to share your video there. At this juncture, ensure you have logged in to your Google Account.
 Any DRM Removal for Win:Remove DRM from Adobe, Kindle, Sony eReader, Kobo, etc, read your ebooks anywhere.
Step 7. You need to provide a “Title” and “Description” of your video. Then go to the “Privacy” Options and make your video “Public.”
Step 8. Finally, tap on the “Publish” tab found at the top-right corner of your screen to make your video viewable by the public.

Method 3: Upload video to YouTube using Safari
Safari is another alternative method to upload a video to YouTube.
Step 1. First, go to “youtube.com” on Safari and sign in.
Step 2. Then tap on the “account” icon at the top right side of the screen.
Step 3. Hit on the “Upload” icon and wait to be redirected to the YouTube Studio desktop site.
Step 4. Click on the “Select Files” option.
Step 5. Choose the video you wish to add to YouTube from the “Photo” library and tap on the “Add” button.
 TubeDigger - online video downloader from mostly any site
Step 6. Add your video’s “title and description” and hit the “Next” button.
Step 7. Tap on the “Next” button once more to go to the “Visibility” page.
Step 8. Select the “Public” option to upload your video to the public.
Why your phone doesn’t post videos to YouTube
Despite learning how to upload to YouTube from iPhone, you may be perplexed to realize that your phone refuses to post videos to YouTube. What could be the reason?
1) YouTube issues
In most cases, the problem doesn’t arise from your phone but from YouTube. This streaming app may also experience some hitches along the way. Remember that even if your phone sync with your YouTube account to upload videos from the “Camera Roll,” YouTube isn’t managed from the Camera Roll but the YouTube app directly. You can solve the issue by signing out of your YouTube account and signing back in.
2) Connection Strength
Some videos may appear quite large and cause a time-out during the upload process. Check your Wi-Fi or internet connection strength to determine if it needs a boost or wait until the streaming strength is strong for a quick upload. Test your internet speed by searching “internet test speed” on Google. Then click the “Run Speed Test” in the search box. A window will open and give you an estimate of the Mbps that your connection is operating at. If too low, switch to other alternatives.
3) Verify your YouTube account
Verifying your account will help you to enjoy YouTube’s full features. It’s then that you’ll manage to upload videos without any drawbacks. Also, that’s when you’ll manage to upload longer videos that go beyond the 15-minute duration.
4) Pay attention to the video size
There is a limit for videos to post to YouTube. If it is too large or long, the upload will cancel before completion.
5) Be patient
YouTube can save your partial upload for 24 hours. So, you can continue to upload from where you left. Learn to be patient as there could be a surge of user traffic, especially during evenings.
Make your YouTube video better with Filmora
Good video quality will make you go miles ahead of your marketing gig. You can use Filmora mobile application to make your videos look better before uploading them to YouTube. This intuitive video editing app has advanced features and several ways to compose creative videos.
- Stunning video effects that let you add animated text to video
- Easily record your voice-overs with its perfect sound effects
- Split functionality that allows you to slice your video footage into two or more separate video clips
- Playback your clips in reverse and adjust the speed for fast or slow motion
- Select the best aspect ratio for your video
- Advanced camera to create emoji selfies and other video beautification
- Directly share your videos to social media sites like YouTube and Facebook.
Check out the steps to edit your video with Filmora on your iOS device
Step 1. Download and install Filmora
For iOS devices, go to the “Apple Store” to download and install the app. Also, allow it to access your videos, camera, and pictures in the process.
Step 2. Import video
You may already have a video in your library that you wish to upload to YouTube. Nonetheless, you can shoot a video afresh to add. To shoot one, you need to settle on a topic before recording and downloading other images you may need. Ensure you watch what you are filming and use adequate lighting during the shooting process.
Next, begin to import your video file. Just open the application and select the “Create new video” option. Then choose the “Video” icon and select a folder that contains the video to be added. Hit the “Add” button from the bottom right corner.
Step 3. Edit video
Filmora has several editing features to make your video better. Use the “Edit tools” feature to turn your video into an impeccable piece. Easily add filters, adjust the speed, or create subtitles, among other functions. You can also split, trim, or delete the unwanted clip parts.
It is important to add a title and description to your video. Just use the “Titles” button to add the title. Other precepts that you can add include transitions, sound like voice-over,
Step 4. Export and share
You’ve just finished creating and editing your video. Click on the “Save” tab and let the application export your video. Then select the “Save to Camera Roll” option to save the video to your iPhone. Finally, you can upload and share the video directly to your YouTube account.
Conclusion
● However, it appears to be a difficult task; you must have found relief after going through these procedures. You don’t need prior knowledge on how to upload a video to YouTube from your iPhone. Several options are at your disposal. You can use the Safari, YouTube app, or the Photo app to upload your videos. The better part is that you can create top-notch videos with Filmora. This mobile video editing app has a lot to offer, ensuring quality content.
Initially, iOS users had the option to load videos directly to YouTube via the tap-to-upload feature. However, this option is missing in the recent iOS devices versions. Therefore, many users search for possible ways to post a video on YouTube from iPhone. For this, you have to put some considerations into place before moving on. The video title length should not exceed 100 characters, while the description is maintained at 5,000 characters. Also, ensure the video length doesn’t exceed 15 minutes. Let’s roll out the best ways to upload your videos and make that big catch on subscribers.
In this article
01 [ How to upload a video to YouTube from iPhone or iPad](#Part 1)
02 [Why your phone doesn’t post videos to YouTube](#Part 2)
03 [Make your YouTube video better with Filmora](#Part 3)
 CalendarBudget - Monthly subscription membership to CalendarBudget via web browser or mobile app. Support included.
 How to upload a video to YouTube from iPhone or iPad
Are you ready to start on that big adventure and share your videos on YouTube? Follow these steps to learn how to upload a video to YouTube from your iPhone.
Method 1: Upload using the YouTube iOS app
Using the YouTube app is the simplest way to upload your YouTube videos. The YouTube app should be installed on your iOS device.
Step 1. Launch the YouTube app on your device, then sign in to your account. If you don’t have an account yet, you will need to “Sign up” for a new one before continuing the upload process.
Step 2. Click on the “+” icon found at the bottom of the screen.
Step 3. Then choose the “Upload a video” option from the populated list of options.
Step 4. Check out the pop-up that appears and “Allow access” to it.
Step 5. Edit your video to your preference by trimming or cropping as you desire. Then click on the “Next” option.
Step 6. Add “title and description” to your video. Remember, the title should contain less than 100 characters and the description no more than 500 characters.
Step 7. Then set the visibility mode as “Public” to enable you to share your video over the internet.
Step 8. Click on the “Upload” button to finally upload your video to YouTube.
Method 2: Upload using Photo App
The Photo App has a “Share” option that you can use to upload your videos to YouTube. Here is the guide.
Step 1. Go to your iOS device and tap on the “Photos” app.
Step 2. Then tap on the “Videos Folder” to locate the video you wish to upload to YouTube.
Step 3. Next, tap on the video that you want to upload.
Step 4. Then tap on the “Share” icon located at the bottom left of your iOS device screen.
Step 5. You’ll then access a “Share” menu from where you have various share options for your video.
Step 6. Choose the “YouTube” option to continue to share your video there. At this juncture, ensure you have logged in to your Google Account.
Step 7. You need to provide a “Title” and “Description” of your video. Then go to the “Privacy” Options and make your video “Public.”
Step 8. Finally, tap on the “Publish” tab found at the top-right corner of your screen to make your video viewable by the public.
 vMix 4K - Software based live production. vMix 4K includes everything in vMix HD plus 4K support, PTZ control, External/Fullscreen output, 4 Virtual Outputs, 1 Replay, 4 vMix Call, and 2 Recorders.
Method 3: Upload video to YouTube using Safari
Safari is another alternative method to upload a video to YouTube.
Step 1. First, go to “youtube.com” on Safari and sign in.

WPS Office Premium ( File Recovery, Photo Scanning, Convert PDF)–Yearly
Step 2. Then tap on the “account” icon at the top right side of the screen.
Step 3. Hit on the “Upload” icon and wait to be redirected to the YouTube Studio desktop site.
Step 4. Click on the “Select Files” option.
Step 5. Choose the video you wish to add to YouTube from the “Photo” library and tap on the “Add” button.
Step 6. Add your video’s “title and description” and hit the “Next” button.
Step 7. Tap on the “Next” button once more to go to the “Visibility” page.
Step 8. Select the “Public” option to upload your video to the public.
Why your phone doesn’t post videos to YouTube
Despite learning how to upload to YouTube from iPhone, you may be perplexed to realize that your phone refuses to post videos to YouTube. What could be the reason?
1) YouTube issues
In most cases, the problem doesn’t arise from your phone but from YouTube. This streaming app may also experience some hitches along the way. Remember that even if your phone sync with your YouTube account to upload videos from the “Camera Roll,” YouTube isn’t managed from the Camera Roll but the YouTube app directly. You can solve the issue by signing out of your YouTube account and signing back in.
2) Connection Strength
Some videos may appear quite large and cause a time-out during the upload process. Check your Wi-Fi or internet connection strength to determine if it needs a boost or wait until the streaming strength is strong for a quick upload. Test your internet speed by searching “internet test speed” on Google. Then click the “Run Speed Test” in the search box. A window will open and give you an estimate of the Mbps that your connection is operating at. If too low, switch to other alternatives.
3) Verify your YouTube account
Verifying your account will help you to enjoy YouTube’s full features. It’s then that you’ll manage to upload videos without any drawbacks. Also, that’s when you’ll manage to upload longer videos that go beyond the 15-minute duration.
4) Pay attention to the video size
There is a limit for videos to post to YouTube. If it is too large or long, the upload will cancel before completion.
5) Be patient
YouTube can save your partial upload for 24 hours. So, you can continue to upload from where you left. Learn to be patient as there could be a surge of user traffic, especially during evenings.


Make your YouTube video better with Filmora
Good video quality will make you go miles ahead of your marketing gig. You can use Filmora mobile application to make your videos look better before uploading them to YouTube. This intuitive video editing app has advanced features and several ways to compose creative videos.
- Stunning video effects that let you add animated text to video
- Easily record your voice-overs with its perfect sound effects
- Split functionality that allows you to slice your video footage into two or more separate video clips
- Playback your clips in reverse and adjust the speed for fast or slow motion
- Select the best aspect ratio for your video
- Advanced camera to create emoji selfies and other video beautification
- Directly share your videos to social media sites like YouTube and Facebook.
Check out the steps to edit your video with Filmora on your iOS device
Step 1. Download and install Filmora
For iOS devices, go to the “Apple Store” to download and install the app. Also, allow it to access your videos, camera, and pictures in the process.
Step 2. Import video
You may already have a video in your library that you wish to upload to YouTube. Nonetheless, you can shoot a video afresh to add. To shoot one, you need to settle on a topic before recording and downloading other images you may need. Ensure you watch what you are filming and use adequate lighting during the shooting process.
Next, begin to import your video file. Just open the application and select the “Create new video” option. Then choose the “Video” icon and select a folder that contains the video to be added. Hit the “Add” button from the bottom right corner.
Step 3. Edit video
Filmora has several editing features to make your video better. Use the “Edit tools” feature to turn your video into an impeccable piece. Easily add filters, adjust the speed, or create subtitles, among other functions. You can also split, trim, or delete the unwanted clip parts.
It is important to add a title and description to your video. Just use the “Titles” button to add the title. Other precepts that you can add include transitions, sound like voice-over,
Step 4. Export and share
You’ve just finished creating and editing your video. Click on the “Save” tab and let the application export your video. Then select the “Save to Camera Roll” option to save the video to your iPhone. Finally, you can upload and share the video directly to your YouTube account.
 With Screensaver Wonder you can easily make a screensaver from your own pictures and video files. Create screensavers for your own computer or create standalone, self-installing screensavers for easy sharing with your friends. Together with its sister product Screensaver Factory, Screensaver Wonder is one of the most popular screensaver software products in the world, helping thousands of users decorate their computer screens quickly and easily.
Conclusion
● However, it appears to be a difficult task; you must have found relief after going through these procedures. You don’t need prior knowledge on how to upload a video to YouTube from your iPhone. Several options are at your disposal. You can use the Safari, YouTube app, or the Photo app to upload your videos. The better part is that you can create top-notch videos with Filmora. This mobile video editing app has a lot to offer, ensuring quality content.
- Title: [Updated] Strategies for YouTube Music Fusions
- Author: Steven
- Created at : 2024-07-31 00:47:48
- Updated at : 2024-08-01 00:47:48
- Link: https://facebook-record-videos.techidaily.com/updated-strategies-for-youtube-music-fusions/
- License: This work is licensed under CC BY-NC-SA 4.0.