![[Updated] Mastering the Art of Clearing YouTube's Stored Videos](https://thmb.techidaily.com/310ebf5ae5294b3c09bff886e3c558b63079bc0b815690abddeb6c6ade1d7933.JPG)
[Updated] Mastering the Art of Clearing YouTube's Stored Videos
Mastering the Art of Clearing YouTube’s Stored Videos
The YouTube Watch Later playlist is a great way to save videos and view them later. But if you don’t keep on top of it, your Watch Later list can quickly become unmanageable and cluttered with content that you no longer want to watch afterward.
If you are wondering how, you can declutter the playlist, we’ve got you covered. To help you with the task, we’ve compiled a comprehensive step-by-step guide. In this article, we will show you how to clear Watch Later on YouTube with just a few clicks.
So, without beating around the bush, let’s get started with our tutorial!
How To Delete YouTube Watch Later Playlist
If your YouTube Watch Later playlist is filled with videos you’ll never watch again, or you are not interested in that specific content type, you can quickly delete these videos at any time.
Here’s the step-by-step process on how to clear Watch Later on YouTube Web and App:
How To Delete YouTube Watch Later Playlist On Web?
You can delete the YouTube Watch Later Playlist on your desktop in the following ways:
From YouTube Homepage
To clear the YouTube Watch Later Playlist from the YouTube Homepage, do the following steps:
Step1 First, open a browser on your PC and visit the YouTube homepage. Sign into your account if needed and click the “Library” option located at the left-hand side menu panel.

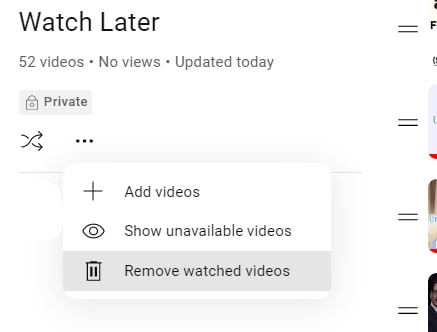
Step2 Croll down and click the “See All” option under the Watch Later header. Click the Three Dots below the Watch Later playlist details on the next page.
Step3 From the drop-down menu, click “Remove Watch Videos.” This will instantly remove all the videos you’ve watched but are still in the playlist.
Step4 Finally, to remove the unwatched videos, hover over a video and click the Three Dots. Select the “Remove from Watch Later” option to delete the video. You can repeat this process to remove all the content from the playlist until it is decluttered at the point of your satisfaction.

Using A Script
Since the above process can be tiring, you can use a script to remove all the videos at once from the Watch Later playlist in the following way:
Step1 In the first step, launch the Google Chrome browser on your system and head to the YouTube website**.** Next, select the “Library” option in the left pane and click “Watch Later” from the menu.
Step2 Now, hit the “Ctrl + Shift + J” keys on Windows or the “Command + Option+ J” buttons on Mac to launch the developer mode and open the console window.

Step3 Copy and paste the following lines of the script at the end of the line under the Console tab where the cursor is blinking.
setInterval(function () { document.querySelector(‘#primary button[aria-label=”Action menu”]‘).click(); var things = document.evaluate( ‘//span[contains(text(),”Remove from”)]‘, document, null, XPathResult.ORDERED_NODE_SNAPSHOT_TYPE, null ); for (var i = 0; i < things.snapshotLength; i++) { things.snapshotItem(i).click(); } }, 1000);
Step4 In the last step, hit the “Enter” key to clear the Watch Later Playlist on YouTube. However, the process may take some time, depending on the number of videos in your playlist.
Although a bit tech-savvy, the script execution method is the most effective way to delete all Watch Later videos at once.
You can also replace the number at the end of the script with a lower entry to delete videos according to your preference. Also, choosing a lesser number can speed up the video deletion process from YouTube Watch Later list by a great deal.
![]()
Note: It is important to note that experimenting with scripts is only for some. The script above has been confirmed to work, but others still need to be thoroughly checked and could potentially damage your computer. To prevent this from happening, only look for scripts from reliable sources instead of those posted by random people in various forums.
How To Delete YouTube Watch Later Playlist On YouTube App?
If you are using YouTube on an Android or iOS device, it is possible to clear the Watch Later Playlist by doing the steps below:
Step1 In the first step, swipe up on the Homescreen of your Android device or swipe right on your iOS device to launch App Drawer, and tap “YouTube” to launch the app.
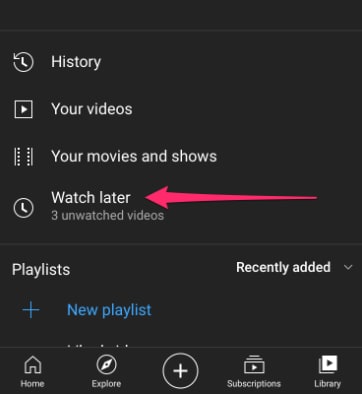
Step2 Now, tap the “Library” option in the bottom-right corner of the screen and tap “Watch Later.”
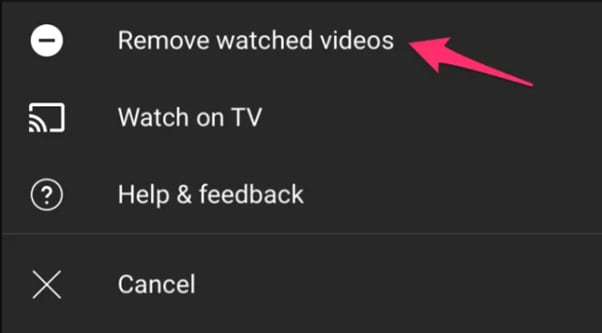
Step3 Next, tap the three dots (vertical ellipses) icon on the top-right side of the screen and choose the “Remove Watched Videos” option to delete them from the playlist.
Step4 If there are still unwatched videos in the playlist, select a video and tap the three dots next to it. Now, tap the “Remove from Watch Later” option. Repeat the process to remove all the unwatched videos to clear the playlist.
Is there an Alternative Way to Download YouTube Videos without Using Software?
Now that you’ve learned how you can clear the Watch Later playlist on YouTube, you might be looking for a way to download your favorite videos on your PC for later watch without using any software. If so,click here to find out 13 proven ways to get this done.
Free Download For Win 7 or later(64-bit)
Free Download For macOS 10.14 or later
Bonus Video Tutorial: From a User to a Creator, How To Edit YouTube Videos Like a Pro
Hopefully, you have found the most appropriate solution to clear your YouTube Watcher Later playlist. However, while you are a YouTube user, how can you transfer your character from a user to a creator? In this video era, why not participate in the creation party and be one of them?
If you have any interests, you can watch the video we specially prepared for you. This video will show you how to use a user-friendly video editor, Filmora , to create your own YouTube videos!
Conclusion
In this article, we’ve discussed how to clear your YouTube watch later playlist from both the YouTube web from the homepage and using the script in the browser’s developer mode. We’ve also provided a step-by-step process for deleting the Watch Later playlist on the YouTube mobile app.
This guide was informative enough to answer most of your queries, and after reading it, you can now unclutter your YouTube Watch Later without any issues.
How To Delete YouTube Watch Later Playlist On YouTube App?
If you are using YouTube on an Android or iOS device, it is possible to clear the Watch Later Playlist by doing the steps below:
Step1 In the first step, swipe up on the Homescreen of your Android device or swipe right on your iOS device to launch App Drawer, and tap “YouTube” to launch the app.
Step2 Now, tap the “Library” option in the bottom-right corner of the screen and tap “Watch Later.”
Step3 Next, tap the three dots (vertical ellipses) icon on the top-right side of the screen and choose the “Remove Watched Videos” option to delete them from the playlist.
Step4 If there are still unwatched videos in the playlist, select a video and tap the three dots next to it. Now, tap the “Remove from Watch Later” option. Repeat the process to remove all the unwatched videos to clear the playlist.
Is there an Alternative Way to Download YouTube Videos without Using Software?
Now that you’ve learned how you can clear the Watch Later playlist on YouTube, you might be looking for a way to download your favorite videos on your PC for later watch without using any software. If so,click here to find out 13 proven ways to get this done.
Free Download For Win 7 or later(64-bit)
Free Download For macOS 10.14 or later
Bonus Video Tutorial: From a User to a Creator, How To Edit YouTube Videos Like a Pro
Hopefully, you have found the most appropriate solution to clear your YouTube Watcher Later playlist. However, while you are a YouTube user, how can you transfer your character from a user to a creator? In this video era, why not participate in the creation party and be one of them?
If you have any interests, you can watch the video we specially prepared for you. This video will show you how to use a user-friendly video editor, Filmora , to create your own YouTube videos!
Conclusion
In this article, we’ve discussed how to clear your YouTube watch later playlist from both the YouTube web from the homepage and using the script in the browser’s developer mode. We’ve also provided a step-by-step process for deleting the Watch Later playlist on the YouTube mobile app.
This guide was informative enough to answer most of your queries, and after reading it, you can now unclutter your YouTube Watch Later without any issues.
Channel Upgrade: The Beginner’s Roadmap to Video Mastery
YouTube Video Editing Tips for Beginner Editors

Marion Dubois
Oct 26, 2023• Proven solutions
Creating good-quality videos regularly can be difficult, especially when you are a beginner. The most crucial part of making a video is editing. This is the part where you have to look at every intricate detail. This is the part where you remove unwanted footage and place useful shots in their position. Every creator has their editing style by which they put their mark on their videos.
Editing can be a long and tedious process. It takes time, patience, and an immense amount of creativity to create a video good enough to impress the viewers. Here are few tips that will make your editing process easier and cut your editing time in half.
Top 10 Video Editing Tips for YouTube Beginners
The following will not tell you how to edit your YouTube videos, but will surely make editing a little more convenient.
1. Choose a Good Video Editor
One of the first things you have to do is make sure that you have chosen a video editor that is best for you.
Using either too complicated or too basic a video editor can only create problems for you. An advanced video editor may create very high-end, professional videos, but it will take months just to get the hang of the software. Whereas a free basic video editor may not give as many options as you’d need to edit your videos properly.
2. Use Fast Computers
Being a video creator, you’ll have to store numerous huge files on your computer. To improve your current PC, you can invest in an SSD, which is a lot faster than the traditional hard disk.
SSD will not only improve your export, loading, and rendering time but it will allow you to access files and editing software much faster. Another improvement you can make to make your editing process faster is to increase the RAM of your computer (it should be at least 8 GB). Also, make sure to get the recommended video card and processor for your video editor.
3. Invest Your Time in Video Editing Tutorials
You can watch video editing tutorials to learn and perfect the art of video editing. You can easily find free tutorials online, visiting websites like Skillshare and Red Giant tutorials to access free video editing tutorials. Search for tutorials that are specific to the editing software you use. You can also search for tutorials that will help improve your content.
4. Use Keyboard Shortcuts
Learn the keyboard shortcuts for various functions in the software, especially the ones that are usually repeated throughout the process like undo, redo, delete, etc.
You can also invest in an Editing keyboard, they are software specific and already have keyboard shortcut icons in them.
5. Add Good Music
Another important tip to keep your audience all ears is to add good music to your videos. Whether it is background music or a soundtrack in between shots, it has to pair well with your video.
If you are on a budget and don’t want to spend money on music, there are royalty-free options available. But, know that good music only comes at a price.
6. Add Text, Titles, and Graphics
You can choose from a wide variety of text and titles. You’ll also have tools to enhance the graphics of your video. When you have so many options, choosing the right one can be difficult. It is better to keep the font of the text simple.
You can also use video editors to add flashy motion graphics to your videos. You can either create your graphics by hand or you can also choose from a variety of ready-made graphics templates.
7. Don’t Forget to Color Correction
Not color correcting your videos may render them looking dull and lifeless. Color is one of the major elements that play a crucial part in setting the mood of your video. Depending upon the type of content you’re portraying in the video, you can use a color scheme to highlight specific aspects or to evoke certain emotions in the audience.
Color correction is used to make your video appear consistent throughout the scenes. Whereas color grading is used to make videos stand out. Both are essential to differentiate certain scenes from others.
8. Learn Important Terms
Learn the terms commonly used in video editing. It will help you become proficient with the software and the process of editing. Some common terms used in the editing sphere are:
- Cutaways
- Jump Cuts
- Match Cuts/Match-Action Montage
- J and L Cuts
- Cutting on Action
9. Store Your Video Files on an External Drive
Storing your huge video files on an external drive will free up a lot of space on your computer. This will help speed up your device so you don’t have to worry about slow rendering.
10. Make Copies of Your Files
Always make more than two copies of your files. You can use the 321 rule. The rule is to make 3 copies of your files, store them in two different places, where one place should be physically separate from the other.
The Best YouTube Video Editing Software for Beginners
There are many video editing software available in the video editing market, but Wondershare Filmora is the best video editor for beginners and professionals alike. It has a beginner-friendly interface, contains advanced editing tools, and is available at a reasonable price.


Here is a list of few features offered by Wondershare Filmora.
1. AI Portrait
It helps make your videos vibrant and colorful
2. Visual and Audio Effects
Visual and audio effects can be added to improve the image and sound quality of the video
3. Audio Ducking
You can layer one sound on top of the other.
4. Cool Texts
You can add cool texts and titles from the library.
5. Screen Recording
You can record the screen activity of your device.
Final Word
As a beginner, the time and effort required to make a good video can be reduced to half if you follow a few simple tricks that professionals use daily. It’s all about working smart and not hard. You can save time by learning the editing term and keyboard shortcuts. You can save your files in an external drive to save storage and make backup in case of any mishaps. Remember to color grade, add cool texts and good music to make your videos distinct.
Marion Dubois
Marion Dubois is a writer and a lover of all things video.
Follow @Marion Dubois
Marion Dubois
Oct 26, 2023• Proven solutions
Creating good-quality videos regularly can be difficult, especially when you are a beginner. The most crucial part of making a video is editing. This is the part where you have to look at every intricate detail. This is the part where you remove unwanted footage and place useful shots in their position. Every creator has their editing style by which they put their mark on their videos.
Editing can be a long and tedious process. It takes time, patience, and an immense amount of creativity to create a video good enough to impress the viewers. Here are few tips that will make your editing process easier and cut your editing time in half.
Top 10 Video Editing Tips for YouTube Beginners
The following will not tell you how to edit your YouTube videos, but will surely make editing a little more convenient.
1. Choose a Good Video Editor
One of the first things you have to do is make sure that you have chosen a video editor that is best for you.
Using either too complicated or too basic a video editor can only create problems for you. An advanced video editor may create very high-end, professional videos, but it will take months just to get the hang of the software. Whereas a free basic video editor may not give as many options as you’d need to edit your videos properly.
2. Use Fast Computers
Being a video creator, you’ll have to store numerous huge files on your computer. To improve your current PC, you can invest in an SSD, which is a lot faster than the traditional hard disk.
SSD will not only improve your export, loading, and rendering time but it will allow you to access files and editing software much faster. Another improvement you can make to make your editing process faster is to increase the RAM of your computer (it should be at least 8 GB). Also, make sure to get the recommended video card and processor for your video editor.
3. Invest Your Time in Video Editing Tutorials
You can watch video editing tutorials to learn and perfect the art of video editing. You can easily find free tutorials online, visiting websites like Skillshare and Red Giant tutorials to access free video editing tutorials. Search for tutorials that are specific to the editing software you use. You can also search for tutorials that will help improve your content.
4. Use Keyboard Shortcuts
Learn the keyboard shortcuts for various functions in the software, especially the ones that are usually repeated throughout the process like undo, redo, delete, etc.
You can also invest in an Editing keyboard, they are software specific and already have keyboard shortcut icons in them.
5. Add Good Music
Another important tip to keep your audience all ears is to add good music to your videos. Whether it is background music or a soundtrack in between shots, it has to pair well with your video.
If you are on a budget and don’t want to spend money on music, there are royalty-free options available. But, know that good music only comes at a price.
6. Add Text, Titles, and Graphics
You can choose from a wide variety of text and titles. You’ll also have tools to enhance the graphics of your video. When you have so many options, choosing the right one can be difficult. It is better to keep the font of the text simple.
You can also use video editors to add flashy motion graphics to your videos. You can either create your graphics by hand or you can also choose from a variety of ready-made graphics templates.
7. Don’t Forget to Color Correction
Not color correcting your videos may render them looking dull and lifeless. Color is one of the major elements that play a crucial part in setting the mood of your video. Depending upon the type of content you’re portraying in the video, you can use a color scheme to highlight specific aspects or to evoke certain emotions in the audience.
Color correction is used to make your video appear consistent throughout the scenes. Whereas color grading is used to make videos stand out. Both are essential to differentiate certain scenes from others.
8. Learn Important Terms
Learn the terms commonly used in video editing. It will help you become proficient with the software and the process of editing. Some common terms used in the editing sphere are:
- Cutaways
- Jump Cuts
- Match Cuts/Match-Action Montage
- J and L Cuts
- Cutting on Action
9. Store Your Video Files on an External Drive
Storing your huge video files on an external drive will free up a lot of space on your computer. This will help speed up your device so you don’t have to worry about slow rendering.
10. Make Copies of Your Files
Always make more than two copies of your files. You can use the 321 rule. The rule is to make 3 copies of your files, store them in two different places, where one place should be physically separate from the other.
The Best YouTube Video Editing Software for Beginners
There are many video editing software available in the video editing market, but Wondershare Filmora is the best video editor for beginners and professionals alike. It has a beginner-friendly interface, contains advanced editing tools, and is available at a reasonable price.
Here is a list of few features offered by Wondershare Filmora.
1. AI Portrait
It helps make your videos vibrant and colorful
2. Visual and Audio Effects
Visual and audio effects can be added to improve the image and sound quality of the video
3. Audio Ducking
You can layer one sound on top of the other.
4. Cool Texts
You can add cool texts and titles from the library.
5. Screen Recording
You can record the screen activity of your device.
Final Word
As a beginner, the time and effort required to make a good video can be reduced to half if you follow a few simple tricks that professionals use daily. It’s all about working smart and not hard. You can save time by learning the editing term and keyboard shortcuts. You can save your files in an external drive to save storage and make backup in case of any mishaps. Remember to color grade, add cool texts and good music to make your videos distinct.
Marion Dubois
Marion Dubois is a writer and a lover of all things video.
Follow @Marion Dubois
Also read:
- [New] Creating Engaging Stream Content Shorts for 2024
- [New] Deciphering the Coded Language of Concealed YouTube Movies for 2024
- [New] In 2024, Essential Techniques for YT Video Tweaking with WM Maker
- [Updated] 2024 Approved Pinnacle of Plot Construction – The World's Best 8 Academies
- [Updated] Customizing Your Watch The Art of Altering YouTube Video Pace
- [Updated] Pioneering Strategies to Escalate Your Channel's Popularity
- Can I use iTools gpx file to catch the rare Pokemon On Honor X9b | Dr.fone
- Deciphering USSD - The Role and Functions of Unstructured Supplementary Service Data in Telecommunications
- How to Mirror Nubia Z50 Ultra to Mac? | Dr.fone
- In 2024, The Top 5 Android Apps That Use Fingerprint Sensor to Lock Your Apps On Samsung Galaxy A05
- Leading SEO Firms in the U.S. for Maximizing Your Digital Presence: Insights with SEO PowerSuite
- New Compress MPEG2 Files with VirtualDub A Step-by-Step Guide for 2024
- Windows 11 Gamers' Ultimate Playbook Top 5 Record Techniques for 2024
- Title: [Updated] Mastering the Art of Clearing YouTube's Stored Videos
- Author: Steven
- Created at : 2025-02-18 19:06:49
- Updated at : 2025-02-19 23:46:19
- Link: https://facebook-record-videos.techidaily.com/updated-mastering-the-art-of-clearing-youtubes-stored-videos/
- License: This work is licensed under CC BY-NC-SA 4.0.