![[Updated] Earn While Playing Games Online for 2024](https://thmb.techidaily.com/2ceae87a9b9364e8de7f8199f6943542799e9e444d1e94cece6744b91d0b78e1.jpg)
[Updated] Earn While Playing Games Online for 2024
Earn While Playing Games Online
Gone is when playing video games was strictly for entertainment. These days, you can record and share your gaming skills on YouTube and earn a fortune. A good example is Techno Gamerz. This YouTube channel has over 29 million subscribers, and it’s believed to be among the fastest-growing channels in India. In fact, the channel recently crossed the 1 billion views mark.


Now, this begs the query; what is the Techno Gamerz income on YouTube? This article discusses everything you need to know about the young YouTube gamer, from his monthly and yearly payments to his net worth.
Meta Description: This article discusses the brains behind the popular Techno Gamerz YouTube channel. You’ll learn about the Techno Gamerz income, age, gender, nationality, and more.
Part 1: Summary Box on Techno Gamerz
| Name | Ujjwal Chaurasia |
|---|---|
| Net worth in USD (2022) | $2 million |
| Monthly income and salary | RS.15 Lakh+ |
| Yearly income and salary | 1.5 Crore |
| Age | 20 years (born January 12, 2002) |
| Gender | Male |
| Nationality | Indian |
| Height | 5.5 inches |
| Profession | YouTuber |
| YouTube channel | Techno Gamerz |
| Awards and recognition | Diamond, Gold, and Silver play buttons |
Up to this point, you should have a brief overview of who Techno Gamerz is and what he does to earn such staggering figures on YouTube. So, the next section discusses his income in detail and what makes this YouTuber so famous. Keep reading!
Part 2: Techno Gamerz YouTube Earning and Stats
Ujjwal Chaurasia, alias Techno Gamerz, was born and grew up in New Delhi, India. The charismatic vlogger first joined YouTube on August 13, 2017, and uploaded his first gaming video on January 2018. Initially, Ujjwal used his elder brother’s phone to post gaming tutorial videos. This obviously limited his input on YouTube as he also had to set aside time for studying.
 DLNow Video Downloader
But after seeing potential in what Techno Gamerz was doing, his brother encouraged him to post more often. His first viral video was for Dragon Ball Z, a downloading tutorial. This video garnered a massive 250K views, boosting his channel’s profile. The young YouTube star has never looked back since then.
Meantime, you must be asking yourself how YouTube generates income in India. It’s simple; via AdSense! YouTube’s RPM (Revenue Per Mile) metric per 1,000 views varies between countries. In India, the video-sharing platform pays $0.50 per 1,000 views. This means that Indian YouTube teachers and influencers can earn $500 after garnering 1 million views.
But nothing is cast in stone on YouTube. Most Indian channels can earn between $800 and $2,500 after reaching 1 million views. However, this depends on where you get the most views from. For example, if at least half of your views are from the US, you’ll earn at least $1,500. Techno Gamerz YouTube income per 1,000 views is approximately $1.21.
Remember that there are some conditions to meet before you start earning money on YouTube. First, the channel must be active for at least a year and have a minimum of 1,000 subscribers. That’s not all; you’ll need nothing less than 4,000 watch hours to be on YouTube’s payroll.
With that said, below are some YouTube stats about the Techno Gamerz monthly income, number of views, and more:
| Estimated Monthly earnings in USD/Indian rupees | $167K |
|---|---|
| Estimated Yearly earnings in USD/Indian rupees | $8.6 million |
| Total video uploads | 858 |
| Type of videos | Gaming tutorials |
| Subscribers | 29 million |
| Video views | 7.5 billion |
| Last 30 days’ views | 7 million |
As expected, Ujjwal Chaurasia has a massive following on other social media platforms, especially on Instagram. Here, the 20-year-old has more than 2 million followers and over 250K likes on “ujjwalgamer.” He usually posts selfies, pictures, and a few gaming contents on Instagram. Ujjwal’s engagement rate on Instagram is around 12.5%.

He also has another Instagram account called “Techno_Gamerz ,” which has over 1M followers and over 120K likes. Ujjwal uses this account to keep his followers abreast of what’s happening on his YouTube channel and give hints of future releases. He also posts subscriber milestones. His Twitter account is “Ujjwal Chaurasia ,” with over 116K followers and around 290 posts.

Ujjwal is also venturing into music lately, specifically Hip Hop. He partnered with one of India’s most prominent producers, Sez on the Beat, to release Game On. This music tells a tale of how Chaurasia started from zero subscribers to more than 10 million. Currently, this single boasts over 62 million views.
Part 3: Why Is Techno Gamerz Trending on YouTube?
The Techno Gamerz earnings are certainly no fluke. Many YouTube careers come crashing down before they even start. You’ll even need to congratulate yourself for earning just $100 on YouTube. So, what makes Techno Gamers a darling to many YouTubers?
1. Engaging and interactive videos
YouTube is a very competitive video-sharing platform, and Techno Gamerz knows this fact quite well. Techno Gamerz adds funny and interactive commentary to his YouTube gaming videos to make them more interactive. Many YouTubers also love his confidence and composure in front of the camera.
2. Captivating story and continuity
One major thing you’ll see about all of Techno Gamerz’s videos is continuity. The YouTuber churns out new content every couple of days, keeping his fans entertained at all times. Also, Techno Gamerz always does a recap on his previous episodes to ensure that viewers can keep up with the pace. He even admitted in an interview that it’s critical for his audience to follow the storyline, making watching series like GTA V more interesting.
3. Single and multiplayer tutorials
Techno Gamerz’s tutorials consist of single and multiplayer games. He says that single-player games bring out his character’s awesomely powerful and superior side. He also admitted that he loves multiplayer games’ unpredictable and challenging nature.
Something about Techno Gamerz’s most loved videos
As said before, Dragon Ball Z was the YouTuber’s first upload on the platform. Then in January 2018, he went ahead to upload PUBG videos, but his breakthrough came when he switched to GTA. Up to now, he has posted 140+ GTA 5 episodes, which are famous for their unique storylines. Interestingly, each of his GTA videos has 5+ million views.
But to be one of the most popular YouTubers, you’ll need diversity. Techno Gamerz has this in abundance. His “Grandpa and Granny Two Hunters” video has 10+ million views. It’s a horror game where Techno Gamerz plays the scary granny with insane tricks.
His other videos, “BeamNG” and “Just Draw,” have more than 12 million and 13 million views, respectively. GTA V is the most loved by his audience, with over 30 million views.
Bonus Tip: How To Be a YouTuber and Make Videos Like Techno Gamerz
Evidently, you need to create compelling videos to increase your chances of getting over 1 million views and matching the Techno Gamerz salary. So, what makes a great YouTube video? The perfect YouTube videos should have a catchy intro, voice overlays, picture-in-picture effects, background audio, and more. You can also include elements like timers, subtitles, and effect overlays.
Thankfully, Wondershare Filmora comes with all these features and many more. It’s a macOS/iPadOS/Windows program that allows you to record Techno Gamerz-like videos with a live microphone commentary. After recording the video, add it to the editing timeline to customize it with stunning plugin effects, texts, transitions, subtitles, background music, and more. You also can explore features like motion tracking, key framing, speed ramping, and split screen if it’s a fast-paced video like GTA.
Let’s learn how to create and edit a YouTube video on Filmora 11:
Free Download For Win 7 or later(64-bit)
Free Download For macOS 10.14 or later
Step1 Start a new video project
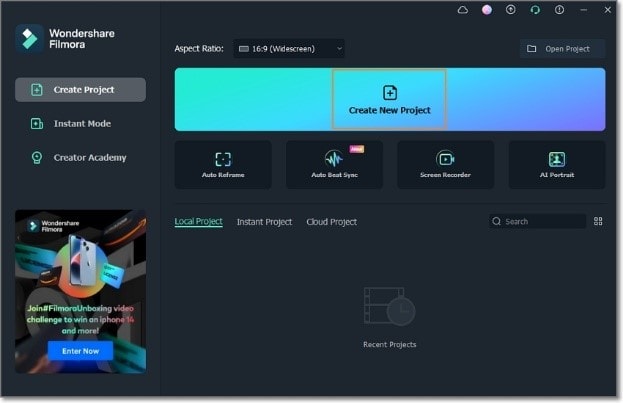
Install and run Filmora 11 on your computer and choose the 16:9 aspect ratio for YouTube videos. Then, start a New Project.
Step2 Import the YouTube video tutorial
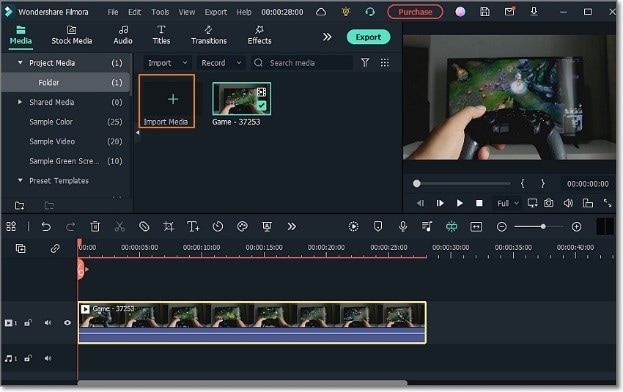
Now click the Import Media button to open a video file from your local storage. You can add multiple media files before moving them to the storyboard.
Step3 Edit your gaming video
 Simple and intuitive video editing
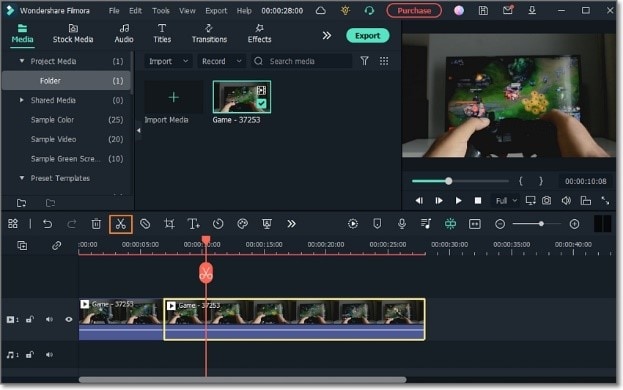
Start by trimming your video to remove the noisy or unwanted parts. To trim and split a video, place the playhead where you want to cut and press the Split button. Repeat the same procedure to cut out a clip and delete it.
Your YouTube gaming tutorial also needs subtitles to stand out from the crowd. Select the YouTube video clip and click the Speech-to-Text button. Once the Speech-to-Text feature is active, select the translation language to start creating subtitles. Remember, you can edit and download the subtitle tracks as a .txt or .srt file.
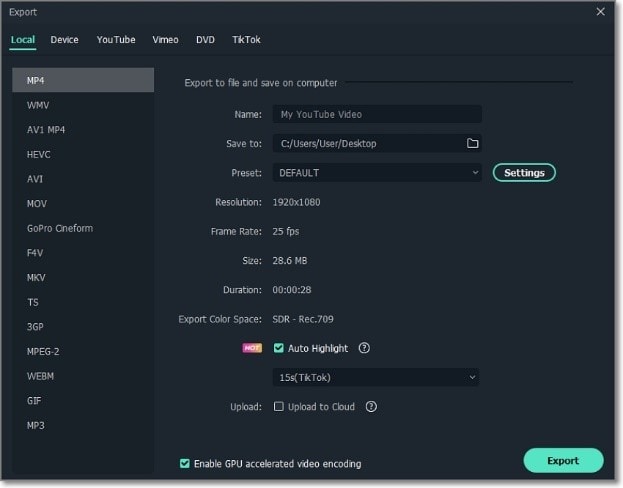
Step4 Convert the video and upload it on YouTube
If you’re satisfied with the edited video, click the Export button, then select MP4, WebM, or MP4 AV1 as the target format. Now name your video, choose a folder path, and export it. Remember that you can also directly upload videos on YouTube by clicking the YouTube tab.
Hot FAQs on Techno Gamerz
1. Who earns more between Techno Gamerz and Carry Minati?
Techno Gamerz is not alone in Indian YouTube vlogging. CarryMinati is another top YouTuber in India, with 36.90 million followers. This YouTuber earns more than 25 Lakhs per month with annual revenue of at least 3 Crore Rupees. According to reports, Carry Minati (Ajey Nagar) has over $5 million in net worth.

2. How much does Techno Gamerz earn from one video?
It depends on the number of views. According to reports, this popular Indian YouTuber earns over $1.21 per 1,000 views. He has over 7.5 billion views currently.
 With Screensaver Wonder you can easily make a screensaver from your own pictures and video files. Create screensavers for your own computer or create standalone, self-installing screensavers for easy sharing with your friends. Together with its sister product Screensaver Factory, Screensaver Wonder is one of the most popular screensaver software products in the world, helping thousands of users decorate their computer screens quickly and easily.
3. What does Techno Gamerz do for a living?
Techno Gamerz’s primary source of income is YouTubing. This is where the 20-year-old earns most of his dollars.
Final Words
YouTubing can pay top money as long as you do it professionally. But it may need a lot of hard work and patience to start earning on YouTube. Also, invest in a powerful, all-in-one video editor for vloggers like Filmora 11. So, are you ready to start making the Techno Gamerz monthly income from YouTube? Give it a try!
Free Download For Win 7 or later(64-bit)
Free Download For macOS 10.14 or later
Up to this point, you should have a brief overview of who Techno Gamerz is and what he does to earn such staggering figures on YouTube. So, the next section discusses his income in detail and what makes this YouTuber so famous. Keep reading!
Part 2: Techno Gamerz YouTube Earning and Stats
Ujjwal Chaurasia, alias Techno Gamerz, was born and grew up in New Delhi, India. The charismatic vlogger first joined YouTube on August 13, 2017, and uploaded his first gaming video on January 2018. Initially, Ujjwal used his elder brother’s phone to post gaming tutorial videos. This obviously limited his input on YouTube as he also had to set aside time for studying.
 Greeting Card Builder
But after seeing potential in what Techno Gamerz was doing, his brother encouraged him to post more often. His first viral video was for Dragon Ball Z, a downloading tutorial. This video garnered a massive 250K views, boosting his channel’s profile. The young YouTube star has never looked back since then.
Meantime, you must be asking yourself how YouTube generates income in India. It’s simple; via AdSense! YouTube’s RPM (Revenue Per Mile) metric per 1,000 views varies between countries. In India, the video-sharing platform pays $0.50 per 1,000 views. This means that Indian YouTube teachers and influencers can earn $500 after garnering 1 million views.
But nothing is cast in stone on YouTube. Most Indian channels can earn between $800 and $2,500 after reaching 1 million views. However, this depends on where you get the most views from. For example, if at least half of your views are from the US, you’ll earn at least $1,500. Techno Gamerz YouTube income per 1,000 views is approximately $1.21.
Remember that there are some conditions to meet before you start earning money on YouTube. First, the channel must be active for at least a year and have a minimum of 1,000 subscribers. That’s not all; you’ll need nothing less than 4,000 watch hours to be on YouTube’s payroll.
With that said, below are some YouTube stats about the Techno Gamerz monthly income, number of views, and more:
| Estimated Monthly earnings in USD/Indian rupees | $167K |
|---|---|
| Estimated Yearly earnings in USD/Indian rupees | $8.6 million |
| Total video uploads | 858 |
| Type of videos | Gaming tutorials |
| Subscribers | 29 million |
| Video views | 7.5 billion |
| Last 30 days’ views | 7 million |
As expected, Ujjwal Chaurasia has a massive following on other social media platforms, especially on Instagram. Here, the 20-year-old has more than 2 million followers and over 250K likes on “ujjwalgamer.” He usually posts selfies, pictures, and a few gaming contents on Instagram. Ujjwal’s engagement rate on Instagram is around 12.5%.
He also has another Instagram account called “Techno_Gamerz ,” which has over 1M followers and over 120K likes. Ujjwal uses this account to keep his followers abreast of what’s happening on his YouTube channel and give hints of future releases. He also posts subscriber milestones. His Twitter account is “Ujjwal Chaurasia ,” with over 116K followers and around 290 posts.
Ujjwal is also venturing into music lately, specifically Hip Hop. He partnered with one of India’s most prominent producers, Sez on the Beat, to release Game On. This music tells a tale of how Chaurasia started from zero subscribers to more than 10 million. Currently, this single boasts over 62 million views.
Part 3: Why Is Techno Gamerz Trending on YouTube?
The Techno Gamerz earnings are certainly no fluke. Many YouTube careers come crashing down before they even start. You’ll even need to congratulate yourself for earning just $100 on YouTube. So, what makes Techno Gamers a darling to many YouTubers?
1. Engaging and interactive videos
YouTube is a very competitive video-sharing platform, and Techno Gamerz knows this fact quite well. Techno Gamerz adds funny and interactive commentary to his YouTube gaming videos to make them more interactive. Many YouTubers also love his confidence and composure in front of the camera.
2. Captivating story and continuity
One major thing you’ll see about all of Techno Gamerz’s videos is continuity. The YouTuber churns out new content every couple of days, keeping his fans entertained at all times. Also, Techno Gamerz always does a recap on his previous episodes to ensure that viewers can keep up with the pace. He even admitted in an interview that it’s critical for his audience to follow the storyline, making watching series like GTA V more interesting.
3. Single and multiplayer tutorials
Techno Gamerz’s tutorials consist of single and multiplayer games. He says that single-player games bring out his character’s awesomely powerful and superior side. He also admitted that he loves multiplayer games’ unpredictable and challenging nature.
Something about Techno Gamerz’s most loved videos
As said before, Dragon Ball Z was the YouTuber’s first upload on the platform. Then in January 2018, he went ahead to upload PUBG videos, but his breakthrough came when he switched to GTA. Up to now, he has posted 140+ GTA 5 episodes, which are famous for their unique storylines. Interestingly, each of his GTA videos has 5+ million views.
But to be one of the most popular YouTubers, you’ll need diversity. Techno Gamerz has this in abundance. His “Grandpa and Granny Two Hunters” video has 10+ million views. It’s a horror game where Techno Gamerz plays the scary granny with insane tricks.
His other videos, “BeamNG” and “Just Draw,” have more than 12 million and 13 million views, respectively. GTA V is the most loved by his audience, with over 30 million views.
Bonus Tip: How To Be a YouTuber and Make Videos Like Techno Gamerz
Evidently, you need to create compelling videos to increase your chances of getting over 1 million views and matching the Techno Gamerz salary. So, what makes a great YouTube video? The perfect YouTube videos should have a catchy intro, voice overlays, picture-in-picture effects, background audio, and more. You can also include elements like timers, subtitles, and effect overlays.
Thankfully, Wondershare Filmora comes with all these features and many more. It’s a macOS/iPadOS/Windows program that allows you to record Techno Gamerz-like videos with a live microphone commentary. After recording the video, add it to the editing timeline to customize it with stunning plugin effects, texts, transitions, subtitles, background music, and more. You also can explore features like motion tracking, key framing, speed ramping, and split screen if it’s a fast-paced video like GTA.
Let’s learn how to create and edit a YouTube video on Filmora 11:
Free Download For Win 7 or later(64-bit)
Free Download For macOS 10.14 or later
Step1 Start a new video project
Install and run Filmora 11 on your computer and choose the 16:9 aspect ratio for YouTube videos. Then, start a New Project.
Step2 Import the YouTube video tutorial
Now click the Import Media button to open a video file from your local storage. You can add multiple media files before moving them to the storyboard.
Step3 Edit your gaming video
Start by trimming your video to remove the noisy or unwanted parts. To trim and split a video, place the playhead where you want to cut and press the Split button. Repeat the same procedure to cut out a clip and delete it.
Your YouTube gaming tutorial also needs subtitles to stand out from the crowd. Select the YouTube video clip and click the Speech-to-Text button. Once the Speech-to-Text feature is active, select the translation language to start creating subtitles. Remember, you can edit and download the subtitle tracks as a .txt or .srt file.
Step4 Convert the video and upload it on YouTube
If you’re satisfied with the edited video, click the Export button, then select MP4, WebM, or MP4 AV1 as the target format. Now name your video, choose a folder path, and export it. Remember that you can also directly upload videos on YouTube by clicking the YouTube tab.
Hot FAQs on Techno Gamerz
1. Who earns more between Techno Gamerz and Carry Minati?
Techno Gamerz is not alone in Indian YouTube vlogging. CarryMinati is another top YouTuber in India, with 36.90 million followers. This YouTuber earns more than 25 Lakhs per month with annual revenue of at least 3 Crore Rupees. According to reports, Carry Minati (Ajey Nagar) has over $5 million in net worth.
2. How much does Techno Gamerz earn from one video?
It depends on the number of views. According to reports, this popular Indian YouTuber earns over $1.21 per 1,000 views. He has over 7.5 billion views currently.
3. What does Techno Gamerz do for a living?
Techno Gamerz’s primary source of income is YouTubing. This is where the 20-year-old earns most of his dollars.
Final Words
YouTubing can pay top money as long as you do it professionally. But it may need a lot of hard work and patience to start earning on YouTube. Also, invest in a powerful, all-in-one video editor for vloggers like Filmora 11. So, are you ready to start making the Techno Gamerz monthly income from YouTube? Give it a try!
Free Download For Win 7 or later(64-bit)
Free Download For macOS 10.14 or later

Step-by-Step: IMovie Videos on Your YouTube Channel
How to Upload a Video from iMovie to YouTube?


Liza Brown
Aug 18, 2022• Proven solutions
“Is iMovie good for YouTube?”
The iMovie is not only good for YouTube but various other social media platforms. The thing is, you have to compromise with the quality offered by Apple’s video editor iMovie. Well, iMovie is perfect for getting started for beginners. But, the professionals and ones who want a bit high features than basic ones should look elsewhere. Thus, we always recommend alternatives to a particular software for our audience. In this article, there is a mention of Wondershare Filmora to overcome the drawbacks of iMovie.
Without further ado, let’s begin with how to upload a video from iMovie to YouTube. We want to lead with the best iMovie export settings, specific troubleshooting issues, and our alternative intro section to overcome iMovie’s limitations.
Part 1: How to Upload a Video from iMovie to YouTube?
iMovie is ideal for making YouTube videos if you are too basic and are not looking for advanced features. Remember that professionalism pays in these platforms and helps you stand better among others. If you’re still interested in making introductory videos, here is a step-by-step guide on uploading a video to YouTube from iMovie on Mac first and leading with iPhone.
Step-by-Step Tutorial on how to upload a video from iMovie to YouTube on Mac
Step 1: Create a Project
On the first step, go to iMovie on Mac and click the Create New tab below.
Step 2: Import Media
Click the Import Media button and browse the files on your computer, as shown below.
Step 3: Edit Clips
It’s time to edit video footage. Drag your video to the timeline, as shown below.
Then, you can trim and drag the edges of video clips to allow editing.
Step 4: Add Titles
You can add titles by clicking the Title tab and further drag the Title’s template into the timeline.
Step 5: Export the Video
Click the Export button as follows after editing is over.
Select YouTube to upload your video over the platform directly.
Step 6: Save
After selecting the desired platform, click the Next tab to proceed with saving the file.
At last, save your video as shown below.
Step-by-Step Tutorial on how to upload iMovie to YouTube from iPhone
Step 1: Share the iMovie Project
Go to iMovie on your iPhone. Open the iMovie project on your iPhone and tap the Share button to select YouTube. Enter the information of Title, Description, Size, Tags, Privacy, and Location (optional).
Step 2: Upload iMovie Files
For ease of use, you can upload saved videos in Photo Library on your iPhone. Then, you can upload iMovie videos via the YouTube iOS app. Sign In to YouTube and click the Camera icon at the top of the Home page. Select your iPhone Photo Library file and set the video Title, Description, Size, Tags, and Privacy. Then, hit the Upload button to confirm.
Part 2: The Best iMovie Export Settings for YouTube Videos
As we all know that iMovie consists of a bit long procedure to export projects. Here are some tips on the best iMovie export settings to avoid an unnecessary headache.
- Set small resolution: Small resolution plays a more significant role, especially while uploading. Thus, you can set the smallest resolution in the Email tab of the Export button.
2. Change Export settings in the File tab: There is a File tab under the Export button. Click it and find various settings that you need to change to get the best export settings for YouTube 2021. Make the Title of the video as small as possible. Set the resolution at 1080P than 4K.
However, it isn’t going to upgrade the resolution if your video is already in the 1080P definition. Now, the last setting that will crazily offer you the best quality and lots of space-saving. You have to select Best (ProRes) in quality settings for this purpose. These settings also take less time to upload to YouTube.
3. Compress is not for speed: Various options you see in the Compresstab are not for speed. They are for how you save the video on a desktop. Thus, always choose the Better Quality tab than Faster.
- Do not export directly to YouTube: iMovie is pretty basic and doesn’t offer great settings to upload your video instantly. You may have to make changes to the uploaded video even if you do this as per our step-by-step guide mentioned above.
 SwifDoo PDF Perpetual (1 PC) Free upgrade. No monthly fees ever.
Part 3: How to fix the “Failed to Upload to YouTube” Error on iMovie?
The “iMovie to YouTube failed” problem occurs when you directly upload a YouTube video from iMovie. The issue will result if you upload from any third-party uploader. That is why the direct upload doesn’t work, especially in iMovie. You can opt to share your video to the desktop first and then drag it to upload to the YouTube platform.
Part 4: Upload Videos to YouTube with the Best Alternative to iMovie - Wondershare Filmora
“What can I use instead of iMovie to overcome its limitations?”
When you see that iMovie is not uploading to YouTube or iMovie upload to YouTube got stuck, go for a better alternative. In this section, we’d like to recommend Wondershare Filmora that offers the best export settings compared to iMovie. It is the go-to solution if you can’t upload video from iMovie to YouTube directly. Filmora further provides intuitive editing tools that professionally make your YouTube video projects.
Export Key Aspects of Wondershare Filmora in comparison to iMovie:
- It offers a long list of export resolutions to choose from.
- You get separate video and audio settings such as Encoder, Channel, Frame Rate, Bit Rate, Resolution, etc.
- It is further compatible with export to various devices including the iPhone, Samsung, iPod, Apple TV, iPad, Google Pixel, PSP, Smart TV, etc.
Step-by-Step Guide on how to upload a video from iMovie to YouTube via Wondershare Filmora
Step 1: Click the Export button and select resolution
After your project in Wondershare Filmora is over, click the Export tab and select video resolution from the Local tab, as shown below.
It has a list of formats. You can also edit the Name and saving location here.
Step 2: Select Quality
Select the Settings button and choose from three quality levels of Best, Better, and Good. You can also adjust video and audio parameters, including the Encoder, Frame Rate, Resolution, Bit Rate, etc.
Step 3: Select platform
Select the YouTube tab, Sign In to your YouTube account, and hit the Export button after modifying the Title and Quality if needed. Also, make sure to check the Enable GPU accelerated video encoding tab.
Select Wondershare Filmora as the ultimate solution even if iMovie upload to YouTube not showing up.
## ConclusionHopefully, we’ve informed you of the relevant facts on how to upload a video from iMovie to YouTube. We have also examined the number of troubleshooting issues involved in the iMovie video editor. Well, you will get to face similar kinds of export difficulties in the iMovie editor. Also, the entire procedure to end the exporting task is a bit long in iMovie compared to any other video editing software. Thus, it’s crucial to check out what other alternatives the technological world has today. We can’t state to you a better beginner-friendly yet advanced editing option than Wondershare Filmora that rightly outtakes the iMovie video editor in all aspects.
Liza Brown
Liza Brown is a writer and a lover of all things video.
Follow @Liza Brown
Liza Brown
Aug 18, 2022• Proven solutions
“Is iMovie good for YouTube?”
The iMovie is not only good for YouTube but various other social media platforms. The thing is, you have to compromise with the quality offered by Apple’s video editor iMovie. Well, iMovie is perfect for getting started for beginners. But, the professionals and ones who want a bit high features than basic ones should look elsewhere. Thus, we always recommend alternatives to a particular software for our audience. In this article, there is a mention of Wondershare Filmora to overcome the drawbacks of iMovie.
Without further ado, let’s begin with how to upload a video from iMovie to YouTube. We want to lead with the best iMovie export settings, specific troubleshooting issues, and our alternative intro section to overcome iMovie’s limitations.
Part 1: How to Upload a Video from iMovie to YouTube?
iMovie is ideal for making YouTube videos if you are too basic and are not looking for advanced features. Remember that professionalism pays in these platforms and helps you stand better among others. If you’re still interested in making introductory videos, here is a step-by-step guide on uploading a video to YouTube from iMovie on Mac first and leading with iPhone.
Step-by-Step Tutorial on how to upload a video from iMovie to YouTube on Mac
Step 1: Create a Project
On the first step, go to iMovie on Mac and click the Create New tab below.
Step 2: Import Media
Click the Import Media button and browse the files on your computer, as shown below.
Step 3: Edit Clips
It’s time to edit video footage. Drag your video to the timeline, as shown below.
Then, you can trim and drag the edges of video clips to allow editing.
Step 4: Add Titles
You can add titles by clicking the Title tab and further drag the Title’s template into the timeline.
Step 5: Export the Video
Click the Export button as follows after editing is over.
Select YouTube to upload your video over the platform directly.
Step 6: Save
After selecting the desired platform, click the Next tab to proceed with saving the file.
At last, save your video as shown below.
Step-by-Step Tutorial on how to upload iMovie to YouTube from iPhone
Step 1: Share the iMovie Project
Go to iMovie on your iPhone. Open the iMovie project on your iPhone and tap the Share button to select YouTube. Enter the information of Title, Description, Size, Tags, Privacy, and Location (optional).
Step 2: Upload iMovie Files
For ease of use, you can upload saved videos in Photo Library on your iPhone. Then, you can upload iMovie videos via the YouTube iOS app. Sign In to YouTube and click the Camera icon at the top of the Home page. Select your iPhone Photo Library file and set the video Title, Description, Size, Tags, and Privacy. Then, hit the Upload button to confirm.
Part 2: The Best iMovie Export Settings for YouTube Videos
As we all know that iMovie consists of a bit long procedure to export projects. Here are some tips on the best iMovie export settings to avoid an unnecessary headache.
- Set small resolution: Small resolution plays a more significant role, especially while uploading. Thus, you can set the smallest resolution in the Email tab of the Export button.
2. Change Export settings in the File tab: There is a File tab under the Export button. Click it and find various settings that you need to change to get the best export settings for YouTube 2021. Make the Title of the video as small as possible. Set the resolution at 1080P than 4K.
However, it isn’t going to upgrade the resolution if your video is already in the 1080P definition. Now, the last setting that will crazily offer you the best quality and lots of space-saving. You have to select Best (ProRes) in quality settings for this purpose. These settings also take less time to upload to YouTube.
3. Compress is not for speed: Various options you see in the Compresstab are not for speed. They are for how you save the video on a desktop. Thus, always choose the Better Quality tab than Faster.
- Do not export directly to YouTube: iMovie is pretty basic and doesn’t offer great settings to upload your video instantly. You may have to make changes to the uploaded video even if you do this as per our step-by-step guide mentioned above.
Part 3: How to fix the “Failed to Upload to YouTube” Error on iMovie?
The “iMovie to YouTube failed” problem occurs when you directly upload a YouTube video from iMovie. The issue will result if you upload from any third-party uploader. That is why the direct upload doesn’t work, especially in iMovie. You can opt to share your video to the desktop first and then drag it to upload to the YouTube platform.
Part 4: Upload Videos to YouTube with the Best Alternative to iMovie - Wondershare Filmora
“What can I use instead of iMovie to overcome its limitations?”
When you see that iMovie is not uploading to YouTube or iMovie upload to YouTube got stuck, go for a better alternative. In this section, we’d like to recommend Wondershare Filmora that offers the best export settings compared to iMovie. It is the go-to solution if you can’t upload video from iMovie to YouTube directly. Filmora further provides intuitive editing tools that professionally make your YouTube video projects.
Export Key Aspects of Wondershare Filmora in comparison to iMovie:
- It offers a long list of export resolutions to choose from.
- You get separate video and audio settings such as Encoder, Channel, Frame Rate, Bit Rate, Resolution, etc.
- It is further compatible with export to various devices including the iPhone, Samsung, iPod, Apple TV, iPad, Google Pixel, PSP, Smart TV, etc.
Step-by-Step Guide on how to upload a video from iMovie to YouTube via Wondershare Filmora
Step 1: Click the Export button and select resolution
After your project in Wondershare Filmora is over, click the Export tab and select video resolution from the Local tab, as shown below.
It has a list of formats. You can also edit the Name and saving location here.
Step 2: Select Quality
Select the Settings button and choose from three quality levels of Best, Better, and Good. You can also adjust video and audio parameters, including the Encoder, Frame Rate, Resolution, Bit Rate, etc.
Step 3: Select platform
Select the YouTube tab, Sign In to your YouTube account, and hit the Export button after modifying the Title and Quality if needed. Also, make sure to check the Enable GPU accelerated video encoding tab.
Select Wondershare Filmora as the ultimate solution even if iMovie upload to YouTube not showing up.
Conclusion
Hopefully, we’ve informed you of the relevant facts on how to upload a video from iMovie to YouTube. We have also examined the number of troubleshooting issues involved in the iMovie video editor. Well, you will get to face similar kinds of export difficulties in the iMovie editor. Also, the entire procedure to end the exporting task is a bit long in iMovie compared to any other video editing software. Thus, it’s crucial to check out what other alternatives the technological world has today. We can’t state to you a better beginner-friendly yet advanced editing option than Wondershare Filmora that rightly outtakes the iMovie video editor in all aspects.
 CollageIt Pro
Liza Brown
Liza Brown is a writer and a lover of all things video.
Follow @Liza Brown
Liza Brown
Aug 18, 2022• Proven solutions
“Is iMovie good for YouTube?”
The iMovie is not only good for YouTube but various other social media platforms. The thing is, you have to compromise with the quality offered by Apple’s video editor iMovie. Well, iMovie is perfect for getting started for beginners. But, the professionals and ones who want a bit high features than basic ones should look elsewhere. Thus, we always recommend alternatives to a particular software for our audience. In this article, there is a mention of Wondershare Filmora to overcome the drawbacks of iMovie.
Without further ado, let’s begin with how to upload a video from iMovie to YouTube. We want to lead with the best iMovie export settings, specific troubleshooting issues, and our alternative intro section to overcome iMovie’s limitations.
Part 1: How to Upload a Video from iMovie to YouTube?
iMovie is ideal for making YouTube videos if you are too basic and are not looking for advanced features. Remember that professionalism pays in these platforms and helps you stand better among others. If you’re still interested in making introductory videos, here is a step-by-step guide on uploading a video to YouTube from iMovie on Mac first and leading with iPhone.
Step-by-Step Tutorial on how to upload a video from iMovie to YouTube on Mac
Step 1: Create a Project
On the first step, go to iMovie on Mac and click the Create New tab below.
Step 2: Import Media
Click the Import Media button and browse the files on your computer, as shown below.
Step 3: Edit Clips
It’s time to edit video footage. Drag your video to the timeline, as shown below.
Then, you can trim and drag the edges of video clips to allow editing.
Step 4: Add Titles
You can add titles by clicking the Title tab and further drag the Title’s template into the timeline.
Step 5: Export the Video
Click the Export button as follows after editing is over.
Select YouTube to upload your video over the platform directly.
Step 6: Save
After selecting the desired platform, click the Next tab to proceed with saving the file.
At last, save your video as shown below.
Step-by-Step Tutorial on how to upload iMovie to YouTube from iPhone
Step 1: Share the iMovie Project
Go to iMovie on your iPhone. Open the iMovie project on your iPhone and tap the Share button to select YouTube. Enter the information of Title, Description, Size, Tags, Privacy, and Location (optional).
Step 2: Upload iMovie Files
For ease of use, you can upload saved videos in Photo Library on your iPhone. Then, you can upload iMovie videos via the YouTube iOS app. Sign In to YouTube and click the Camera icon at the top of the Home page. Select your iPhone Photo Library file and set the video Title, Description, Size, Tags, and Privacy. Then, hit the Upload button to confirm.
Part 2: The Best iMovie Export Settings for YouTube Videos
As we all know that iMovie consists of a bit long procedure to export projects. Here are some tips on the best iMovie export settings to avoid an unnecessary headache.
- Set small resolution: Small resolution plays a more significant role, especially while uploading. Thus, you can set the smallest resolution in the Email tab of the Export button.
2. Change Export settings in the File tab: There is a File tab under the Export button. Click it and find various settings that you need to change to get the best export settings for YouTube 2021. Make the Title of the video as small as possible. Set the resolution at 1080P than 4K.
However, it isn’t going to upgrade the resolution if your video is already in the 1080P definition. Now, the last setting that will crazily offer you the best quality and lots of space-saving. You have to select Best (ProRes) in quality settings for this purpose. These settings also take less time to upload to YouTube.
3. Compress is not for speed: Various options you see in the Compresstab are not for speed. They are for how you save the video on a desktop. Thus, always choose the Better Quality tab than Faster.
- Do not export directly to YouTube: iMovie is pretty basic and doesn’t offer great settings to upload your video instantly. You may have to make changes to the uploaded video even if you do this as per our step-by-step guide mentioned above.
Part 3: How to fix the “Failed to Upload to YouTube” Error on iMovie?
The “iMovie to YouTube failed” problem occurs when you directly upload a YouTube video from iMovie. The issue will result if you upload from any third-party uploader. That is why the direct upload doesn’t work, especially in iMovie. You can opt to share your video to the desktop first and then drag it to upload to the YouTube platform.
Part 4: Upload Videos to YouTube with the Best Alternative to iMovie - Wondershare Filmora
“What can I use instead of iMovie to overcome its limitations?”
When you see that iMovie is not uploading to YouTube or iMovie upload to YouTube got stuck, go for a better alternative. In this section, we’d like to recommend Wondershare Filmora that offers the best export settings compared to iMovie. It is the go-to solution if you can’t upload video from iMovie to YouTube directly. Filmora further provides intuitive editing tools that professionally make your YouTube video projects.
Export Key Aspects of Wondershare Filmora in comparison to iMovie:
- It offers a long list of export resolutions to choose from.
- You get separate video and audio settings such as Encoder, Channel, Frame Rate, Bit Rate, Resolution, etc.
- It is further compatible with export to various devices including the iPhone, Samsung, iPod, Apple TV, iPad, Google Pixel, PSP, Smart TV, etc.
Step-by-Step Guide on how to upload a video from iMovie to YouTube via Wondershare Filmora
Step 1: Click the Export button and select resolution
After your project in Wondershare Filmora is over, click the Export tab and select video resolution from the Local tab, as shown below.
It has a list of formats. You can also edit the Name and saving location here.
Step 2: Select Quality
Select the Settings button and choose from three quality levels of Best, Better, and Good. You can also adjust video and audio parameters, including the Encoder, Frame Rate, Resolution, Bit Rate, etc.
Step 3: Select platform
Select the YouTube tab, Sign In to your YouTube account, and hit the Export button after modifying the Title and Quality if needed. Also, make sure to check the Enable GPU accelerated video encoding tab.
Select Wondershare Filmora as the ultimate solution even if iMovie upload to YouTube not showing up.

Conclusion
Hopefully, we’ve informed you of the relevant facts on how to upload a video from iMovie to YouTube. We have also examined the number of troubleshooting issues involved in the iMovie video editor. Well, you will get to face similar kinds of export difficulties in the iMovie editor. Also, the entire procedure to end the exporting task is a bit long in iMovie compared to any other video editing software. Thus, it’s crucial to check out what other alternatives the technological world has today. We can’t state to you a better beginner-friendly yet advanced editing option than Wondershare Filmora that rightly outtakes the iMovie video editor in all aspects.
Liza Brown
Liza Brown is a writer and a lover of all things video.
Follow @Liza Brown
Liza Brown
Aug 18, 2022• Proven solutions
“Is iMovie good for YouTube?”
The iMovie is not only good for YouTube but various other social media platforms. The thing is, you have to compromise with the quality offered by Apple’s video editor iMovie. Well, iMovie is perfect for getting started for beginners. But, the professionals and ones who want a bit high features than basic ones should look elsewhere. Thus, we always recommend alternatives to a particular software for our audience. In this article, there is a mention of Wondershare Filmora to overcome the drawbacks of iMovie.
Without further ado, let’s begin with how to upload a video from iMovie to YouTube. We want to lead with the best iMovie export settings, specific troubleshooting issues, and our alternative intro section to overcome iMovie’s limitations.
Parental Control Software
## Part 1: How to Upload a Video from iMovie to YouTube?iMovie is ideal for making YouTube videos if you are too basic and are not looking for advanced features. Remember that professionalism pays in these platforms and helps you stand better among others. If you’re still interested in making introductory videos, here is a step-by-step guide on uploading a video to YouTube from iMovie on Mac first and leading with iPhone.
Step-by-Step Tutorial on how to upload a video from iMovie to YouTube on Mac
Step 1: Create a Project
On the first step, go to iMovie on Mac and click the Create New tab below.
Step 2: Import Media
Click the Import Media button and browse the files on your computer, as shown below.
Step 3: Edit Clips
It’s time to edit video footage. Drag your video to the timeline, as shown below.
Then, you can trim and drag the edges of video clips to allow editing.
Step 4: Add Titles
You can add titles by clicking the Title tab and further drag the Title’s template into the timeline.
Step 5: Export the Video
Click the Export button as follows after editing is over.
Select YouTube to upload your video over the platform directly.
Step 6: Save
After selecting the desired platform, click the Next tab to proceed with saving the file.
At last, save your video as shown below.
Step-by-Step Tutorial on how to upload iMovie to YouTube from iPhone
Step 1: Share the iMovie Project
Go to iMovie on your iPhone. Open the iMovie project on your iPhone and tap the Share button to select YouTube. Enter the information of Title, Description, Size, Tags, Privacy, and Location (optional).
Step 2: Upload iMovie Files
For ease of use, you can upload saved videos in Photo Library on your iPhone. Then, you can upload iMovie videos via the YouTube iOS app. Sign In to YouTube and click the Camera icon at the top of the Home page. Select your iPhone Photo Library file and set the video Title, Description, Size, Tags, and Privacy. Then, hit the Upload button to confirm.
Part 2: The Best iMovie Export Settings for YouTube Videos
As we all know that iMovie consists of a bit long procedure to export projects. Here are some tips on the best iMovie export settings to avoid an unnecessary headache.
- Set small resolution: Small resolution plays a more significant role, especially while uploading. Thus, you can set the smallest resolution in the Email tab of the Export button.
2. Change Export settings in the File tab: There is a File tab under the Export button. Click it and find various settings that you need to change to get the best export settings for YouTube 2021. Make the Title of the video as small as possible. Set the resolution at 1080P than 4K.
However, it isn’t going to upgrade the resolution if your video is already in the 1080P definition. Now, the last setting that will crazily offer you the best quality and lots of space-saving. You have to select Best (ProRes) in quality settings for this purpose. These settings also take less time to upload to YouTube.
3. Compress is not for speed: Various options you see in the Compresstab are not for speed. They are for how you save the video on a desktop. Thus, always choose the Better Quality tab than Faster.
- Do not export directly to YouTube: iMovie is pretty basic and doesn’t offer great settings to upload your video instantly. You may have to make changes to the uploaded video even if you do this as per our step-by-step guide mentioned above.
Part 3: How to fix the “Failed to Upload to YouTube” Error on iMovie?
The “iMovie to YouTube failed” problem occurs when you directly upload a YouTube video from iMovie. The issue will result if you upload from any third-party uploader. That is why the direct upload doesn’t work, especially in iMovie. You can opt to share your video to the desktop first and then drag it to upload to the YouTube platform.
Part 4: Upload Videos to YouTube with the Best Alternative to iMovie - Wondershare Filmora
“What can I use instead of iMovie to overcome its limitations?”
When you see that iMovie is not uploading to YouTube or iMovie upload to YouTube got stuck, go for a better alternative. In this section, we’d like to recommend Wondershare Filmora that offers the best export settings compared to iMovie. It is the go-to solution if you can’t upload video from iMovie to YouTube directly. Filmora further provides intuitive editing tools that professionally make your YouTube video projects.
Export Key Aspects of Wondershare Filmora in comparison to iMovie:
- It offers a long list of export resolutions to choose from.
- You get separate video and audio settings such as Encoder, Channel, Frame Rate, Bit Rate, Resolution, etc.
- It is further compatible with export to various devices including the iPhone, Samsung, iPod, Apple TV, iPad, Google Pixel, PSP, Smart TV, etc.
Step-by-Step Guide on how to upload a video from iMovie to YouTube via Wondershare Filmora
Step 1: Click the Export button and select resolution
After your project in Wondershare Filmora is over, click the Export tab and select video resolution from the Local tab, as shown below.
It has a list of formats. You can also edit the Name and saving location here.
Step 2: Select Quality
Select the Settings button and choose from three quality levels of Best, Better, and Good. You can also adjust video and audio parameters, including the Encoder, Frame Rate, Resolution, Bit Rate, etc.
Step 3: Select platform
Select the YouTube tab, Sign In to your YouTube account, and hit the Export button after modifying the Title and Quality if needed. Also, make sure to check the Enable GPU accelerated video encoding tab.
Select Wondershare Filmora as the ultimate solution even if iMovie upload to YouTube not showing up.
Conclusion
Hopefully, we’ve informed you of the relevant facts on how to upload a video from iMovie to YouTube. We have also examined the number of troubleshooting issues involved in the iMovie video editor. Well, you will get to face similar kinds of export difficulties in the iMovie editor. Also, the entire procedure to end the exporting task is a bit long in iMovie compared to any other video editing software. Thus, it’s crucial to check out what other alternatives the technological world has today. We can’t state to you a better beginner-friendly yet advanced editing option than Wondershare Filmora that rightly outtakes the iMovie video editor in all aspects.
 PDF application, powered by AI-based OCR, for unified workflows with both digital and scanned documents.
Liza Brown
Liza Brown is a writer and a lover of all things video.
Follow @Liza Brown
- Title: [Updated] Earn While Playing Games Online for 2024
- Author: Steven
- Created at : 2024-07-30 22:01:07
- Updated at : 2024-07-31 22:01:07
- Link: https://facebook-record-videos.techidaily.com/updated-earn-while-playing-games-online-for-2024/
- License: This work is licensed under CC BY-NC-SA 4.0.