![[Updated] 2024 Approved Curating Tunes A Comprehensive Guide to YouTube Lists](https://thmb.techidaily.com/23f13f96d936d78089a7e8a3b93e560ac0ab8587601498f32a131493f3f787f8.jpg)
"[Updated] 2024 Approved Curating Tunes A Comprehensive Guide to YouTube Lists"
Curating Tunes: A Comprehensive Guide to YouTube Lists
YouTube is one of the biggest video-sharing websites where you can find unlimited videos of your favorite songs in various genres for free. However, due to the thousands of channels on YouTube, remember a soundtrack you once liked.
To tackle this issue, you must create a playlist containing only those you prefer to listen to.
So, if you are looking for information on creating a YouTube music playlist on your Windows or Mac PC, Android, or iPhone web browser, read this article and follow the steps carefully.
How to Create a YouTube Music Playlist?
Are you one of those who want to listen to their favorite tracks while working out or carrying on their work-related tasks? If that’s the case, a YouTube Playlist might come in handy as you don’t have to search again and again for your songs on your device.
How To Create a YouTube Music Playlist on the Web?
If you are using a Windows or Mac computer and want to create a YouTube music playlist on a web browser, follow the below steps:
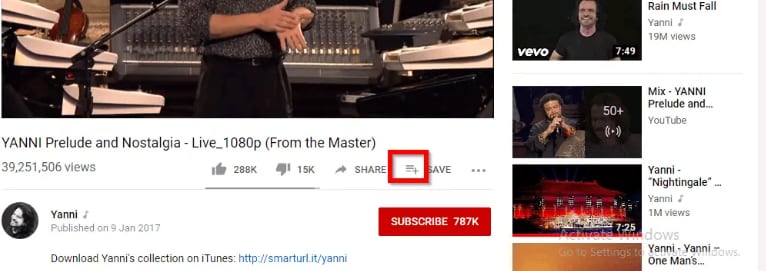
Step1 In the first step, turn on your PC, launch a web browser from the desktop or Dock, and head to theYouTube website. Next, Sign into your account with your Google email ID if you are not already logged in.

![]()
Note: It is only possible to create a YouTube music playlist by signing into your account.
Step2 When you have signed in, look for your favorite track on the YouTube live feed page or search for it in the search bar at the top of the screen. Once you have found the song, click on it to play it, click the three horizontal dots at the bottom right-hand side of the video, and select the “Save” option from the small pop-up.
Step3
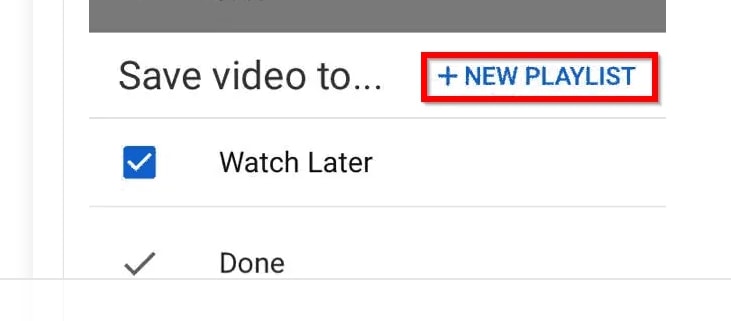
- Now, select the “Create a new playlist”
- Type in the name of your playlist.
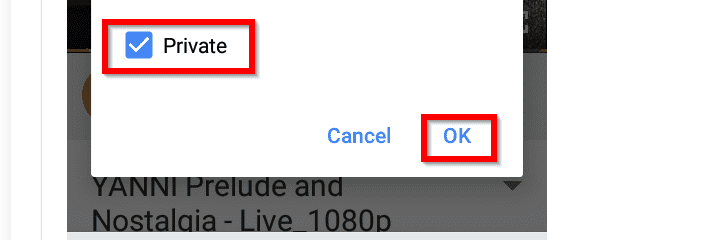
- Choose to make it Public, Unlisted, or Private.

The differences between the three options are:
- A Public playlist is a list of videos that any random person can see, access, or use it.
- An Unlisted playlist can be shared with others by using its link to access it.
- A Private playlist cannot be seen, accessed or used by anyone except you.
Finally, click the “Create” button, and your YouTube music playlist will be saved automatically.
Step4 Repeat the second and third steps to save all the other songs you wish to add to the same playlist. Once done, head back to the main YouTube feed page, click “Library,” and scroll to the middle of the page in the right pane to access and play the music playlist at your will.

![]()
Note: You can always edit your YouTube music playlist by changing its name, privacy, and description or adding and removing any tracks. It is also possible to delete any of your playlists or create and save multiple playlists on your device’s web browser.
How to Create a YouTube Music playlist on iPhone?
To create a YouTube music playlist on your iPhone, follow these quick steps.:
Step1 Download and launch the YouTube Music app on your iPhone , sign into your account, and tap a song you want to add to your playlist. Next, tap on the music video once for the create a playlist option to pop up.

Step2 Now tap the three horizontal lines with the Plus icon, tap “+ NEW PLAYLIST” at the bottom right corner of the screen, and type in the name of the new music playlist.
Step3 In the next step, type in the name of your new playlist, select your privacy preferences, i.e., Private, Public, or unlisted, and tap “Create” to complete the process.

Finally, close the video, tap “Library” at the bottom of the screen, scroll down and see your new YouTube music playlist.
How to Create a YouTube Music playlist on Android?
YouTube Music app interface for Android is different than for iPhone, so do the following steps to create a new playlist quickly.
Step1 Download and launch the YouTube Music app on your Android , sign into your account, and tap a song to open it. Next, tap on the music video once and tap the three horizontal lines with the Plus icon.
Then, tap “Create a new playlist” at the bottom right corner of the screen, and type in the name of the new music playlist.

Step2 In the next step, choose your privacy preferences and tap “OK” to create the new YouTube music playlist.
Now tap to close the video, tap “Library” at the bottom of the screen, scroll down in the middle of the app and view your new YouTube music playlist.
![]()
Note: You may see an option to create a new channel during the YouTube music playlist process. If so, tap “Create Channel” to see the “+ NEW PLAYLIST” option on your iPhone and the “Create a new playlist” option on your Android YouTube app.
Bonus Video Tutorial: From a YouTube User to Creator - How To Make Music Video
You know how to create a YouTube playlist on the web or on your mobile. However, as you are a music lover and use YouTube frequently, are you interested in creating music videos by yourself? If yes, please watch the video below. It will show you how to make music videos with a user-friendly video editor, Filmora . We hope you can enjoy your YouTube music while exploring more creative possibilities:
Free Download For Win 7 or later(64-bit)
Free Download For macOS 10.14 or later
Conclusion
Listening to YouTube’s free music tracks is more fun when you do not have to go and forth to search for your favorite songs. You can enjoy the experience more when you have personalized playlists for situations like a long drive, studying, or working in an office.
So, in this article, we have discussed a step-by-step process for creating a YouTube music playlist on a web browser, Android, and iPhone, and hopefully, you can dance to your favorite beats without searching for them first on YouTube.
Step2 When you have signed in, look for your favorite track on the YouTube live feed page or search for it in the search bar at the top of the screen. Once you have found the song, click on it to play it, click the three horizontal dots at the bottom right-hand side of the video, and select the “Save” option from the small pop-up.
Step3
- Now, select the “Create a new playlist”
- Type in the name of your playlist.
- Choose to make it Public, Unlisted, or Private.
The differences between the three options are:
- A Public playlist is a list of videos that any random person can see, access, or use it.
- An Unlisted playlist can be shared with others by using its link to access it.
- A Private playlist cannot be seen, accessed or used by anyone except you.
Finally, click the “Create” button, and your YouTube music playlist will be saved automatically.
Step4 Repeat the second and third steps to save all the other songs you wish to add to the same playlist. Once done, head back to the main YouTube feed page, click “Library,” and scroll to the middle of the page in the right pane to access and play the music playlist at your will.
![]()
Note: You can always edit your YouTube music playlist by changing its name, privacy, and description or adding and removing any tracks. It is also possible to delete any of your playlists or create and save multiple playlists on your device’s web browser.
How to Create a YouTube Music playlist on iPhone?
To create a YouTube music playlist on your iPhone, follow these quick steps.:
Step1 Download and launch the YouTube Music app on your iPhone , sign into your account, and tap a song you want to add to your playlist. Next, tap on the music video once for the create a playlist option to pop up.
Step2 Now tap the three horizontal lines with the Plus icon, tap “+ NEW PLAYLIST” at the bottom right corner of the screen, and type in the name of the new music playlist.
Step3 In the next step, type in the name of your new playlist, select your privacy preferences, i.e., Private, Public, or unlisted, and tap “Create” to complete the process.
Finally, close the video, tap “Library” at the bottom of the screen, scroll down and see your new YouTube music playlist.
How to Create a YouTube Music playlist on Android?
YouTube Music app interface for Android is different than for iPhone, so do the following steps to create a new playlist quickly.
Step1 Download and launch the YouTube Music app on your Android , sign into your account, and tap a song to open it. Next, tap on the music video once and tap the three horizontal lines with the Plus icon.
Then, tap “Create a new playlist” at the bottom right corner of the screen, and type in the name of the new music playlist.
Step2 In the next step, choose your privacy preferences and tap “OK” to create the new YouTube music playlist.
Now tap to close the video, tap “Library” at the bottom of the screen, scroll down in the middle of the app and view your new YouTube music playlist.
![]()
Note: You may see an option to create a new channel during the YouTube music playlist process. If so, tap “Create Channel” to see the “+ NEW PLAYLIST” option on your iPhone and the “Create a new playlist” option on your Android YouTube app.
Bonus Video Tutorial: From a YouTube User to Creator - How To Make Music Video
You know how to create a YouTube playlist on the web or on your mobile. However, as you are a music lover and use YouTube frequently, are you interested in creating music videos by yourself? If yes, please watch the video below. It will show you how to make music videos with a user-friendly video editor, Filmora . We hope you can enjoy your YouTube music while exploring more creative possibilities:
Free Download For Win 7 or later(64-bit)
Free Download For macOS 10.14 or later
Conclusion
Listening to YouTube’s free music tracks is more fun when you do not have to go and forth to search for your favorite songs. You can enjoy the experience more when you have personalized playlists for situations like a long drive, studying, or working in an office.
So, in this article, we have discussed a step-by-step process for creating a YouTube music playlist on a web browser, Android, and iPhone, and hopefully, you can dance to your favorite beats without searching for them first on YouTube.
Maximizing Your Creations: Uploading IMovie Videos to YouTube
How to Upload a Video from iMovie to YouTube?

Liza Brown
Aug 18, 2022• Proven solutions
“Is iMovie good for YouTube?”
The iMovie is not only good for YouTube but various other social media platforms. The thing is, you have to compromise with the quality offered by Apple’s video editor iMovie. Well, iMovie is perfect for getting started for beginners. But, the professionals and ones who want a bit high features than basic ones should look elsewhere. Thus, we always recommend alternatives to a particular software for our audience. In this article, there is a mention of Wondershare Filmora to overcome the drawbacks of iMovie.
Without further ado, let’s begin with how to upload a video from iMovie to YouTube. We want to lead with the best iMovie export settings, specific troubleshooting issues, and our alternative intro section to overcome iMovie’s limitations.
Part 1: How to Upload a Video from iMovie to YouTube?
iMovie is ideal for making YouTube videos if you are too basic and are not looking for advanced features. Remember that professionalism pays in these platforms and helps you stand better among others. If you’re still interested in making introductory videos, here is a step-by-step guide on uploading a video to YouTube from iMovie on Mac first and leading with iPhone.
Step-by-Step Tutorial on how to upload a video from iMovie to YouTube on Mac
Step 1: Create a Project
On the first step, go to iMovie on Mac and click the Create New tab below.
Step 2: Import Media
Click the Import Media button and browse the files on your computer, as shown below.
Step 3: Edit Clips
It’s time to edit video footage. Drag your video to the timeline, as shown below.
Then, you can trim and drag the edges of video clips to allow editing.
Step 4: Add Titles
You can add titles by clicking the Title tab and further drag the Title’s template into the timeline.
Step 5: Export the Video
Click the Export button as follows after editing is over.
Select YouTube to upload your video over the platform directly.
Step 6: Save
After selecting the desired platform, click the Next tab to proceed with saving the file.
At last, save your video as shown below.
Step-by-Step Tutorial on how to upload iMovie to YouTube from iPhone
Step 1: Share the iMovie Project
Go to iMovie on your iPhone. Open the iMovie project on your iPhone and tap the Share button to select YouTube. Enter the information of Title, Description, Size, Tags, Privacy, and Location (optional).
Step 2: Upload iMovie Files
For ease of use, you can upload saved videos in Photo Library on your iPhone. Then, you can upload iMovie videos via the YouTube iOS app. Sign In to YouTube and click the Camera icon at the top of the Home page. Select your iPhone Photo Library file and set the video Title, Description, Size, Tags, and Privacy. Then, hit the Upload button to confirm.
Part 2: The Best iMovie Export Settings for YouTube Videos
As we all know that iMovie consists of a bit long procedure to export projects. Here are some tips on the best iMovie export settings to avoid an unnecessary headache.
- Set small resolution: Small resolution plays a more significant role, especially while uploading. Thus, you can set the smallest resolution in the Email tab of the Export button.
2. Change Export settings in the File tab: There is a File tab under the Export button. Click it and find various settings that you need to change to get the best export settings for YouTube 2021. Make the Title of the video as small as possible. Set the resolution at 1080P than 4K.
However, it isn’t going to upgrade the resolution if your video is already in the 1080P definition. Now, the last setting that will crazily offer you the best quality and lots of space-saving. You have to select Best (ProRes) in quality settings for this purpose. These settings also take less time to upload to YouTube.
3. Compress is not for speed: Various options you see in the Compresstab are not for speed. They are for how you save the video on a desktop. Thus, always choose the Better Quality tab than Faster.
- Do not export directly to YouTube: iMovie is pretty basic and doesn’t offer great settings to upload your video instantly. You may have to make changes to the uploaded video even if you do this as per our step-by-step guide mentioned above.
Part 3: How to fix the “Failed to Upload to YouTube” Error on iMovie?
The “iMovie to YouTube failed” problem occurs when you directly upload a YouTube video from iMovie. The issue will result if you upload from any third-party uploader. That is why the direct upload doesn’t work, especially in iMovie. You can opt to share your video to the desktop first and then drag it to upload to the YouTube platform.
Part 4: Upload Videos to YouTube with the Best Alternative to iMovie - Wondershare Filmora
“What can I use instead of iMovie to overcome its limitations?”
When you see that iMovie is not uploading to YouTube or iMovie upload to YouTube got stuck, go for a better alternative. In this section, we’d like to recommend Wondershare Filmora that offers the best export settings compared to iMovie. It is the go-to solution if you can’t upload video from iMovie to YouTube directly. Filmora further provides intuitive editing tools that professionally make your YouTube video projects.
Export Key Aspects of Wondershare Filmora in comparison to iMovie:
- It offers a long list of export resolutions to choose from.
- You get separate video and audio settings such as Encoder, Channel, Frame Rate, Bit Rate, Resolution, etc.
- It is further compatible with export to various devices including the iPhone, Samsung, iPod, Apple TV, iPad, Google Pixel, PSP, Smart TV, etc.
Step-by-Step Guide on how to upload a video from iMovie to YouTube via Wondershare Filmora
Step 1: Click the Export button and select resolution
After your project in Wondershare Filmora is over, click the Export tab and select video resolution from the Local tab, as shown below.
It has a list of formats. You can also edit the Name and saving location here.
Step 2: Select Quality
Select the Settings button and choose from three quality levels of Best, Better, and Good. You can also adjust video and audio parameters, including the Encoder, Frame Rate, Resolution, Bit Rate, etc.
Step 3: Select platform
Select the YouTube tab, Sign In to your YouTube account, and hit the Export button after modifying the Title and Quality if needed. Also, make sure to check the Enable GPU accelerated video encoding tab.
Select Wondershare Filmora as the ultimate solution even if iMovie upload to YouTube not showing up.
Conclusion
Hopefully, we’ve informed you of the relevant facts on how to upload a video from iMovie to YouTube. We have also examined the number of troubleshooting issues involved in the iMovie video editor. Well, you will get to face similar kinds of export difficulties in the iMovie editor. Also, the entire procedure to end the exporting task is a bit long in iMovie compared to any other video editing software. Thus, it’s crucial to check out what other alternatives the technological world has today. We can’t state to you a better beginner-friendly yet advanced editing option than Wondershare Filmora that rightly outtakes the iMovie video editor in all aspects.
Liza Brown
Liza Brown is a writer and a lover of all things video.
Follow @Liza Brown
Liza Brown
Aug 18, 2022• Proven solutions
“Is iMovie good for YouTube?”
The iMovie is not only good for YouTube but various other social media platforms. The thing is, you have to compromise with the quality offered by Apple’s video editor iMovie. Well, iMovie is perfect for getting started for beginners. But, the professionals and ones who want a bit high features than basic ones should look elsewhere. Thus, we always recommend alternatives to a particular software for our audience. In this article, there is a mention of Wondershare Filmora to overcome the drawbacks of iMovie.
Without further ado, let’s begin with how to upload a video from iMovie to YouTube. We want to lead with the best iMovie export settings, specific troubleshooting issues, and our alternative intro section to overcome iMovie’s limitations.
Part 1: How to Upload a Video from iMovie to YouTube?
iMovie is ideal for making YouTube videos if you are too basic and are not looking for advanced features. Remember that professionalism pays in these platforms and helps you stand better among others. If you’re still interested in making introductory videos, here is a step-by-step guide on uploading a video to YouTube from iMovie on Mac first and leading with iPhone.
Step-by-Step Tutorial on how to upload a video from iMovie to YouTube on Mac
Step 1: Create a Project
On the first step, go to iMovie on Mac and click the Create New tab below.
Step 2: Import Media
Click the Import Media button and browse the files on your computer, as shown below.
Step 3: Edit Clips
It’s time to edit video footage. Drag your video to the timeline, as shown below.
Then, you can trim and drag the edges of video clips to allow editing.
Step 4: Add Titles
You can add titles by clicking the Title tab and further drag the Title’s template into the timeline.
Step 5: Export the Video
Click the Export button as follows after editing is over.
Select YouTube to upload your video over the platform directly.
Step 6: Save
After selecting the desired platform, click the Next tab to proceed with saving the file.
At last, save your video as shown below.
Step-by-Step Tutorial on how to upload iMovie to YouTube from iPhone
Step 1: Share the iMovie Project
Go to iMovie on your iPhone. Open the iMovie project on your iPhone and tap the Share button to select YouTube. Enter the information of Title, Description, Size, Tags, Privacy, and Location (optional).
Step 2: Upload iMovie Files
For ease of use, you can upload saved videos in Photo Library on your iPhone. Then, you can upload iMovie videos via the YouTube iOS app. Sign In to YouTube and click the Camera icon at the top of the Home page. Select your iPhone Photo Library file and set the video Title, Description, Size, Tags, and Privacy. Then, hit the Upload button to confirm.
Part 2: The Best iMovie Export Settings for YouTube Videos
As we all know that iMovie consists of a bit long procedure to export projects. Here are some tips on the best iMovie export settings to avoid an unnecessary headache.
- Set small resolution: Small resolution plays a more significant role, especially while uploading. Thus, you can set the smallest resolution in the Email tab of the Export button.
2. Change Export settings in the File tab: There is a File tab under the Export button. Click it and find various settings that you need to change to get the best export settings for YouTube 2021. Make the Title of the video as small as possible. Set the resolution at 1080P than 4K.
However, it isn’t going to upgrade the resolution if your video is already in the 1080P definition. Now, the last setting that will crazily offer you the best quality and lots of space-saving. You have to select Best (ProRes) in quality settings for this purpose. These settings also take less time to upload to YouTube.
3. Compress is not for speed: Various options you see in the Compresstab are not for speed. They are for how you save the video on a desktop. Thus, always choose the Better Quality tab than Faster.
- Do not export directly to YouTube: iMovie is pretty basic and doesn’t offer great settings to upload your video instantly. You may have to make changes to the uploaded video even if you do this as per our step-by-step guide mentioned above.
Part 3: How to fix the “Failed to Upload to YouTube” Error on iMovie?
The “iMovie to YouTube failed” problem occurs when you directly upload a YouTube video from iMovie. The issue will result if you upload from any third-party uploader. That is why the direct upload doesn’t work, especially in iMovie. You can opt to share your video to the desktop first and then drag it to upload to the YouTube platform.
Part 4: Upload Videos to YouTube with the Best Alternative to iMovie - Wondershare Filmora
“What can I use instead of iMovie to overcome its limitations?”
When you see that iMovie is not uploading to YouTube or iMovie upload to YouTube got stuck, go for a better alternative. In this section, we’d like to recommend Wondershare Filmora that offers the best export settings compared to iMovie. It is the go-to solution if you can’t upload video from iMovie to YouTube directly. Filmora further provides intuitive editing tools that professionally make your YouTube video projects.
Export Key Aspects of Wondershare Filmora in comparison to iMovie:
- It offers a long list of export resolutions to choose from.
- You get separate video and audio settings such as Encoder, Channel, Frame Rate, Bit Rate, Resolution, etc.
- It is further compatible with export to various devices including the iPhone, Samsung, iPod, Apple TV, iPad, Google Pixel, PSP, Smart TV, etc.
Step-by-Step Guide on how to upload a video from iMovie to YouTube via Wondershare Filmora
Step 1: Click the Export button and select resolution
After your project in Wondershare Filmora is over, click the Export tab and select video resolution from the Local tab, as shown below.
It has a list of formats. You can also edit the Name and saving location here.
Step 2: Select Quality
Select the Settings button and choose from three quality levels of Best, Better, and Good. You can also adjust video and audio parameters, including the Encoder, Frame Rate, Resolution, Bit Rate, etc.
Step 3: Select platform
Select the YouTube tab, Sign In to your YouTube account, and hit the Export button after modifying the Title and Quality if needed. Also, make sure to check the Enable GPU accelerated video encoding tab.
Select Wondershare Filmora as the ultimate solution even if iMovie upload to YouTube not showing up.
Conclusion
Hopefully, we’ve informed you of the relevant facts on how to upload a video from iMovie to YouTube. We have also examined the number of troubleshooting issues involved in the iMovie video editor. Well, you will get to face similar kinds of export difficulties in the iMovie editor. Also, the entire procedure to end the exporting task is a bit long in iMovie compared to any other video editing software. Thus, it’s crucial to check out what other alternatives the technological world has today. We can’t state to you a better beginner-friendly yet advanced editing option than Wondershare Filmora that rightly outtakes the iMovie video editor in all aspects.
Liza Brown
Liza Brown is a writer and a lover of all things video.
Follow @Liza Brown
Also read:
- [New] 2024 Approved Exciting Entertainment - Top 10 iOS Games, Ready for No Wireless Connection
- [New] Captivate Viewers Designing Engaging YouTube Trailers with Filmora for 2024
- [New] How to Convert YouTube Videos to MP3 Songs on Mac-2023 Update
- [Updated] 2024 Approved Boosting Engagement Editing for Perfect Video Titles & Descriptions
- [Updated] 2024 Approved Expertly Crafted Video-Making Software (iPhone, Android)
- [Updated] Clear Sight Tech The Leading 10 Mobile Phone Cameras in 4K for 2024
- [Updated] Cold Climate Conquests Unveiling Beijing's Olympic Flair
- [Updated] Craft Cinematic Magic Learn Green Screen Wonders with YouTube for 2024
- [Updated] Explore Engaging Exchange Zones
- 2024 Approved YouTube's Evergreen Most-Watched Video Catalog
- Defeating Far Cry 5’S Load Screen Dilemma - Tips & Tricks
- Facebook's Premier Video Extraction Tools for iPhone & iPad for 2024
- In 2024, 9 Best Free Android Monitoring Apps to Monitor Phone Remotely For your Xiaomi Redmi Note 12T Pro | Dr.fone
- Mastery Guide: Navigating and Controlling Windows' Fn Key
- Troubleshooting and Updating the Driver for Your USB to COM Port Adapter
- Title: [Updated] 2024 Approved Curating Tunes A Comprehensive Guide to YouTube Lists
- Author: Steven
- Created at : 2025-02-05 19:40:29
- Updated at : 2025-02-09 16:30:54
- Link: https://facebook-record-videos.techidaily.com/updated-2024-approved-curating-tunes-a-comprehensive-guide-to-youtube-lists/
- License: This work is licensed under CC BY-NC-SA 4.0.