![[Updated] 2024 Approved Crafting Perfect YouTube Music Playlists via Web & Mobile Platforms](https://thmb.techidaily.com/ce80644caee7b986767dc148a3626afb6dedcf8d303ed5814c688bdf2e6498bb.jpg)
"[Updated] 2024 Approved Crafting Perfect YouTube Music Playlists via Web & Mobile Platforms"
Crafting Perfect YouTube Music Playlists via Web & Mobile Platforms
YouTube is one of the biggest video-sharing websites where you can find unlimited videos of your favorite songs in various genres for free. However, due to the thousands of channels on YouTube, remember a soundtrack you once liked.
To tackle this issue, you must create a playlist containing only those you prefer to listen to.
So, if you are looking for information on creating a YouTube music playlist on your Windows or Mac PC, Android, or iPhone web browser, read this article and follow the steps carefully.
How to Create a YouTube Music Playlist?
Are you one of those who want to listen to their favorite tracks while working out or carrying on their work-related tasks? If that’s the case, a YouTube Playlist might come in handy as you don’t have to search again and again for your songs on your device.
How To Create a YouTube Music Playlist on the Web?
If you are using a Windows or Mac computer and want to create a YouTube music playlist on a web browser, follow the below steps:
Step1 In the first step, turn on your PC, launch a web browser from the desktop or Dock, and head to theYouTube website. Next, Sign into your account with your Google email ID if you are not already logged in.

![]()
Note: It is only possible to create a YouTube music playlist by signing into your account.
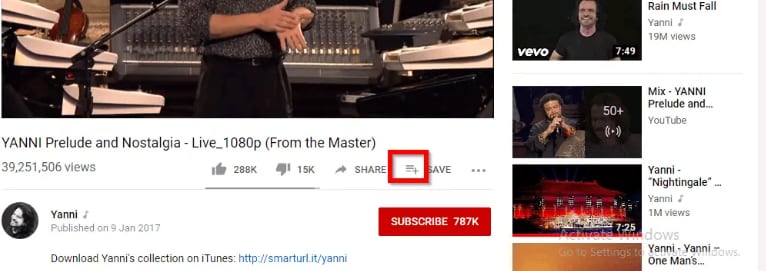
Step2 When you have signed in, look for your favorite track on the YouTube live feed page or search for it in the search bar at the top of the screen. Once you have found the song, click on it to play it, click the three horizontal dots at the bottom right-hand side of the video, and select the “Save” option from the small pop-up.
Step3
- Now, select the “Create a new playlist”
- Type in the name of your playlist.
- Choose to make it Public, Unlisted, or Private.

The differences between the three options are:
- A Public playlist is a list of videos that any random person can see, access, or use it.
- An Unlisted playlist can be shared with others by using its link to access it.
- A Private playlist cannot be seen, accessed or used by anyone except you.
Finally, click the “Create” button, and your YouTube music playlist will be saved automatically.
Step4 Repeat the second and third steps to save all the other songs you wish to add to the same playlist. Once done, head back to the main YouTube feed page, click “Library,” and scroll to the middle of the page in the right pane to access and play the music playlist at your will.

![]()
Note: You can always edit your YouTube music playlist by changing its name, privacy, and description or adding and removing any tracks. It is also possible to delete any of your playlists or create and save multiple playlists on your device’s web browser.
How to Create a YouTube Music playlist on iPhone?
To create a YouTube music playlist on your iPhone, follow these quick steps.:
Step1 Download and launch the YouTube Music app on your iPhone , sign into your account, and tap a song you want to add to your playlist. Next, tap on the music video once for the create a playlist option to pop up.

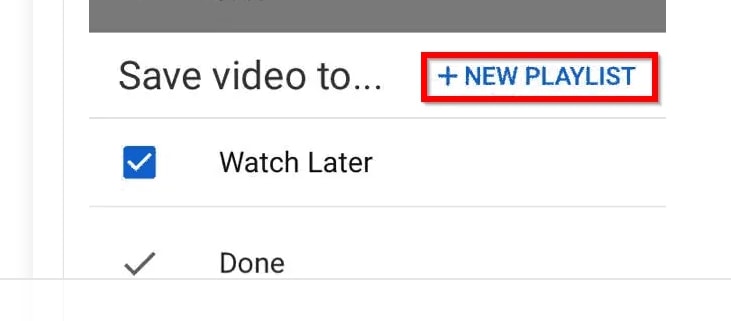
Step2 Now tap the three horizontal lines with the Plus icon, tap “+ NEW PLAYLIST” at the bottom right corner of the screen, and type in the name of the new music playlist.
Step3 In the next step, type in the name of your new playlist, select your privacy preferences, i.e., Private, Public, or unlisted, and tap “Create” to complete the process.

Finally, close the video, tap “Library” at the bottom of the screen, scroll down and see your new YouTube music playlist.
How to Create a YouTube Music playlist on Android?
YouTube Music app interface for Android is different than for iPhone, so do the following steps to create a new playlist quickly.
Step1 Download and launch the YouTube Music app on your Android , sign into your account, and tap a song to open it. Next, tap on the music video once and tap the three horizontal lines with the Plus icon.
Then, tap “Create a new playlist” at the bottom right corner of the screen, and type in the name of the new music playlist.

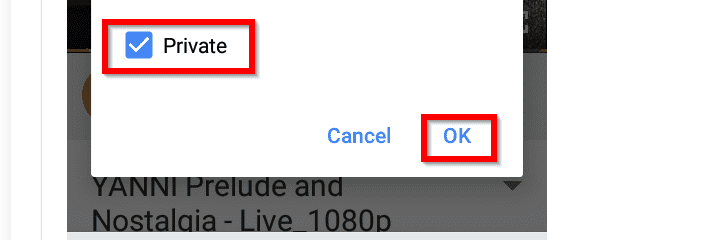
Step2 In the next step, choose your privacy preferences and tap “OK” to create the new YouTube music playlist.
Now tap to close the video, tap “Library” at the bottom of the screen, scroll down in the middle of the app and view your new YouTube music playlist.
![]()
Note: You may see an option to create a new channel during the YouTube music playlist process. If so, tap “Create Channel” to see the “+ NEW PLAYLIST” option on your iPhone and the “Create a new playlist” option on your Android YouTube app.
Bonus Video Tutorial: From a YouTube User to Creator - How To Make Music Video
You know how to create a YouTube playlist on the web or on your mobile. However, as you are a music lover and use YouTube frequently, are you interested in creating music videos by yourself? If yes, please watch the video below. It will show you how to make music videos with a user-friendly video editor, Filmora . We hope you can enjoy your YouTube music while exploring more creative possibilities:
Free Download For Win 7 or later(64-bit)
Free Download For macOS 10.14 or later
Conclusion
Listening to YouTube’s free music tracks is more fun when you do not have to go and forth to search for your favorite songs. You can enjoy the experience more when you have personalized playlists for situations like a long drive, studying, or working in an office.
So, in this article, we have discussed a step-by-step process for creating a YouTube music playlist on a web browser, Android, and iPhone, and hopefully, you can dance to your favorite beats without searching for them first on YouTube.
Step2 When you have signed in, look for your favorite track on the YouTube live feed page or search for it in the search bar at the top of the screen. Once you have found the song, click on it to play it, click the three horizontal dots at the bottom right-hand side of the video, and select the “Save” option from the small pop-up.
Step3
- Now, select the “Create a new playlist”
- Type in the name of your playlist.
- Choose to make it Public, Unlisted, or Private.
The differences between the three options are:
- A Public playlist is a list of videos that any random person can see, access, or use it.
- An Unlisted playlist can be shared with others by using its link to access it.
- A Private playlist cannot be seen, accessed or used by anyone except you.
Finally, click the “Create” button, and your YouTube music playlist will be saved automatically.
Step4 Repeat the second and third steps to save all the other songs you wish to add to the same playlist. Once done, head back to the main YouTube feed page, click “Library,” and scroll to the middle of the page in the right pane to access and play the music playlist at your will.
![]()
Note: You can always edit your YouTube music playlist by changing its name, privacy, and description or adding and removing any tracks. It is also possible to delete any of your playlists or create and save multiple playlists on your device’s web browser.
How to Create a YouTube Music playlist on iPhone?
To create a YouTube music playlist on your iPhone, follow these quick steps.:
Step1 Download and launch the YouTube Music app on your iPhone , sign into your account, and tap a song you want to add to your playlist. Next, tap on the music video once for the create a playlist option to pop up.
Step2 Now tap the three horizontal lines with the Plus icon, tap “+ NEW PLAYLIST” at the bottom right corner of the screen, and type in the name of the new music playlist.
Step3 In the next step, type in the name of your new playlist, select your privacy preferences, i.e., Private, Public, or unlisted, and tap “Create” to complete the process.
Finally, close the video, tap “Library” at the bottom of the screen, scroll down and see your new YouTube music playlist.
How to Create a YouTube Music playlist on Android?
YouTube Music app interface for Android is different than for iPhone, so do the following steps to create a new playlist quickly.
Step1 Download and launch the YouTube Music app on your Android , sign into your account, and tap a song to open it. Next, tap on the music video once and tap the three horizontal lines with the Plus icon.
Then, tap “Create a new playlist” at the bottom right corner of the screen, and type in the name of the new music playlist.
Step2 In the next step, choose your privacy preferences and tap “OK” to create the new YouTube music playlist.
Now tap to close the video, tap “Library” at the bottom of the screen, scroll down in the middle of the app and view your new YouTube music playlist.
![]()
Note: You may see an option to create a new channel during the YouTube music playlist process. If so, tap “Create Channel” to see the “+ NEW PLAYLIST” option on your iPhone and the “Create a new playlist” option on your Android YouTube app.
Bonus Video Tutorial: From a YouTube User to Creator - How To Make Music Video
You know how to create a YouTube playlist on the web or on your mobile. However, as you are a music lover and use YouTube frequently, are you interested in creating music videos by yourself? If yes, please watch the video below. It will show you how to make music videos with a user-friendly video editor, Filmora . We hope you can enjoy your YouTube music while exploring more creative possibilities:
Free Download For Win 7 or later(64-bit)
Free Download For macOS 10.14 or later
Conclusion
Listening to YouTube’s free music tracks is more fun when you do not have to go and forth to search for your favorite songs. You can enjoy the experience more when you have personalized playlists for situations like a long drive, studying, or working in an office.
So, in this article, we have discussed a step-by-step process for creating a YouTube music playlist on a web browser, Android, and iPhone, and hopefully, you can dance to your favorite beats without searching for them first on YouTube.
From Conference Call to YouTube Stream - How To Broadcast Google Meet
Google Meet helps people to connect virtually with each other in a well-protected environment. If you have physical restrictions, Google Meet can provide an enhanced ecosystem to collaborate with your team members. With high video and audio quality, it can prevent you from any sort of disturbance. If you want to connect with a larger audience during your Google Meet sessions, you can go for live streaming.
This article will address how to conduct Google Meet live stream through the platform of YouTube. To learn more, continue reading this guide.
- Available Google Workspace Edition
- Approval of YouTube Channel for Live
- Connect your YouTube Channel to Google Meet
- How to Live Stream from Google Meet to YouTube
- Bonus Tip: Easily Record your Google Meet Live Stream
Part 1: Three Things to Check Before Starting Your Live
Before increasing your audience from Google Meet live stream on YouTube, make sure to check the below prerequisites.
1. Available Google Workspace Edition
For Google Meet YouTube live, there are some requirements. The reason is that not every ordinary user of Google Meet can go for YouTube live streaming. To do so, you should buy any of the following pricing plans:
| Google Workspace Pricing Plan | Price |
|---|---|
| Enterprise Starter | Approx. $10/User/Month |
| Enterprise Standard | Approx. $20/User/Month |
| Enterprise Plus | Approx. $30/User/Month |
| Education Plus | Approx. $5/Student/Month |
| Teaching and Learning Upgrade | Approx. $4/License/Month |
| Workspace Individual Subscriber | Approx. $9.9/Month |
| Google One Subscribers with 2 TB or More Storage Space | Approx. $10/Month |
![]()
Note: To know the exact pricing plans of Google Workspace, you have to contact Google Support.
2. Approval of YouTube Channel for Live
To conduct live streaming, you must receive approval from the YouTube channel. For this, you must access your channel’s YouTube Studio to perform the account verification. Now to activate and enable live streaming on your YouTube account, check the following steps:
Step1 Open your YouTube account and click on the “Profile” icon given at the top-right corner. After opening the Profile menu, click on the “YouTube Studio” option.

Step2 A new window will be displayed on your screen. From the left panel, select “Content” among other options. Under the section called “Live,” locate the “Get Started” option. Afterward, tap on the “Request” option and perform the verification steps for enabling live streaming. After 24 hours, you would get approval for live streaming on YouTube. Hence, you would be able to live stream Google Meet meetings through your YouTube channel.

3. Connect your YouTube Channel to Google Meet
Once you get approval for live streaming, you can connect the YouTube channel to your Google Meet account. If the Host Management option is disabled, anyone within the Google Meet session can start live streaming. Conversely, only hosts or co-hosts can begin live streaming if this option is activated. Moreover, the individual who is starting the live stream from Google Meet will get connected to his YouTube channel.
Furthermore, you should use the same email address to enter the Google Meet that is connected to your YouTube account. By using the same email address, you can ensure smooth live streaming of Google Meet sessions to your YouTube channel. Also, you can only use laptops or desktops for initiating live streaming. The reason is that the Google Meet live stream on YouTube is not currently available on mobile devices.
Part 2: How to Live Stream from Google Meet to YouTube
Once you have fulfilled all the requirements, you can start a live stream from Google Meet to YouTube. Check the following steps to execute the process:
Step1 To allow Google Meet sessions to live stream on YouTube, the Google Workspace admin must adjust some settings. To begin, log in to the “Admin Console” on the Workspace administrator account. Now go to “Apps” and access the “Google Workspace” option.
Step2 Afterward, click “Google Meet” and tap on the “Stream” option. Once done, click on the “Pencil” icon to open the Settings menu. Now enable the options “Let People Steam Their Meetings” and “Let People Use YouTube to Stream Meetings.” Once done with the changes, click on the “Save” button.
Step3 Make sure that the Google account attached to your YouTube channel is capable of live streaming. Once done, go to your YouTube channel and tap on the “Create” button. Afterward, hit the “Live” button.
Step4 Now enter your Google Meet session and click on the “Activities” option. From the Activities menu, select “Live Streaming.” Now a small menu will open for live-streaming settings. You can create a new event and add an event title. Make sure to choose the privacy options and desired language. Afterward, click on the “Start Streaming” option.
Step5 A small pop-up will appear that will tell you to remind your participants about live streaming. After reminding, click on the “Start” button. You can see the red “Live” button that will indicate to you the ongoing live-streaming session. Once you have concluded the live streaming by clicking on the “Stop Streaming” button, you can check the video analytics by visiting your YouTube channel.
Bonus Tip: Easily Record your Google Meet Live Stream
Do you want to save your Google Meet live-stream session? The best tool through which you can save your essential live-streaming sessions is Wondershare Filmora Screen Recorder . By using this efficient screen recorder, you can access your saved live streaming session and revise the important points discussed in it.
The screen recorder of Filmora is capable of capturing webcam and screen recording simultaneously. You can select a customized recording area through this tool. For example, you can choose a full screen, a specific window, or a customized area. Furthermore, this screen recording tool can also capture your microphone and system’s sounds in high quality. At the same time, as a powerful video editor, you can edit your videos with various advanced features of Filmora to bring them to the next level. Click the video below to learn more about Filmora’s new features.
Steps to Record Live Streaming Using Filmora Screen Recorder
Are you ready to capture your live-streaming session on Google Meet? Here are the simple and accurate steps to begin the process:
Step1 Open the Screen Recorder
Download Wondershare Filmora and open its interface. Click the “Screen Recorder” option given on the main homepage. By doing so, a screen recorder window will open. Here, you can select screen recording modes such as full-screen, target window, or custom. Also, make sure to choose your system’s audio and microphone to proceed.

Step2 Adjust Settings and Start Recording
From Settings, you can also select the quality, frame rate, and color of mouse clicks. Once you have adjusted all the settings properly, hit the “REC” button.

Step3 End the Recording
After the countdown, the screen recording will begin. To stop the recording, you can press the F9 button from your keyboard. After the recording ends, the file will be dropped into the media library of Filmora.

Conclusion
Google Meet is a reliable environment to connect and collaborate with people. To increase your reach and target audience, you can conduct Google Meet live streaming on YouTube. This article has discussed a detailed way through which you can live stream your Google Meet session on your YouTube channel.
To save and access your live streaming sessions later, you can try the screen recorder of Wondershare Filmora . This screen recorder can capture screen and respective audio in high quality.
Free Download For Win 7 or later(64-bit)
Free Download For macOS 10.14 or later
Part 1: Three Things to Check Before Starting Your Live
Before increasing your audience from Google Meet live stream on YouTube, make sure to check the below prerequisites.
1. Available Google Workspace Edition
For Google Meet YouTube live, there are some requirements. The reason is that not every ordinary user of Google Meet can go for YouTube live streaming. To do so, you should buy any of the following pricing plans:
| Google Workspace Pricing Plan | Price |
|---|---|
| Enterprise Starter | Approx. $10/User/Month |
| Enterprise Standard | Approx. $20/User/Month |
| Enterprise Plus | Approx. $30/User/Month |
| Education Plus | Approx. $5/Student/Month |
| Teaching and Learning Upgrade | Approx. $4/License/Month |
| Workspace Individual Subscriber | Approx. $9.9/Month |
| Google One Subscribers with 2 TB or More Storage Space | Approx. $10/Month |
![]()
Note: To know the exact pricing plans of Google Workspace, you have to contact Google Support.
2. Approval of YouTube Channel for Live
To conduct live streaming, you must receive approval from the YouTube channel. For this, you must access your channel’s YouTube Studio to perform the account verification. Now to activate and enable live streaming on your YouTube account, check the following steps:
Step1 Open your YouTube account and click on the “Profile” icon given at the top-right corner. After opening the Profile menu, click on the “YouTube Studio” option.
Step2 A new window will be displayed on your screen. From the left panel, select “Content” among other options. Under the section called “Live,” locate the “Get Started” option. Afterward, tap on the “Request” option and perform the verification steps for enabling live streaming. After 24 hours, you would get approval for live streaming on YouTube. Hence, you would be able to live stream Google Meet meetings through your YouTube channel.
3. Connect your YouTube Channel to Google Meet
Once you get approval for live streaming, you can connect the YouTube channel to your Google Meet account. If the Host Management option is disabled, anyone within the Google Meet session can start live streaming. Conversely, only hosts or co-hosts can begin live streaming if this option is activated. Moreover, the individual who is starting the live stream from Google Meet will get connected to his YouTube channel.
Furthermore, you should use the same email address to enter the Google Meet that is connected to your YouTube account. By using the same email address, you can ensure smooth live streaming of Google Meet sessions to your YouTube channel. Also, you can only use laptops or desktops for initiating live streaming. The reason is that the Google Meet live stream on YouTube is not currently available on mobile devices.
Part 2: How to Live Stream from Google Meet to YouTube
Once you have fulfilled all the requirements, you can start a live stream from Google Meet to YouTube. Check the following steps to execute the process:
Step1 To allow Google Meet sessions to live stream on YouTube, the Google Workspace admin must adjust some settings. To begin, log in to the “Admin Console” on the Workspace administrator account. Now go to “Apps” and access the “Google Workspace” option.
Step2 Afterward, click “Google Meet” and tap on the “Stream” option. Once done, click on the “Pencil” icon to open the Settings menu. Now enable the options “Let People Steam Their Meetings” and “Let People Use YouTube to Stream Meetings.” Once done with the changes, click on the “Save” button.
Step3 Make sure that the Google account attached to your YouTube channel is capable of live streaming. Once done, go to your YouTube channel and tap on the “Create” button. Afterward, hit the “Live” button.
Step4 Now enter your Google Meet session and click on the “Activities” option. From the Activities menu, select “Live Streaming.” Now a small menu will open for live-streaming settings. You can create a new event and add an event title. Make sure to choose the privacy options and desired language. Afterward, click on the “Start Streaming” option.
Step5 A small pop-up will appear that will tell you to remind your participants about live streaming. After reminding, click on the “Start” button. You can see the red “Live” button that will indicate to you the ongoing live-streaming session. Once you have concluded the live streaming by clicking on the “Stop Streaming” button, you can check the video analytics by visiting your YouTube channel.
Bonus Tip: Easily Record your Google Meet Live Stream
Do you want to save your Google Meet live-stream session? The best tool through which you can save your essential live-streaming sessions is Wondershare Filmora Screen Recorder . By using this efficient screen recorder, you can access your saved live streaming session and revise the important points discussed in it.
The screen recorder of Filmora is capable of capturing webcam and screen recording simultaneously. You can select a customized recording area through this tool. For example, you can choose a full screen, a specific window, or a customized area. Furthermore, this screen recording tool can also capture your microphone and system’s sounds in high quality. At the same time, as a powerful video editor, you can edit your videos with various advanced features of Filmora to bring them to the next level. Click the video below to learn more about Filmora’s new features.
Steps to Record Live Streaming Using Filmora Screen Recorder
Are you ready to capture your live-streaming session on Google Meet? Here are the simple and accurate steps to begin the process:
Step1 Open the Screen Recorder
Download Wondershare Filmora and open its interface. Click the “Screen Recorder” option given on the main homepage. By doing so, a screen recorder window will open. Here, you can select screen recording modes such as full-screen, target window, or custom. Also, make sure to choose your system’s audio and microphone to proceed.
Step2 Adjust Settings and Start Recording
From Settings, you can also select the quality, frame rate, and color of mouse clicks. Once you have adjusted all the settings properly, hit the “REC” button.
Step3 End the Recording
After the countdown, the screen recording will begin. To stop the recording, you can press the F9 button from your keyboard. After the recording ends, the file will be dropped into the media library of Filmora.
Conclusion
Google Meet is a reliable environment to connect and collaborate with people. To increase your reach and target audience, you can conduct Google Meet live streaming on YouTube. This article has discussed a detailed way through which you can live stream your Google Meet session on your YouTube channel.
To save and access your live streaming sessions later, you can try the screen recorder of Wondershare Filmora . This screen recorder can capture screen and respective audio in high quality.
Free Download For Win 7 or later(64-bit)
Free Download For macOS 10.14 or later
Also read:
- [New] 2024 Approved Backtrack with Flair Ingenious Ways to Watch Youtube Reverse
- [New] Bridal Bliss Filmed Alike High-Quality 8 Marriage Videos Online for 2024
- [New] Essential History Series YouTube Recommendations for Learners for 2024
- [New] In 2024, Analyzing Aurora HDR's Impact on Visual Experience
- [New] Tips and Tricks to Elevate Your YouTube Production Through Subtitle Integration
- [Updated] Dive Into DIY The Beginner’s Guide to Eye-Catching Mac Videos for 2024
- [Updated] From Video Lessons to Visual Gigs YouTube Videos Converted Seamlessly
- [Updated] Top Video Shooting Equipment A Comprehensive Review
- 2024 Approved Perfect Spectrum Balancer
- 2024 Approved Youtube to Gif Magic Your Ultimate Guide to Animated Images
- AI Revolution: Which Professions Might Be Abolished?
- Asus ROG Rapture GT-AX1n000 Reviewed – Revolutionary Gaming Speeds and Innovative Functions Explored
- DSLR or Mirrorless for High-Quality Video Recording?
- Fixing the Solution: How to Resolve Low Frame Rate Problems in Outriders
- In 2024, 7 Ways to Unlock a Locked Oppo Phone
- In 2024, How To Leave a Life360 Group On Samsung Galaxy A15 5G Without Anyone Knowing? | Dr.fone
- Resetting Your YouTube Reputation for 2024
- The Complete Guide to Motorola G54 5G FRP Bypass Everything You Need to Know
- The Visual Guide to ASPECT RATIOS on Platforms Like YouTube for 2024
- Title: [Updated] 2024 Approved Crafting Perfect YouTube Music Playlists via Web & Mobile Platforms
- Author: Steven
- Created at : 2024-11-17 19:58:48
- Updated at : 2024-11-23 19:10:49
- Link: https://facebook-record-videos.techidaily.com/updated-2024-approved-crafting-perfect-youtube-music-playlists-via-web-and-mobile-platforms/
- License: This work is licensed under CC BY-NC-SA 4.0.