"Optimizing Video Income on Youtube A Practical Guide for 2024"
Optimizing Video Income on Youtube: A Practical Guide
YouTube is a widely beloved platform that appeals to individuals of all age groups. If you understand how to harness its potential, YouTube can become a source of income. Generating income from YouTube videos becomes simple through YouTube video monetization. If you’re keen on monetizing your YouTube account, this article is your guide. You can turn it into a part-time gig or a full-time profession, potentially earning a solid income.
To earn well, your content must align with what viewers truly desire. Read this article to learn about how you can monetize YouTube videos, its rules, and requirements.
YouTube Monetization Helper Create the conditions for effective YouTube monetization with Wondershare Filmora!
Free Download Free Download Learn More


Part 1. How to Get Monetized on YouTube: Rules and Requirements
 Allavsoft Batch Download Online Videos, Music Offline to MP4, MP3, MOV, etc format
How to Monetize YouTube Channel
Begin making money from your YouTube videos through the YouTube Partner Program. You can create earnings from your YouTube channel by connecting it to your Google account. Monetize your website using Google AdSense.
Google AdSense generates substantial website revenue. If viewers interact with the ads in your videos, you earn money. Adding AdSense to your YouTube channel makes your videos monetizable.
Some videos cannot be monetized, however. Content must meet specific requirements to qualify for YouTube’s program. Criteria include content quality, community guidelines, and copyright compliance. Your YouTube channel can generate income once your videos meet these standards.

Monetizing YouTube Videos: What Are The Requirements?
You can monetize your YouTube videos by joining the YouTube Partner Program. Everyone can create a YouTube account, but YPP requires certain requirements. Every time you create content, you must consider these requirements.
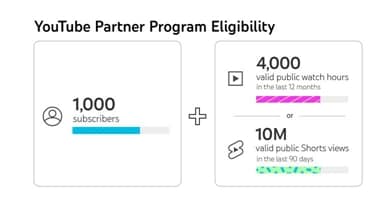
Prior to applying for the program, your channel must first accomplish the following:
- One thousand subscribers
- A total of 4,000 watch hours in the past year
Building your audience and creating great content will help you meet these requirements. Joining the YPP, and making sure your YouTube channel complies with YouTube’s rules and policies, is the more complicated aspect.
Those advertising on YouTube want to avoid being linked to low-quality content. Therefore, YouTube Partner Program members are encouraged to create unique, valuable videos.
When you upload content to YouTube, you’ll need to keep these things in mind. Those who plan on monetizing their videos should thoroughly read these documents. You also need to set up a Google AdSense account, which tracks and pays for your YouTube ads.

 /a>
/a>Part 2. 10 Proven Ways to Monetize Your YouTube Channel

10 Methods to Monetize YouTube Videos
You can monetize your YouTube videos in 10 different ways, including:
- Google Adsense
- Paid Sponsorship
- YouTube Premium
- Memberships
- Merchandise
- Invest in crowd-funding
- Stickers, chats, and thanks
- YouTube Shorts
- YouTube Brandconnect
- YouTube Shopping
1. Google AdSense
YouTube channel monetization is the most popular method. By adding AdSense to your videos, you can generate revenue from the ads displayed. You must adhere to our advertiser-friendly guidelines when creating your videos. The monetization of all videos may not be possible, therefore. YouTube and AdSense work seamlessly together. With no technical knowledge required, your monetization strategy can be set up and managed easily.

2. Paid Sponsorships
Sponsorship involves paying a content creator to use, demonstrate, or test a brand’s product in a video. Both the creator and the brand benefit from sponsorships provided by brands.
The rewards of sponsorship can be immense, but sponsorships are hard to come by. You can pitch relevant brands to partner with your influential channel if your channel has a large following.

3. YouTube Premium
Joining the YouTube Partner Program qualifies you for YouTube Premium. In addition, it can increase your earnings. YouTube Premium members get paid when they watch your content as a creator. The number of Premium members has now surpassed 20 million. It is possible that this may occur quite frequently. YouTube Premium will automatically pay you if someone watches your content.


4. Memberships
Creating membership tiers on your channel allows you to offer different perks to different levels of subscription. Using memberships has the main benefit of providing a more steady income stream. Ad revenue is a more traditional method of monetization. This feature is enabled by channels with at least 1,000 subscribers, and the creator sets fees.

5. Merchandise
You can sell merchandise on YouTube videos with over 10,000 subscribers using a merch shelf. By selling branded merchandise to your YouTube fans, you can generate additional revenue.
It’s especially useful for YouTube creators without their own website who want to sell merchandise. Currently, there are over 45 platforms or retailers worldwide that support merch, so growing your brand is easy.
6. Invest in crowd-funding
It’s not just for startups anymore; you can use crowdfunding to fund content creation on YouTube as well. You can find people to support your work through third-party applications like Patreon in exchange for perks. You can now place sponsor buttons on your YouTube videos, which allows you to crowdfund. With this, you can offer rewards in exchange for monthly funding like with Patreon.
7. Stickers, chats, and thanks
During live streams and premieres, creators can engage their fans with Super Chat and Super Stickers. In the live chat, fans can purchase Super Chats to display their message prominently. A Super Sticker is an animated image displayed during a live chat session. The Super Thanks feature enables creators to earn income from their videos. Additional appreciation may be expressed by those who wish to do so
8. YouTube Shorts
Using the YouTube app, short, vertical videos can be uploaded straight to YouTube using a smartphone. In the same way as Instagram Stories are uploaded to the social media site. The length of YouTube shorts is limited to 60 seconds. In 2021 and 2022, a $100 million fund will be distributed for YouTube Shorts. With this initial stage, YouTube Shorts began to monetize in May 2021. A YouTube Short will only be compensated if it meets the fund’s criteria.

9. YouTube BrandConnect
Brands and YouTube creators can work together on content campaigns through YouTube BrandConnect. In terms of product recommendations, audiences trust creators. It is also possible to partner with YouTube channels through BrandConnect
10. YouTube Shopping
YouTube shopping gives you the chance to promote your own products or those of other brands. It is possible to connect your store (such as Shopify) to YouTube. Add your products to videos, shorts, live streams, etc., as well as tag other brands’ products.
Part 3. Wondershare Filmora: A Video Editing Software to Help Edit YouTube Videos
Wondershare Filmora is your creative ally when it comes to enhancing and editing YouTube videos. Video editing software like Filmora allows you to produce visually engaging and captivating content. Creating the conditions for effective YouTube monetization.
Filmora is cross-platform compatible. Making it accessible for all creators, so you can work on your videos wherever you are. With Filmora, you can enhance your video content no matter what platform you’re using.
Edit YouTube videos with Filmora’s features
Using Filmora’s features, you can give your videos a professional edge.
Free Download For Win 7 or later(64-bit)
Free Download For macOS 10.14 or later
Adjustment Layer
Take the Adjustment Layer feature, for instance, which allows you to add general effects to multiple video clips simultaneously, saving you time and effort. This feature can make your video content more engaging, ultimately attracting a larger audience.
Split Screen
You can create eye-catching split-screen videos with Filmora’s Split Screen Video Editor. Simply click a button to create split-screen videos using premade templates. Enhancing the visual appeal and dynamic of your videos for easy monetization on YouTube.
Motion Tracking
Motion Tracking is another exciting feature that Filmora brings to the table. It enables you to track the movement of objects within your videos and pin graphics and media files to follow the motion magically. This not only adds a touch of professionalism to your videos but also keeps your audience engaged.
Video Effects
Filmora offers a treasure trove of creative possibilities with its Video Effects, including transitions, filters, titles, and motion elements that you won’t find elsewhere. These exclusive features will help you infuse your videos with creativity and style.
Mask and Blend
And let’s not forget the Mask and Blend feature, which allows you to create unique video effects by masking and blending video clips. With only a few clicks, you can create distinct video effects that will set your content apart.
Wondershare Filmora empowers you to take your YouTube videos to the next level. making them more visually appealing, engaging, and ultimately better suited for monetization.
Try Filmora out Free! Click here!
Free Download For Win 7 or later(64-bit)
Free Download For macOS 10.14 or later
 vMix 4K - Software based live production. vMix 4K includes everything in vMix HD plus 4K support, PTZ control, External/Fullscreen output, 4 Virtual Outputs, 1 Replay, 4 vMix Call, and 2 Recorders.
Conclusion
For those aspiring to turn their passion into a source of income, YouTube is a treasure trove of opportunities. This comprehensive 2024 guide has shed light on the path to monetizing your YouTube channel. With Google AdSense, paid sponsorships, and YouTube Premium, you’ve learned the ropes of the YouTube Partner Program.
With Wondershare Filmora‘s user-friendly tools, your videos will stand out on a professional level. As a result, your YouTube dreams will become a reality in 2024 with dedication and these insights.
Free Download Free Download Learn More
Part 1. How to Get Monetized on YouTube: Rules and Requirements
How to Monetize YouTube Channel
Begin making money from your YouTube videos through the YouTube Partner Program. You can create earnings from your YouTube channel by connecting it to your Google account. Monetize your website using Google AdSense.
Google AdSense generates substantial website revenue. If viewers interact with the ads in your videos, you earn money. Adding AdSense to your YouTube channel makes your videos monetizable.
Some videos cannot be monetized, however. Content must meet specific requirements to qualify for YouTube’s program. Criteria include content quality, community guidelines, and copyright compliance. Your YouTube channel can generate income once your videos meet these standards.

You can monetize your YouTube videos by joining the YouTube Partner Program. Everyone can create a YouTube account, but YPP requires certain requirements. Every time you create content, you must consider these requirements.
Prior to applying for the program, your channel must first accomplish the following:
- One thousand subscribers
- A total of 4,000 watch hours in the past year
Building your audience and creating great content will help you meet these requirements. Joining the YPP, and making sure your YouTube channel complies with YouTube’s rules and policies, is the more complicated aspect.
Those advertising on YouTube want to avoid being linked to low-quality content. Therefore, YouTube Partner Program members are encouraged to create unique, valuable videos.
When you upload content to YouTube, you’ll need to keep these things in mind. Those who plan on monetizing their videos should thoroughly read these documents. You also need to set up a Google AdSense account, which tracks and pays for your YouTube ads.
Part 2. 10 Proven Ways to Monetize Your YouTube Channel
10 Methods to Monetize YouTube Videos
You can monetize your YouTube videos in 10 different ways, including:
- Google Adsense
- Paid Sponsorship
- YouTube Premium
- Memberships
- Merchandise
- Invest in crowd-funding
- Stickers, chats, and thanks
- YouTube Shorts
- YouTube Brandconnect
- YouTube Shopping
1. Google AdSense
YouTube channel monetization is the most popular method. By adding AdSense to your videos, you can generate revenue from the ads displayed. You must adhere to our advertiser-friendly guidelines when creating your videos. The monetization of all videos may not be possible, therefore. YouTube and AdSense work seamlessly together. With no technical knowledge required, your monetization strategy can be set up and managed easily.
2. Paid Sponsorships
Sponsorship involves paying a content creator to use, demonstrate, or test a brand’s product in a video. Both the creator and the brand benefit from sponsorships provided by brands.
The rewards of sponsorship can be immense, but sponsorships are hard to come by. You can pitch relevant brands to partner with your influential channel if your channel has a large following.
3. YouTube Premium
Joining the YouTube Partner Program qualifies you for YouTube Premium. In addition, it can increase your earnings. YouTube Premium members get paid when they watch your content as a creator. The number of Premium members has now surpassed 20 million. It is possible that this may occur quite frequently. YouTube Premium will automatically pay you if someone watches your content.
4. Memberships
Creating membership tiers on your channel allows you to offer different perks to different levels of subscription. Using memberships has the main benefit of providing a more steady income stream. Ad revenue is a more traditional method of monetization. This feature is enabled by channels with at least 1,000 subscribers, and the creator sets fees.
5. Merchandise
You can sell merchandise on YouTube videos with over 10,000 subscribers using a merch shelf. By selling branded merchandise to your YouTube fans, you can generate additional revenue.
It’s especially useful for YouTube creators without their own website who want to sell merchandise. Currently, there are over 45 platforms or retailers worldwide that support merch, so growing your brand is easy.
6. Invest in crowd-funding
It’s not just for startups anymore; you can use crowdfunding to fund content creation on YouTube as well. You can find people to support your work through third-party applications like Patreon in exchange for perks. You can now place sponsor buttons on your YouTube videos, which allows you to crowdfund. With this, you can offer rewards in exchange for monthly funding like with Patreon.
 Glary Utilities PRO - Premium all-in-one utility to clean, speed up, maintain and protect your PC
7. Stickers, chats, and thanks
During live streams and premieres, creators can engage their fans with Super Chat and Super Stickers. In the live chat, fans can purchase Super Chats to display their message prominently. A Super Sticker is an animated image displayed during a live chat session. The Super Thanks feature enables creators to earn income from their videos. Additional appreciation may be expressed by those who wish to do so
8. YouTube Shorts
Using the YouTube app, short, vertical videos can be uploaded straight to YouTube using a smartphone. In the same way as Instagram Stories are uploaded to the social media site. The length of YouTube shorts is limited to 60 seconds. In 2021 and 2022, a $100 million fund will be distributed for YouTube Shorts. With this initial stage, YouTube Shorts began to monetize in May 2021. A YouTube Short will only be compensated if it meets the fund’s criteria.
9. YouTube BrandConnect
Brands and YouTube creators can work together on content campaigns through YouTube BrandConnect. In terms of product recommendations, audiences trust creators. It is also possible to partner with YouTube channels through BrandConnect
10. YouTube Shopping
YouTube shopping gives you the chance to promote your own products or those of other brands. It is possible to connect your store (such as Shopify) to YouTube. Add your products to videos, shorts, live streams, etc., as well as tag other brands’ products.
Part 3. Wondershare Filmora: A Video Editing Software to Help Edit YouTube Videos
Wondershare Filmora is your creative ally when it comes to enhancing and editing YouTube videos. Video editing software like Filmora allows you to produce visually engaging and captivating content. Creating the conditions for effective YouTube monetization.
Filmora is cross-platform compatible. Making it accessible for all creators, so you can work on your videos wherever you are. With Filmora, you can enhance your video content no matter what platform you’re using.
Edit YouTube videos with Filmora’s features
Using Filmora’s features, you can give your videos a professional edge.
Free Download For Win 7 or later(64-bit)
Free Download For macOS 10.14 or later
Adjustment Layer
Take the Adjustment Layer feature, for instance, which allows you to add general effects to multiple video clips simultaneously, saving you time and effort. This feature can make your video content more engaging, ultimately attracting a larger audience.
Split Screen
You can create eye-catching split-screen videos with Filmora’s Split Screen Video Editor. Simply click a button to create split-screen videos using premade templates. Enhancing the visual appeal and dynamic of your videos for easy monetization on YouTube.
Motion Tracking
Motion Tracking is another exciting feature that Filmora brings to the table. It enables you to track the movement of objects within your videos and pin graphics and media files to follow the motion magically. This not only adds a touch of professionalism to your videos but also keeps your audience engaged.
Video Effects
Filmora offers a treasure trove of creative possibilities with its Video Effects, including transitions, filters, titles, and motion elements that you won’t find elsewhere. These exclusive features will help you infuse your videos with creativity and style.
Mask and Blend
And let’s not forget the Mask and Blend feature, which allows you to create unique video effects by masking and blending video clips. With only a few clicks, you can create distinct video effects that will set your content apart.
Wondershare Filmora empowers you to take your YouTube videos to the next level. making them more visually appealing, engaging, and ultimately better suited for monetization.
Try Filmora out Free! Click here!
Free Download For Win 7 or later(64-bit)
Free Download For macOS 10.14 or later
Conclusion
For those aspiring to turn their passion into a source of income, YouTube is a treasure trove of opportunities. This comprehensive 2024 guide has shed light on the path to monetizing your YouTube channel. With Google AdSense, paid sponsorships, and YouTube Premium, you’ve learned the ropes of the YouTube Partner Program.
With Wondershare Filmora‘s user-friendly tools, your videos will stand out on a professional level. As a result, your YouTube dreams will become a reality in 2024 with dedication and these insights.
 Power Tools add-on for Google Sheets, Lifetime subscription
How Do I Use Adobe Premiere To Upload YouTube Videos?
How Do I Use Adobe Premiere To Upload YouTube Videos?

Benjamin Arango
Mar 27, 2024• Proven solutions
Whilst getting the editing and post work just right on any project is what we all aim for, the ultimate aim is for other people to see our creations, and the most popular way to achieve that is YouTube . Chances are, if you are producing video, you will be putting some of it on YouTube at some point, so let’s have a look at the most efficient way to get your work from Premiere to YouTube.
Check if your computer meet the Premiere System Requirements >>
This is a basic tutorial about Adobe Premiere, professional video editing software. However, if video editing is new to you, consider Wondershare Filmora , which is a powerful but easy-to-use tool for users just starting out. Download the free trial version below.
 Download Mac Version ](https://tools.techidaily.com/wondershare/filmora/download/ )
How Do I Use Adobe Premiere To Upload YouTube Videos
1. Master Copy
Before exporting your work, it is important to first create a master copy of your project that is ‘as is’, in that it reflects the settings and codecs used in the original footage.
To do this you simply select the sequence within the Timeline or in the Project Panel, and go through the menu tree via File > Export > Media to bring up the export dialogue.

To create your Master Copy, simply select the first option of ‘Match Sequence Settings’, this exports a file that is of the same quality as your original footage, essentially producing a digital copy of the work for archiving before anything else is done.
With you work safe and secure it is now time to look at ensuring the project is suitable for YouTube. With our sequence selected in the Timeline or Project Panel again, we go through the same File > Export > Media path to bring up the media export dialogue as before.
2. Container
The first option we have to consider is the file format that our finished video needs to be in. Here you should refer to YouTube for its guidelines, whilst they do accept a number of file formats, digging through the YouTube help system to find the settings for highest quality we find that they recommend MPEG4 as the container, using the codec.

WPS Office Premium ( File Recovery, Photo Scanning, Convert PDF)–Yearly

We can also see further recommended settings in this screenshot that will be covered later.
The good news is that Premiere automatically selects the appropriate container for us when we select our codec, however it is worth knowing the file type YouTube is expecting just to check yourself.
3. Video Codec
So having established that YouTube recommends the MPEG4 container using the codec, the first option we need to look for in the media export dialogue is to select the appropriate Format.
This is the first drop down in the dialogue box, and in this case we simply select from the list.
 Easy GIF Animator is a powerful animated GIF editor and the top tool for creating animated pictures, banners, buttons and GIF videos. You get extensive animation editing features, animation effects, unmatched image quality and optimization for the web. No other GIF animation software matches our features and ease of use, that’s why Easy GIF Animator is so popular.
Once you select you can check the ‘output name’ field and see that premiere is automatically set the output file to .mp4 which is exactly what we need.
4. Preset
The next field we come to is the ‘Preset’ dropdown menu. This is a major help to most people, as Adobe have very kindly included large numbers of presets to quickly adapt video settings to suit specific uses. They vary depending on the exact version of Premiere you are using, and each format type does have its own list of presets, as we can see has a large number for YouTube, but also has many presets for specific devices (presets for iPad, Kindle, Nook, various other tablets and phones, Vimeo and a host of others) to make getting the right settings that bit easier for us.

It is important here to select the correct preset from the various YouTube options. You want to select the resolution and frame rate that match your source file, for the best results. So, if your source file is 1080p with a frame rate of 29.97 fps then that is the YouTube setting you would select.
Once a preset is selected a summary of the settings is displayed below, normally these will be well suited to your project, however you can fine tune anything you wish by selecting the video or audio tabs at the bottom which give you the chance to adjust each parameter individually. If you do this, you can save these changes as a custom preset by clicking the button at the side of the Preset dropdown menu and simply use it on later projects by selecting it from the list the same as any other, a great time saving tool.

5. Rendering
Once you are satisfied with the settings, either from the Preset alone or if you have adjusted anything yourself, you are nearly ready to render the file and export it.
For YouTube it is recommended you select the ‘Use Maximum Render Quality’ option to maintain the best output you can, it does add time to the render process but if you value the quality of your work it is worthwhile.
Finally you can choose a suitable filename and the destination of the file by clicking on the ‘Output Name’ field.
I normally use a filename that includes the destination medium so I can differentiate between different versions of a project and know which one to upload where, in this case I include ‘youtube’, but if I were planning on uploading clips of the project to vimeo as well for instance there may be a cut of the project with ‘vimeo’ in the name too. The destination is personal preference, because I do use filenames to differentiate versions I can put the various iterations into a single project file, others have folder structures for each type of file , so all YouTube output goes into a single folder and so on, how you organize is entirely dependent on how you work.

Once those are selected clicking ‘Export’ starts the rendering process, and eventually (how long depends on the speed of your computer and the size and type of file involved), you will end up with your YouTube optimized video in the location you chose.
Here I created 4 key frames that let the ‘Animation’ object move around the ‘Demo Text’ Object and finally come to rest below it. Whilst this type of effect does look very effective on screen, such is the ease of use of After Effects it really is just a few minutes work to achieve.
Learn more details about How to add text in Premiere >>
6. Uploading
Now you have your file, the next step is to go to your YouTube account and log in if you need to.
On the top of your homepage on the right is the upload button, selecting that brings up the select file menu as below.

You can either drag your file into the window or click on it to open a standard file browser to locate the desired file, click and the upload will begin. The dropdown underneath allows you to set the video as Public, Unlisted or Private. You can change this at any time once the video is uploaded as well.
This opens the upload progress window, where you can add in a name, description and tags as well as add the video to a playlist or adjust the privacy settings as the video is uploading.
 With Screensaver Wonder you can easily make a screensaver from your own pictures and video files. Create screensavers for your own computer or create standalone, self-installing screensavers for easy sharing with your friends. Together with its sister product Screensaver Factory, Screensaver Wonder is one of the most popular screensaver software products in the world, helping thousands of users decorate their computer screens quickly and easily.
Once the upload as finished, you can do final adjustments to settings and choose a thumbnail for the video. The final step is to click the ‘Publish’ button and your video will be processed and go live.

Benjamin Arango
Benjamin Arango is a writer and a lover of all things video.
Follow @Benjamin Arango
Benjamin Arango
Mar 27, 2024• Proven solutions
Whilst getting the editing and post work just right on any project is what we all aim for, the ultimate aim is for other people to see our creations, and the most popular way to achieve that is YouTube . Chances are, if you are producing video, you will be putting some of it on YouTube at some point, so let’s have a look at the most efficient way to get your work from Premiere to YouTube.
Check if your computer meet the Premiere System Requirements >>
This is a basic tutorial about Adobe Premiere, professional video editing software. However, if video editing is new to you, consider Wondershare Filmora , which is a powerful but easy-to-use tool for users just starting out. Download the free trial version below.

WPS Office Premium ( File Recovery, Photo Scanning, Convert PDF)–Yearly
Download Mac Version ](https://tools.techidaily.com/wondershare/filmora/download/ )
How Do I Use Adobe Premiere To Upload YouTube Videos
1. Master Copy
Before exporting your work, it is important to first create a master copy of your project that is ‘as is’, in that it reflects the settings and codecs used in the original footage.
To do this you simply select the sequence within the Timeline or in the Project Panel, and go through the menu tree via File > Export > Media to bring up the export dialogue.
To create your Master Copy, simply select the first option of ‘Match Sequence Settings’, this exports a file that is of the same quality as your original footage, essentially producing a digital copy of the work for archiving before anything else is done.
With you work safe and secure it is now time to look at ensuring the project is suitable for YouTube. With our sequence selected in the Timeline or Project Panel again, we go through the same File > Export > Media path to bring up the media export dialogue as before.
2. Container
The first option we have to consider is the file format that our finished video needs to be in. Here you should refer to YouTube for its guidelines, whilst they do accept a number of file formats, digging through the YouTube help system to find the settings for highest quality we find that they recommend MPEG4 as the container, using the codec.
We can also see further recommended settings in this screenshot that will be covered later.
The good news is that Premiere automatically selects the appropriate container for us when we select our codec, however it is worth knowing the file type YouTube is expecting just to check yourself.
3. Video Codec
So having established that YouTube recommends the MPEG4 container using the codec, the first option we need to look for in the media export dialogue is to select the appropriate Format.
This is the first drop down in the dialogue box, and in this case we simply select from the list.

Once you select you can check the ‘output name’ field and see that premiere is automatically set the output file to .mp4 which is exactly what we need.
4. Preset
The next field we come to is the ‘Preset’ dropdown menu. This is a major help to most people, as Adobe have very kindly included large numbers of presets to quickly adapt video settings to suit specific uses. They vary depending on the exact version of Premiere you are using, and each format type does have its own list of presets, as we can see has a large number for YouTube, but also has many presets for specific devices (presets for iPad, Kindle, Nook, various other tablets and phones, Vimeo and a host of others) to make getting the right settings that bit easier for us.
It is important here to select the correct preset from the various YouTube options. You want to select the resolution and frame rate that match your source file, for the best results. So, if your source file is 1080p with a frame rate of 29.97 fps then that is the YouTube setting you would select.
Once a preset is selected a summary of the settings is displayed below, normally these will be well suited to your project, however you can fine tune anything you wish by selecting the video or audio tabs at the bottom which give you the chance to adjust each parameter individually. If you do this, you can save these changes as a custom preset by clicking the button at the side of the Preset dropdown menu and simply use it on later projects by selecting it from the list the same as any other, a great time saving tool.
5. Rendering
Once you are satisfied with the settings, either from the Preset alone or if you have adjusted anything yourself, you are nearly ready to render the file and export it.
For YouTube it is recommended you select the ‘Use Maximum Render Quality’ option to maintain the best output you can, it does add time to the render process but if you value the quality of your work it is worthwhile.
Finally you can choose a suitable filename and the destination of the file by clicking on the ‘Output Name’ field.
I normally use a filename that includes the destination medium so I can differentiate between different versions of a project and know which one to upload where, in this case I include ‘youtube’, but if I were planning on uploading clips of the project to vimeo as well for instance there may be a cut of the project with ‘vimeo’ in the name too. The destination is personal preference, because I do use filenames to differentiate versions I can put the various iterations into a single project file, others have folder structures for each type of file , so all YouTube output goes into a single folder and so on, how you organize is entirely dependent on how you work.

Once those are selected clicking ‘Export’ starts the rendering process, and eventually (how long depends on the speed of your computer and the size and type of file involved), you will end up with your YouTube optimized video in the location you chose.
Here I created 4 key frames that let the ‘Animation’ object move around the ‘Demo Text’ Object and finally come to rest below it. Whilst this type of effect does look very effective on screen, such is the ease of use of After Effects it really is just a few minutes work to achieve.
Learn more details about How to add text in Premiere >>
6. Uploading
Now you have your file, the next step is to go to your YouTube account and log in if you need to.
On the top of your homepage on the right is the upload button, selecting that brings up the select file menu as below.
You can either drag your file into the window or click on it to open a standard file browser to locate the desired file, click and the upload will begin. The dropdown underneath allows you to set the video as Public, Unlisted or Private. You can change this at any time once the video is uploaded as well.
This opens the upload progress window, where you can add in a name, description and tags as well as add the video to a playlist or adjust the privacy settings as the video is uploading.
Once the upload as finished, you can do final adjustments to settings and choose a thumbnail for the video. The final step is to click the ‘Publish’ button and your video will be processed and go live.
Benjamin Arango
Benjamin Arango is a writer and a lover of all things video.
Follow @Benjamin Arango
Benjamin Arango
Mar 27, 2024• Proven solutions
Whilst getting the editing and post work just right on any project is what we all aim for, the ultimate aim is for other people to see our creations, and the most popular way to achieve that is YouTube . Chances are, if you are producing video, you will be putting some of it on YouTube at some point, so let’s have a look at the most efficient way to get your work from Premiere to YouTube.
Check if your computer meet the Premiere System Requirements >>
This is a basic tutorial about Adobe Premiere, professional video editing software. However, if video editing is new to you, consider Wondershare Filmora , which is a powerful but easy-to-use tool for users just starting out. Download the free trial version below.
 CollageIt Pro
Download Mac Version ](https://tools.techidaily.com/wondershare/filmora/download/ )
How Do I Use Adobe Premiere To Upload YouTube Videos
1. Master Copy
Before exporting your work, it is important to first create a master copy of your project that is ‘as is’, in that it reflects the settings and codecs used in the original footage.
To do this you simply select the sequence within the Timeline or in the Project Panel, and go through the menu tree via File > Export > Media to bring up the export dialogue.
To create your Master Copy, simply select the first option of ‘Match Sequence Settings’, this exports a file that is of the same quality as your original footage, essentially producing a digital copy of the work for archiving before anything else is done.
With you work safe and secure it is now time to look at ensuring the project is suitable for YouTube. With our sequence selected in the Timeline or Project Panel again, we go through the same File > Export > Media path to bring up the media export dialogue as before.
2. Container
The first option we have to consider is the file format that our finished video needs to be in. Here you should refer to YouTube for its guidelines, whilst they do accept a number of file formats, digging through the YouTube help system to find the settings for highest quality we find that they recommend MPEG4 as the container, using the codec.

We can also see further recommended settings in this screenshot that will be covered later.
The good news is that Premiere automatically selects the appropriate container for us when we select our codec, however it is worth knowing the file type YouTube is expecting just to check yourself.
3. Video Codec
So having established that YouTube recommends the MPEG4 container using the codec, the first option we need to look for in the media export dialogue is to select the appropriate Format.
This is the first drop down in the dialogue box, and in this case we simply select from the list.
Once you select you can check the ‘output name’ field and see that premiere is automatically set the output file to .mp4 which is exactly what we need.
4. Preset
The next field we come to is the ‘Preset’ dropdown menu. This is a major help to most people, as Adobe have very kindly included large numbers of presets to quickly adapt video settings to suit specific uses. They vary depending on the exact version of Premiere you are using, and each format type does have its own list of presets, as we can see has a large number for YouTube, but also has many presets for specific devices (presets for iPad, Kindle, Nook, various other tablets and phones, Vimeo and a host of others) to make getting the right settings that bit easier for us.
It is important here to select the correct preset from the various YouTube options. You want to select the resolution and frame rate that match your source file, for the best results. So, if your source file is 1080p with a frame rate of 29.97 fps then that is the YouTube setting you would select.
Once a preset is selected a summary of the settings is displayed below, normally these will be well suited to your project, however you can fine tune anything you wish by selecting the video or audio tabs at the bottom which give you the chance to adjust each parameter individually. If you do this, you can save these changes as a custom preset by clicking the button at the side of the Preset dropdown menu and simply use it on later projects by selecting it from the list the same as any other, a great time saving tool.
5. Rendering
Once you are satisfied with the settings, either from the Preset alone or if you have adjusted anything yourself, you are nearly ready to render the file and export it.
For YouTube it is recommended you select the ‘Use Maximum Render Quality’ option to maintain the best output you can, it does add time to the render process but if you value the quality of your work it is worthwhile.
Finally you can choose a suitable filename and the destination of the file by clicking on the ‘Output Name’ field.
I normally use a filename that includes the destination medium so I can differentiate between different versions of a project and know which one to upload where, in this case I include ‘youtube’, but if I were planning on uploading clips of the project to vimeo as well for instance there may be a cut of the project with ‘vimeo’ in the name too. The destination is personal preference, because I do use filenames to differentiate versions I can put the various iterations into a single project file, others have folder structures for each type of file , so all YouTube output goes into a single folder and so on, how you organize is entirely dependent on how you work.
Once those are selected clicking ‘Export’ starts the rendering process, and eventually (how long depends on the speed of your computer and the size and type of file involved), you will end up with your YouTube optimized video in the location you chose.
Here I created 4 key frames that let the ‘Animation’ object move around the ‘Demo Text’ Object and finally come to rest below it. Whilst this type of effect does look very effective on screen, such is the ease of use of After Effects it really is just a few minutes work to achieve.
Learn more details about How to add text in Premiere >>
6. Uploading
Now you have your file, the next step is to go to your YouTube account and log in if you need to.
On the top of your homepage on the right is the upload button, selecting that brings up the select file menu as below.

You can either drag your file into the window or click on it to open a standard file browser to locate the desired file, click and the upload will begin. The dropdown underneath allows you to set the video as Public, Unlisted or Private. You can change this at any time once the video is uploaded as well.
This opens the upload progress window, where you can add in a name, description and tags as well as add the video to a playlist or adjust the privacy settings as the video is uploading.
Once the upload as finished, you can do final adjustments to settings and choose a thumbnail for the video. The final step is to click the ‘Publish’ button and your video will be processed and go live.
Benjamin Arango
Benjamin Arango is a writer and a lover of all things video.
Follow @Benjamin Arango
Benjamin Arango
Mar 27, 2024• Proven solutions
Whilst getting the editing and post work just right on any project is what we all aim for, the ultimate aim is for other people to see our creations, and the most popular way to achieve that is YouTube . Chances are, if you are producing video, you will be putting some of it on YouTube at some point, so let’s have a look at the most efficient way to get your work from Premiere to YouTube.
Check if your computer meet the Premiere System Requirements >>
This is a basic tutorial about Adobe Premiere, professional video editing software. However, if video editing is new to you, consider Wondershare Filmora , which is a powerful but easy-to-use tool for users just starting out. Download the free trial version below.
Download Mac Version ](https://tools.techidaily.com/wondershare/filmora/download/ )
 Epubor Audible Converter for Win: Download and convert Audible AAXC/AA/AAX to MP3 with 100% original quality preserved.
How Do I Use Adobe Premiere To Upload YouTube Videos
1. Master Copy
Before exporting your work, it is important to first create a master copy of your project that is ‘as is’, in that it reflects the settings and codecs used in the original footage.
To do this you simply select the sequence within the Timeline or in the Project Panel, and go through the menu tree via File > Export > Media to bring up the export dialogue.
To create your Master Copy, simply select the first option of ‘Match Sequence Settings’, this exports a file that is of the same quality as your original footage, essentially producing a digital copy of the work for archiving before anything else is done.
With you work safe and secure it is now time to look at ensuring the project is suitable for YouTube. With our sequence selected in the Timeline or Project Panel again, we go through the same File > Export > Media path to bring up the media export dialogue as before.
2. Container
The first option we have to consider is the file format that our finished video needs to be in. Here you should refer to YouTube for its guidelines, whilst they do accept a number of file formats, digging through the YouTube help system to find the settings for highest quality we find that they recommend MPEG4 as the container, using the codec.

We can also see further recommended settings in this screenshot that will be covered later.
The good news is that Premiere automatically selects the appropriate container for us when we select our codec, however it is worth knowing the file type YouTube is expecting just to check yourself.
3. Video Codec
So having established that YouTube recommends the MPEG4 container using the codec, the first option we need to look for in the media export dialogue is to select the appropriate Format.
This is the first drop down in the dialogue box, and in this case we simply select from the list.
Once you select you can check the ‘output name’ field and see that premiere is automatically set the output file to .mp4 which is exactly what we need.
4. Preset
The next field we come to is the ‘Preset’ dropdown menu. This is a major help to most people, as Adobe have very kindly included large numbers of presets to quickly adapt video settings to suit specific uses. They vary depending on the exact version of Premiere you are using, and each format type does have its own list of presets, as we can see has a large number for YouTube, but also has many presets for specific devices (presets for iPad, Kindle, Nook, various other tablets and phones, Vimeo and a host of others) to make getting the right settings that bit easier for us.
 Greeting Card Builder
It is important here to select the correct preset from the various YouTube options. You want to select the resolution and frame rate that match your source file, for the best results. So, if your source file is 1080p with a frame rate of 29.97 fps then that is the YouTube setting you would select.
Once a preset is selected a summary of the settings is displayed below, normally these will be well suited to your project, however you can fine tune anything you wish by selecting the video or audio tabs at the bottom which give you the chance to adjust each parameter individually. If you do this, you can save these changes as a custom preset by clicking the button at the side of the Preset dropdown menu and simply use it on later projects by selecting it from the list the same as any other, a great time saving tool.
5. Rendering
Once you are satisfied with the settings, either from the Preset alone or if you have adjusted anything yourself, you are nearly ready to render the file and export it.
For YouTube it is recommended you select the ‘Use Maximum Render Quality’ option to maintain the best output you can, it does add time to the render process but if you value the quality of your work it is worthwhile.
Finally you can choose a suitable filename and the destination of the file by clicking on the ‘Output Name’ field.
I normally use a filename that includes the destination medium so I can differentiate between different versions of a project and know which one to upload where, in this case I include ‘youtube’, but if I were planning on uploading clips of the project to vimeo as well for instance there may be a cut of the project with ‘vimeo’ in the name too. The destination is personal preference, because I do use filenames to differentiate versions I can put the various iterations into a single project file, others have folder structures for each type of file , so all YouTube output goes into a single folder and so on, how you organize is entirely dependent on how you work.

Once those are selected clicking ‘Export’ starts the rendering process, and eventually (how long depends on the speed of your computer and the size and type of file involved), you will end up with your YouTube optimized video in the location you chose.
Here I created 4 key frames that let the ‘Animation’ object move around the ‘Demo Text’ Object and finally come to rest below it. Whilst this type of effect does look very effective on screen, such is the ease of use of After Effects it really is just a few minutes work to achieve.
Learn more details about How to add text in Premiere >>
6. Uploading
Now you have your file, the next step is to go to your YouTube account and log in if you need to.
On the top of your homepage on the right is the upload button, selecting that brings up the select file menu as below.
You can either drag your file into the window or click on it to open a standard file browser to locate the desired file, click and the upload will begin. The dropdown underneath allows you to set the video as Public, Unlisted or Private. You can change this at any time once the video is uploaded as well.
This opens the upload progress window, where you can add in a name, description and tags as well as add the video to a playlist or adjust the privacy settings as the video is uploading.
Once the upload as finished, you can do final adjustments to settings and choose a thumbnail for the video. The final step is to click the ‘Publish’ button and your video will be processed and go live.

Benjamin Arango
Benjamin Arango is a writer and a lover of all things video.
Follow @Benjamin Arango
- Title: Optimizing Video Income on Youtube A Practical Guide for 2024
- Author: Steven
- Created at : 2024-07-30 23:48:20
- Updated at : 2024-07-31 23:48:20
- Link: https://facebook-record-videos.techidaily.com/optimizing-video-income-on-youtube-a-practical-guide-for-2024/
- License: This work is licensed under CC BY-NC-SA 4.0.