![[New] Why Choose YouTube's AV1 for Impeccable Video Playback?](https://thmb.techidaily.com/482b0b9f60bdf46ea3aa9192b63978daf29cfbcce588ef757833463a9f6ee469.png)
[New] Why Choose YouTube's AV1 for Impeccable Video Playback?

Why Choose YouTube’s AV1 for Impeccable Video Playback?
Do you notice that many YouTube videos have been streamed in AV1? YouTube AV1 just happened suddenly a few years ago. This article will inform you about all the things you want to know about AV1 Youtube settings. I will let you know the tutorial to turn in AV1 settings on YouTube and the reason why should choose AV1 along with the others, and some more things about AV1.

Part 1: How to turn on AV1 settings on YouTube?
Do you wonder how to turn on AV1 settings on YouTube? For your information, AV1 is a video codec that is developed by a consortium of companies. It offers you advanced compression, enabling you to do smoother HD streaming and data savings for the video. Google also has already implemented AV1 use on YouTube. To turn on AV1 settings on YouTube, here are the steps:
Step1Go to playback and performance
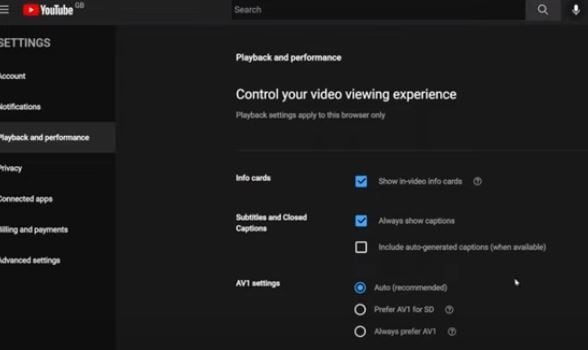
- To turn on the AV1 settings, go to your YouTube account, after that click “Playback and Performance”.
- In the AV1 settings. Besides “Auto (Recommended)”, there are other two options, which are “Prefer AV1 for SD” and also “Always prefer SD”.
- “Always Prefer AV1” uses the codec whenever it is available for a video while “Prefer AV1 for SD” limits it to SD videos. There are two options to avoid low-performance devices when AV1 videos are played on YouTube. You can select “Always Prefer AV1” to see if your device performance is good enough when you play videos on YouTube that support AV1.
Step2Test if the AV1 settings are already enabled in your video
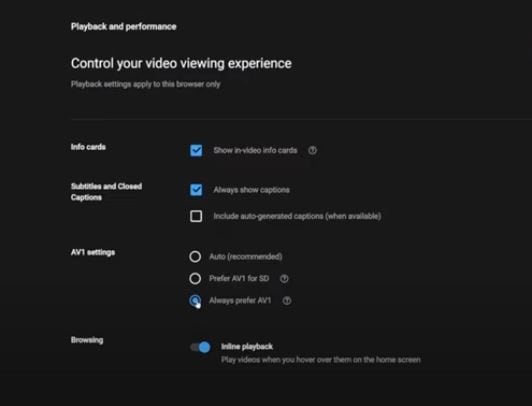
You may ask how to confirm your YouTube videos are playing with AV1 Codec. Well, you can search playlist on YouTube with the keywords “4K, 5K, and 8K videos with the new AV1 Codec “. You can test it by playing one of the videos. You have to right-click on the media player and then select “Stats for nerd”. If it shows the av01 codec there, then the AV1 settings are enabled already.
Part 2: Why choose AV1 over VP9 and other formats?
Now, do you need a reason why you should choose AV1 compared to VP9 and the others? As you know, there is also another video codec like VP9. There are also the others such as VVC, and many more. So what is the superiority of AV1 over the others? I will let you know why you should choose AV1 in this part.
The main thing is, as mentioned before, AV1 is developed by a consortium of companies founded in 2015. It is supported by The Alliance for Open Media (AOMedia) such as Amazon, Facebook, Google, Microsoft, and Netflix, and also by web browser developers and semiconductor firms. Aomedia made it clear the algorithm is free-to-use. It means that there are no greedy negotiators that will be dependent on the developers.
Also, these days, with a format that provides a much smaller workload for internet providers. Their today focus is, that AV1 can reach the quality but can get the job done with 20% more efficiency. Then, with AV1 encoding, a “standard” 4K movie will be much more accessible than it is now. These are some more reasons why you should choose AV1.
1. Royalty-free
As mentioned before, AV1 is royalty-free. AV1 is such a next-generation of royalty video codec. It means that it is not just free to use, but also free of charge, obligations, or even liability. It is an open and royalty-free video codec that the video platform will not charge to pay royalties to the Moving Picture Experts Group (MPEG), the developer of video codecs.
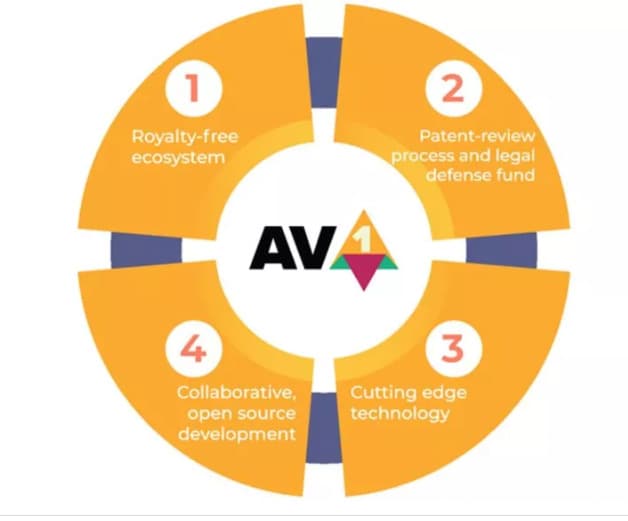
When it comes to the group that will ask for the royalty, MPEG is not the only one. There are also other patent groups and companies that can ask for it. Aomedia integrated Google, Mozilla, and Cisco, while they were busy creating their new video codec. However, the three companies joined together to create one codec to beat them all.
2. Better performance
It is said that the AV1 codec is 30% more efficient. According to the tests conducted by Moscow State University, AV1 can outperform AV1 by about 28% in the efficiency of encoding and decoding. As per the performance graph from the Graphics & Media Lab Video Group, MSU below, AV1 can offer the exactly same quality as X264 at 55% of the average bitrate.
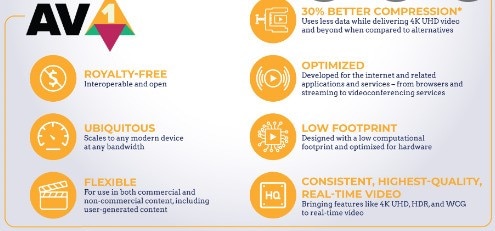
AV1 is designed so exclusively to function better than all the other codecs in the market. It is an open-sourced codec with simple patent licensing, and the integration manages to save, as mentioned, up to 30% of the bandwidth for the exactly same image quality. In other words, with AV1, distributors can send streams much faster and cheaper and we can enjoy higher definitions in the same bandwidth.
3. AV2 to come in the future
AV1 is undoubtedly superior if we compare it to other available video codecs and the exploration of the codec technology AV2 has already begun. This is such an early performance evaluation. There is some interesting part of the exploration development of AV2, such as multiple line selection for Intra prediction can make you select not just neighboring row/column for directional prediction. The same tool also exists in VVC.
There are also three essential improvements, which are simplifying the existing feature (also complete removal) and picking the tool used by VVC/H.266 (It is lack originality but so much work on it) and improvement periodically improvement of an existing tool, it is too few and also not original. We haven’t known yet when AV2 will be done completely though, maybe there still be some more essential improvements.
Part 3: What’s the best video editor for YouTubers with AV1 format?
When we talk about YouTube, it feels incomplete if we don’t talk about the video editor. So, what is the best video editing software for YouTubers with AV1 format? Yes, it is Filmora . It is such a great video editing software that allows you to import and edit many video file formats. Filmora also allows users to export AV1 MP4 format video and then can directly upload it to YouTube.

Filmora gives some ways to export your videos. Here are the five ways. You can also customize the export settings then you can save them to reuse the same settings next time. The first is you can export your project file and video to the local computer. It supports export as MP4, AVI, WMV, AV1, MOV, GoPro Cineform, F4V, MKV, TS, and 3GP.
After that, you can export your video to any device you want, such as iPhone, iPad, Apple TV, Apple TV 4K, iPod, Samsung Galaxy, Smart Phone, Android Generic, Google Pixel, Xbox One, PlayStation 4, PSP, and Smart TV. Then you can upload it to YouTube, Filmora provides you to export your video to Youtube directly. All you need to do is logging your Youtube account and export.
Free Download For Win 7 or later(64-bit)
Free Download For macOS 10.14 or later
Part 4: FAQ: Does YouTube use AV1 or VP9?
For today, YouTube encodes all the videos with the VP9 codec, but for some reason displays for low view count videos. AV1 usage also had been pushed to very low view counts. When it comes to cost or quality tradeoffs, AV1 took about 18 times longer to encode than x264.
Unlock Easy Paths for Exceptional YT Thumbnails
How to Make a Thumbnail for Your YouTube Free Easily

Shanoon Cox
Mar 27, 2024• Proven solutions
Youtube is one of the widely and most used video-sharing platforms all around the world. Being such a huge platform, billions of users upload different videos every second, making it a very competitive platform. Getting your videos noticed and clicked by others requires so many factors to be considered. One of the main factors that increase the chances of your videos being connected and seen by others is an attractive thumbnail. It is the first and the most important factor that helps the viewers decide what to watch and ignore. According to an estimate, among all the best-performing videos on Youtube, 90% have custom thumbnails. So, if you are looking forward to increasing the number of clicks on your videos, having a custom thumbnail is one of the most important things to consider. There are multiple ways to make a thumbnail for Youtube, but most are paid and difficult to use. In this article, we will discuss a hack to make a thumbnail for your Youtube free.
You might be interested in:
How to make a thumbnail for Youtube using AI Portrait
With time, Filmora brings new and advanced features for its users to equip them with all the necessary tools required for effective and efficient video editing. One of its latest features is AI Portrait. This feature has several uses and benefits. This feature is designed for Gamers, Vlogger, and other related genres to help them make their videos stand out from the crowd and gain more clicks and views. AI Portrait contains several effects that help you make the human element of the video separate from the background and make it more obvious. We can also use the AI Portrait effects to make beautiful and attractive thumbnails for your Youtube. Follow these steps to create a stunning thumbnail for your Youtube videos.
Step 01: Open Filmora X. If it is not already installed on your computer, download and install its latest version from here .

Step 02: Make sure that the aspect ratio of your project is 16:9. To do that, click on a screen-shaped icon below the preview screen and select “Change Project Aspect Ratio.”
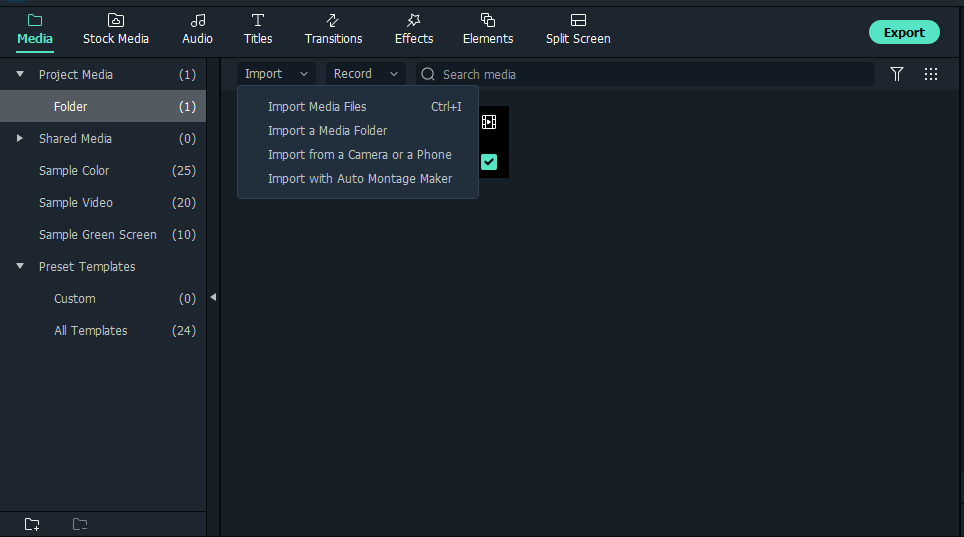
Step 03: Change the Aspect Ratio to 16:9 if it is not set to it already. 16:9 aspect ratio is the standard size of Youtube thumbnails that represents the best possible results.
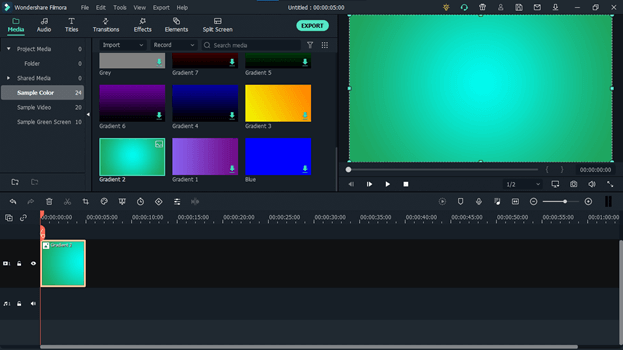
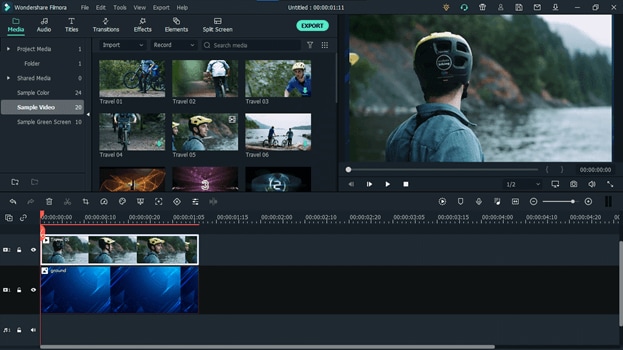
Step 04: Choose a background of your choice for your thumbnail. You can choose a background from the sample colors provided by Filmora.

Step 05: If you want to use your custom background, you can import it into the Filmora by clicking import or dragging and dropping it in the media section.
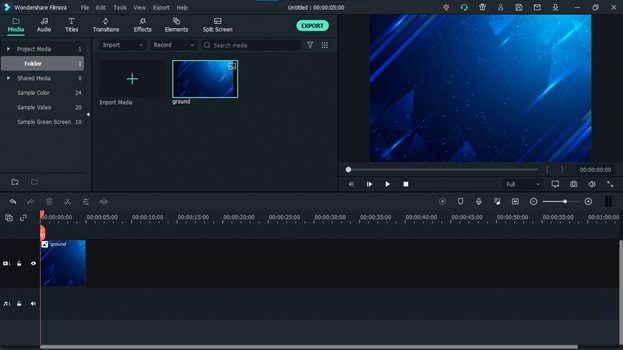
Step 06: Import your video the same way into the media folder of Filmora and drag it into the timeline and place it above your background.
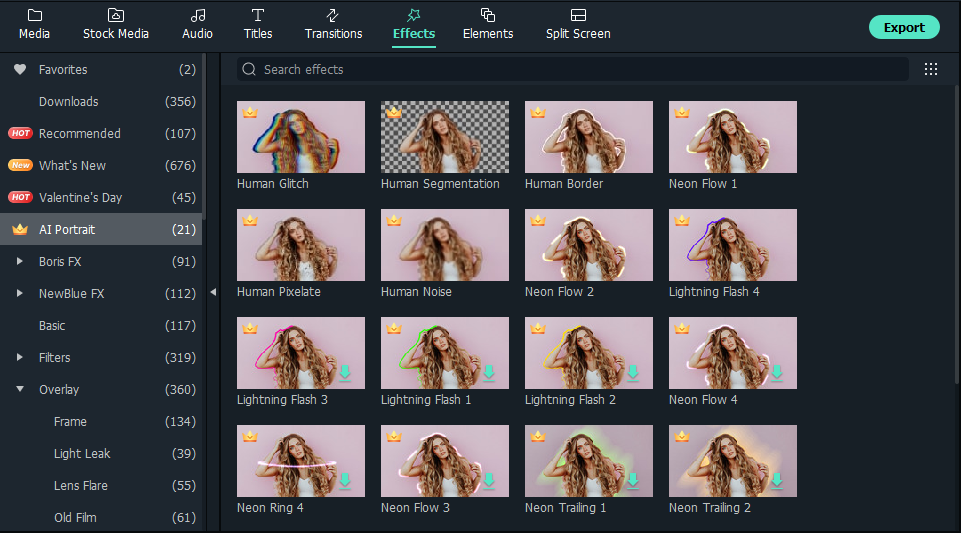
Step 07: Select your footage, go to the Effects tab and click on AI Portraits. It will open up all the effects related to AI Portraits. These AI Portrait features help you separate the human from a background without using a green screen or anything else.
Step 08: Double click on any of these effects to see how they will look like on your footage.
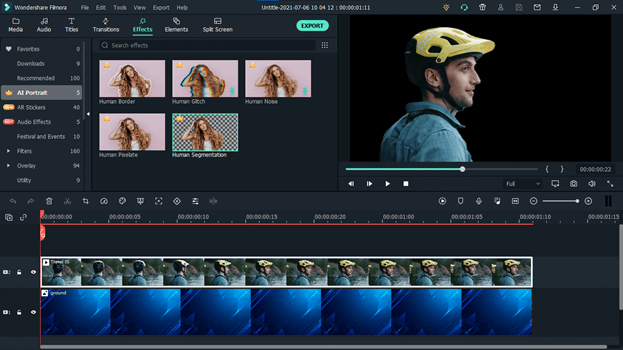
Step 09: To make a thumbnail for your Youtube, we have to remove the background of your footage first. To do that we have to apply Human Segmentation to the footage first. It will separate the human from the footage. Drag and drop the Human Segmentation effect into the footage in the timeline. Once you drop it into the footage, it will ask you to purchase this feature to export the footage. Since we are not trying to export the footage, we are only creating a thumbnail, click on “Try It”. Once the background is removed, you can add other effects as well. Drag and drop the “Human Border” into the footage. It creates an outline around the human in your footage.
Step 10: The effect will be applied to the footage. Now the background has been removed from the footage and ready to be used on your custom background. You can adjust the human accordingly where it looks perfect.
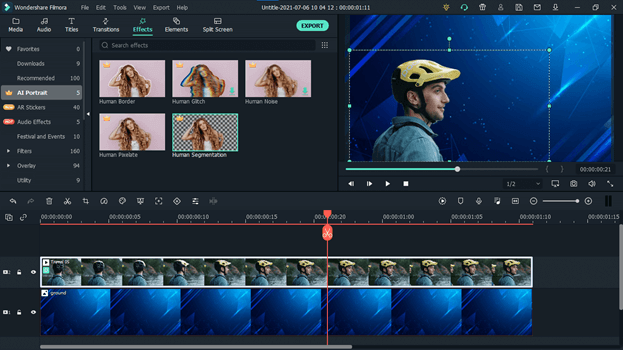
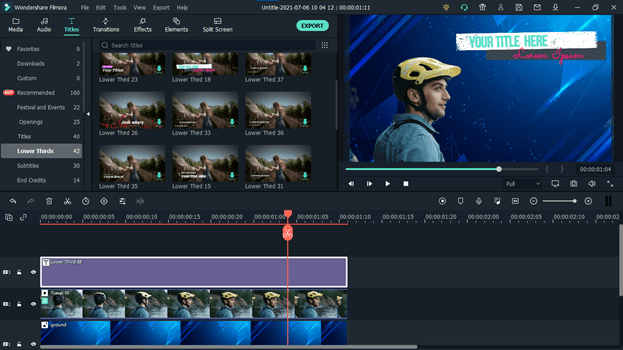
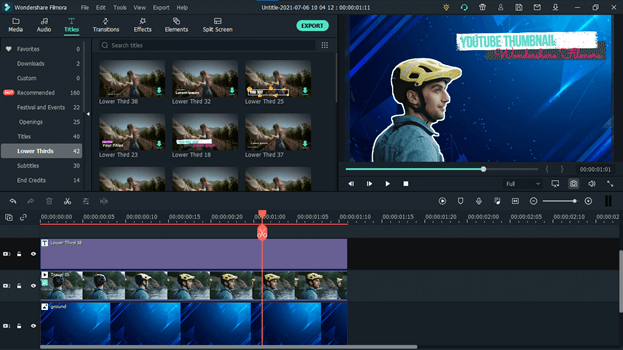
Step 11: Now it is time to add a title into your thumbnail to highlight what the video is all about. Go to the Titles, and select lower thirds. You can also select any of the titles types which best suits your needs. Drop the title into the timeline above the footage and adjust it accordingly. Now double click on the header to edit and rename it.

Step 12: Once you are satisfied with the final results, click on the Camera icon below the preview screen or press “Ctrl+Alt+S” to take the screenshot.
Conclusion
This is how your Youtube thumbnail will look like after applying all the above-mentioned effects and settings.
This article on making a thumbnail for your Youtube is just an idea for you, and you can use your creativity to create amazing thumbnails using other features of Filmora. These cool thumbnails will help you attract more viewers and click, which will ultimately help you grow your Youtube Channel. Unlike all other articles and tutorials that show you how to make a thumbnail for Youtube, this method is free and doesn’t need any technical skills to be implemented.

Shanoon Cox
Shanoon Cox is a writer and a lover of all things video.
Follow @Shanoon Cox
Shanoon Cox
Mar 27, 2024• Proven solutions
Youtube is one of the widely and most used video-sharing platforms all around the world. Being such a huge platform, billions of users upload different videos every second, making it a very competitive platform. Getting your videos noticed and clicked by others requires so many factors to be considered. One of the main factors that increase the chances of your videos being connected and seen by others is an attractive thumbnail. It is the first and the most important factor that helps the viewers decide what to watch and ignore. According to an estimate, among all the best-performing videos on Youtube, 90% have custom thumbnails. So, if you are looking forward to increasing the number of clicks on your videos, having a custom thumbnail is one of the most important things to consider. There are multiple ways to make a thumbnail for Youtube, but most are paid and difficult to use. In this article, we will discuss a hack to make a thumbnail for your Youtube free.
You might be interested in:
How to make a thumbnail for Youtube using AI Portrait
With time, Filmora brings new and advanced features for its users to equip them with all the necessary tools required for effective and efficient video editing. One of its latest features is AI Portrait. This feature has several uses and benefits. This feature is designed for Gamers, Vlogger, and other related genres to help them make their videos stand out from the crowd and gain more clicks and views. AI Portrait contains several effects that help you make the human element of the video separate from the background and make it more obvious. We can also use the AI Portrait effects to make beautiful and attractive thumbnails for your Youtube. Follow these steps to create a stunning thumbnail for your Youtube videos.
Step 01: Open Filmora X. If it is not already installed on your computer, download and install its latest version from here .

Step 02: Make sure that the aspect ratio of your project is 16:9. To do that, click on a screen-shaped icon below the preview screen and select “Change Project Aspect Ratio.”

Step 03: Change the Aspect Ratio to 16:9 if it is not set to it already. 16:9 aspect ratio is the standard size of Youtube thumbnails that represents the best possible results.

Step 04: Choose a background of your choice for your thumbnail. You can choose a background from the sample colors provided by Filmora.

Step 05: If you want to use your custom background, you can import it into the Filmora by clicking import or dragging and dropping it in the media section.

Step 06: Import your video the same way into the media folder of Filmora and drag it into the timeline and place it above your background.

Step 07: Select your footage, go to the Effects tab and click on AI Portraits. It will open up all the effects related to AI Portraits. These AI Portrait features help you separate the human from a background without using a green screen or anything else.

Step 08: Double click on any of these effects to see how they will look like on your footage.

Step 09: To make a thumbnail for your Youtube, we have to remove the background of your footage first. To do that we have to apply Human Segmentation to the footage first. It will separate the human from the footage. Drag and drop the Human Segmentation effect into the footage in the timeline. Once you drop it into the footage, it will ask you to purchase this feature to export the footage. Since we are not trying to export the footage, we are only creating a thumbnail, click on “Try It”. Once the background is removed, you can add other effects as well. Drag and drop the “Human Border” into the footage. It creates an outline around the human in your footage.

Step 10: The effect will be applied to the footage. Now the background has been removed from the footage and ready to be used on your custom background. You can adjust the human accordingly where it looks perfect.

Step 11: Now it is time to add a title into your thumbnail to highlight what the video is all about. Go to the Titles, and select lower thirds. You can also select any of the titles types which best suits your needs. Drop the title into the timeline above the footage and adjust it accordingly. Now double click on the header to edit and rename it.

Step 12: Once you are satisfied with the final results, click on the Camera icon below the preview screen or press “Ctrl+Alt+S” to take the screenshot.

Conclusion
This is how your Youtube thumbnail will look like after applying all the above-mentioned effects and settings.
This article on making a thumbnail for your Youtube is just an idea for you, and you can use your creativity to create amazing thumbnails using other features of Filmora. These cool thumbnails will help you attract more viewers and click, which will ultimately help you grow your Youtube Channel. Unlike all other articles and tutorials that show you how to make a thumbnail for Youtube, this method is free and doesn’t need any technical skills to be implemented.

Shanoon Cox
Shanoon Cox is a writer and a lover of all things video.
Follow @Shanoon Cox
Shanoon Cox
Mar 27, 2024• Proven solutions
Youtube is one of the widely and most used video-sharing platforms all around the world. Being such a huge platform, billions of users upload different videos every second, making it a very competitive platform. Getting your videos noticed and clicked by others requires so many factors to be considered. One of the main factors that increase the chances of your videos being connected and seen by others is an attractive thumbnail. It is the first and the most important factor that helps the viewers decide what to watch and ignore. According to an estimate, among all the best-performing videos on Youtube, 90% have custom thumbnails. So, if you are looking forward to increasing the number of clicks on your videos, having a custom thumbnail is one of the most important things to consider. There are multiple ways to make a thumbnail for Youtube, but most are paid and difficult to use. In this article, we will discuss a hack to make a thumbnail for your Youtube free.
You might be interested in:
How to make a thumbnail for Youtube using AI Portrait
With time, Filmora brings new and advanced features for its users to equip them with all the necessary tools required for effective and efficient video editing. One of its latest features is AI Portrait. This feature has several uses and benefits. This feature is designed for Gamers, Vlogger, and other related genres to help them make their videos stand out from the crowd and gain more clicks and views. AI Portrait contains several effects that help you make the human element of the video separate from the background and make it more obvious. We can also use the AI Portrait effects to make beautiful and attractive thumbnails for your Youtube. Follow these steps to create a stunning thumbnail for your Youtube videos.
Step 01: Open Filmora X. If it is not already installed on your computer, download and install its latest version from here .

Step 02: Make sure that the aspect ratio of your project is 16:9. To do that, click on a screen-shaped icon below the preview screen and select “Change Project Aspect Ratio.”

Step 03: Change the Aspect Ratio to 16:9 if it is not set to it already. 16:9 aspect ratio is the standard size of Youtube thumbnails that represents the best possible results.

Step 04: Choose a background of your choice for your thumbnail. You can choose a background from the sample colors provided by Filmora.

Step 05: If you want to use your custom background, you can import it into the Filmora by clicking import or dragging and dropping it in the media section.

Step 06: Import your video the same way into the media folder of Filmora and drag it into the timeline and place it above your background.

Step 07: Select your footage, go to the Effects tab and click on AI Portraits. It will open up all the effects related to AI Portraits. These AI Portrait features help you separate the human from a background without using a green screen or anything else.

Step 08: Double click on any of these effects to see how they will look like on your footage.

Step 09: To make a thumbnail for your Youtube, we have to remove the background of your footage first. To do that we have to apply Human Segmentation to the footage first. It will separate the human from the footage. Drag and drop the Human Segmentation effect into the footage in the timeline. Once you drop it into the footage, it will ask you to purchase this feature to export the footage. Since we are not trying to export the footage, we are only creating a thumbnail, click on “Try It”. Once the background is removed, you can add other effects as well. Drag and drop the “Human Border” into the footage. It creates an outline around the human in your footage.

Step 10: The effect will be applied to the footage. Now the background has been removed from the footage and ready to be used on your custom background. You can adjust the human accordingly where it looks perfect.

Step 11: Now it is time to add a title into your thumbnail to highlight what the video is all about. Go to the Titles, and select lower thirds. You can also select any of the titles types which best suits your needs. Drop the title into the timeline above the footage and adjust it accordingly. Now double click on the header to edit and rename it.

Step 12: Once you are satisfied with the final results, click on the Camera icon below the preview screen or press “Ctrl+Alt+S” to take the screenshot.

Conclusion
This is how your Youtube thumbnail will look like after applying all the above-mentioned effects and settings.
This article on making a thumbnail for your Youtube is just an idea for you, and you can use your creativity to create amazing thumbnails using other features of Filmora. These cool thumbnails will help you attract more viewers and click, which will ultimately help you grow your Youtube Channel. Unlike all other articles and tutorials that show you how to make a thumbnail for Youtube, this method is free and doesn’t need any technical skills to be implemented.

Shanoon Cox
Shanoon Cox is a writer and a lover of all things video.
Follow @Shanoon Cox
Shanoon Cox
Mar 27, 2024• Proven solutions
Youtube is one of the widely and most used video-sharing platforms all around the world. Being such a huge platform, billions of users upload different videos every second, making it a very competitive platform. Getting your videos noticed and clicked by others requires so many factors to be considered. One of the main factors that increase the chances of your videos being connected and seen by others is an attractive thumbnail. It is the first and the most important factor that helps the viewers decide what to watch and ignore. According to an estimate, among all the best-performing videos on Youtube, 90% have custom thumbnails. So, if you are looking forward to increasing the number of clicks on your videos, having a custom thumbnail is one of the most important things to consider. There are multiple ways to make a thumbnail for Youtube, but most are paid and difficult to use. In this article, we will discuss a hack to make a thumbnail for your Youtube free.
You might be interested in:
How to make a thumbnail for Youtube using AI Portrait
With time, Filmora brings new and advanced features for its users to equip them with all the necessary tools required for effective and efficient video editing. One of its latest features is AI Portrait. This feature has several uses and benefits. This feature is designed for Gamers, Vlogger, and other related genres to help them make their videos stand out from the crowd and gain more clicks and views. AI Portrait contains several effects that help you make the human element of the video separate from the background and make it more obvious. We can also use the AI Portrait effects to make beautiful and attractive thumbnails for your Youtube. Follow these steps to create a stunning thumbnail for your Youtube videos.
Step 01: Open Filmora X. If it is not already installed on your computer, download and install its latest version from here .

Step 02: Make sure that the aspect ratio of your project is 16:9. To do that, click on a screen-shaped icon below the preview screen and select “Change Project Aspect Ratio.”

Step 03: Change the Aspect Ratio to 16:9 if it is not set to it already. 16:9 aspect ratio is the standard size of Youtube thumbnails that represents the best possible results.

Step 04: Choose a background of your choice for your thumbnail. You can choose a background from the sample colors provided by Filmora.

Step 05: If you want to use your custom background, you can import it into the Filmora by clicking import or dragging and dropping it in the media section.

Step 06: Import your video the same way into the media folder of Filmora and drag it into the timeline and place it above your background.

Step 07: Select your footage, go to the Effects tab and click on AI Portraits. It will open up all the effects related to AI Portraits. These AI Portrait features help you separate the human from a background without using a green screen or anything else.

Step 08: Double click on any of these effects to see how they will look like on your footage.

Step 09: To make a thumbnail for your Youtube, we have to remove the background of your footage first. To do that we have to apply Human Segmentation to the footage first. It will separate the human from the footage. Drag and drop the Human Segmentation effect into the footage in the timeline. Once you drop it into the footage, it will ask you to purchase this feature to export the footage. Since we are not trying to export the footage, we are only creating a thumbnail, click on “Try It”. Once the background is removed, you can add other effects as well. Drag and drop the “Human Border” into the footage. It creates an outline around the human in your footage.

Step 10: The effect will be applied to the footage. Now the background has been removed from the footage and ready to be used on your custom background. You can adjust the human accordingly where it looks perfect.

Step 11: Now it is time to add a title into your thumbnail to highlight what the video is all about. Go to the Titles, and select lower thirds. You can also select any of the titles types which best suits your needs. Drop the title into the timeline above the footage and adjust it accordingly. Now double click on the header to edit and rename it.

Step 12: Once you are satisfied with the final results, click on the Camera icon below the preview screen or press “Ctrl+Alt+S” to take the screenshot.

Conclusion
This is how your Youtube thumbnail will look like after applying all the above-mentioned effects and settings.
This article on making a thumbnail for your Youtube is just an idea for you, and you can use your creativity to create amazing thumbnails using other features of Filmora. These cool thumbnails will help you attract more viewers and click, which will ultimately help you grow your Youtube Channel. Unlike all other articles and tutorials that show you how to make a thumbnail for Youtube, this method is free and doesn’t need any technical skills to be implemented.

Shanoon Cox
Shanoon Cox is a writer and a lover of all things video.
Follow @Shanoon Cox
Also read:
- [New] 2024 Approved Elevate Engagement Natural Ways to Popularize Your Videos
- [New] 2024 Approved Top 10 VR Videos on YouTube to Have Immersive Experience
- [New] In 2024, 15 YouTube Starter Templates A Guide to Popularity
- [New] In 2024, Achieve Video Excellence Learn the Studio Editor Way
- [New] Top Free Audio Samples for YouTube Creators
- [New] Transition From Mobile Screen to Big TV with FB Videos for 2024
- [Updated] Securing YouTube Partnership A Comprehensive Guide for Video Creators
- [Updated] Streaming Success Stories of Gaming Geeks
- 2024 Approved YouTube Yielding The Manual to Merging Media with Moolah
- Apple's New iPadOS 18 Update at WWDC 2024: The Game-Changing Feature That Could Convert Users Overnight - Insights From ZDNet
- Capturing Your Camera's Magic – Review & Best FREE Options
- In 2024, How to Transfer Contacts from Tecno Pova 6 Pro 5G To Phone | Dr.fone
- Las Métodos Mas Eficaces Para Descargar Y Usar El Códec AV1 en Windows
- New Strategies for Fixing Launch Problems with 'Hogwarts Legacy' Game in 202([Email Protected])
- On The Fly Gaming: Top 20 Speedy and Easy-to-Play Phones Games
- Top 6 Apps/Services to Trace Any Infinix Hot 30 5G Location By Mobile Number | Dr.fone
- Unleashing Your YouTube Potential A Comprehensively Tailored Upload Process for 2024
- Video Capture Clash A Rivalry of Screens (OBS Vs. ShadowCast)
- What To Do if Your Infinix Hot 40 Auto Does Not Work | Dr.fone
- Title: [New] Why Choose YouTube's AV1 for Impeccable Video Playback?
- Author: Steven
- Created at : 2024-12-03 16:29:48
- Updated at : 2024-12-10 00:38:20
- Link: https://facebook-record-videos.techidaily.com/new-why-choose-youtubes-av1-for-impeccable-video-playback/
- License: This work is licensed under CC BY-NC-SA 4.0.

