![[New] NanoFilm Whiz](https://thmb.techidaily.com/0a7e98a47c507ce4d17e40879eab668bc44ad83b05fd8fefcba56a2f27460108.jpg)
[New] NanoFilm Whiz
NanoFilm Whiz
In today’s world where businesses are going digital, it is very important to think of how you are going to get your products in front of many customers as possible without having to spend a fortune. That’s where YouTube Clip Maker comes in. It is an effective way for making YouTube videos that you can use for your business advertisements.
If you are a budding YouTuber or just looking at starting to make YouTube videos, you should consider among your editing tools a YouTube Clip Maker. It is an application that has all the tools necessary for you to edit videos in a fast and convenient way and enables you to upload the completed videos to YouTube. It is a simple tool with a friendly-to-use interface for editing videos, it should be a must-have for all users.
Part 1. Best YouTube Clip Maker Filmora
Filmora is a feature-rich audio and video editor that helps beginners with the editing of their audio and video files. The designers did their job with the armature editors in mind. It gives them a simple and easy-to-use layout that makes the work less complicated. Filmora has a built-in feature that lets you record your music and voice and also trim, merge, and cut a split your mp3 files.
Besides all the wonderful features, Filmora lets you make adjustments to speed, pitch, and volume, this makes you improve the clarity of your audio file. The app can be used to customize ringtones and specialized sound effects for your presentation.

For Win 7 or later (64-bit)
For macOS 10.12 or later
Steps on How to Use Filmora
This is an app that is best suited to those starting in video editing and requires the use of an easy-to-use app that can as well deliver quality work. Filmora is an application that was made with the armature editors in mind and is one they should consider while looking for a program to work with. It features some of the essential tools one would require and it is easy to learn how to navigate through it.
Installation Steps
- Click the icon in the center of the Media Library to add files directly.
- Go File > Import Media > Import Media Files.
- Drag and drop to the ‘media library’ directly.
When importing a media file and Filmora asks you to create a proxy file to speed up the editing process. Select “Yes” to have a fast video editing experience.
You can also import video clips using your Touch Bar controls if your computer has Touch Bar.
Record a media file
Apart from the videos shot by your digital devices, you can also directly import media files by recording video from your webcam, screen recording your computer, and a voice-over recording.
Computer screen recording:
Click the “Record” option, and choose “Record PC Screen” to get the built-in Wondershare Screen Recorder. Hit the red button to get started. To finish recording click on F9
Record videos from webcam:
Also, click the “Record” option, and choose “Record from Webcam”. In the recording pop-up window, select the red button, it will start the recording process and is also the button to choose when you want to stop recording. You will then select OK to save the recorded video clip.
Record voice-over:
Choose “Record a voiceover” on the Record menu. It would be better to connect a microphone to your Mac for a better result. Hit the Record button, and it leaves you 3 seconds to get ready.
All media files recorded are automatically saved in the “Media Library”, in case of further editing, you can drag them to the timeline.

Part 2. How to Make YouTube Clip Online
The application lets you trim your YouTube videos without having to have an account. It provides you with a quick way to either cut the beginning or end of a YouTube video. YouTube Trimmer will let you trim the video in a couple of seconds with just a few clicks. To use the app, you just need to copy and paste the earl and you are on your way to editing. You don’t have to be worried about downloading or installing the application for you to use it.
Steps on How to Use YouTube Trimmer
Step 1:
Import
Copy the YouTube link that you want to work on and paste it into the field indicated on the application.
Step 2:
Trim and Edit
You can drag the video at the edges to trim it. You can also move the playhead with your mouse and manually make cuts by clicking on the cut button.
Step 3:
Export
Once you are done editing and happy with the outcome, select the Export button to start rendering the video. Here you can choose to publish it on YouTube or save it for other uses.
 PDF application, powered by AI-based OCR, for unified workflows with both digital and scanned documents.
 Part 3. YouTube Clip Maker for Android and iPhone
KineMaster
It is a simple-to-use application that lets you create professional-quality videos in very short minutes. It enables you to edit pre-made videos or lets you make fresh ones by combining your video with several visual and sound effects. After you are done with the editing, you can save your video or share it out there.
Steps on How to Use Kinemater
Step 1:Create
It lets you import videos, audio, and images from your device. After which you can cut, rearrange, and transition between your images and videos using the KineMaster’s video layering support. This is highly dependent on your computer’s hardware capabilities.
Step 2:Edit
Adjust your video’s appearance parameters by blending color modes, adding light and sound effects, overlaying graphics, and text, or rather directly drawing on the video by using the handwriting layers.
Step 3:Share
You can export your project up to 4k and 60fps. The app saves directly to your camera’s roll besides letting you share to social media.
Part 4: Related FAQs
**How to Make a Clip from a YouTube Video ?
First, sign in to YouTube and start playing a video. Under the video click on the Clip, this will create a clip box after which you will select the part of the video that you want to clip. Give the clip a title then click share after which you will be prompted to choose an option for sharing.
**How to Clip Parts of a YouTube Video ?
Start by sign-in and opening YouTube then proceed by watching a video. If clips are available, you will see a clips icon in the bar at the bottom of the video. Click on the clip icon and select that part of the video you are interested in, give the clip a title, and select Share Clip. Choose whether you want to share the clip or save it for later use.
**What YouTubers Use to Get Clips ?
YouTubers use several video editors for their work. Some of the most popular editors are iMovie, Final Cut Pro X, and Premier Pro CC. These YouTube editing apps vary in technicalities of use and features whereby you will find that some are easy to use and have varying features. Some of the editors are free while others require payments for one to use.
For macOS 10.12 or later
Steps on How to Use Filmora
This is an app that is best suited to those starting in video editing and requires the use of an easy-to-use app that can as well deliver quality work. Filmora is an application that was made with the armature editors in mind and is one they should consider while looking for a program to work with. It features some of the essential tools one would require and it is easy to learn how to navigate through it.
Installation Steps
- Click the icon in the center of the Media Library to add files directly.
- Go File > Import Media > Import Media Files.
- Drag and drop to the ‘media library’ directly.
When importing a media file and Filmora asks you to create a proxy file to speed up the editing process. Select “Yes” to have a fast video editing experience.
You can also import video clips using your Touch Bar controls if your computer has Touch Bar.
Record a media file
Apart from the videos shot by your digital devices, you can also directly import media files by recording video from your webcam, screen recording your computer, and a voice-over recording.
Computer screen recording:
Click the “Record” option, and choose “Record PC Screen” to get the built-in Wondershare Screen Recorder. Hit the red button to get started. To finish recording click on F9
Record videos from webcam:
Also, click the “Record” option, and choose “Record from Webcam”. In the recording pop-up window, select the red button, it will start the recording process and is also the button to choose when you want to stop recording. You will then select OK to save the recorded video clip.
Record voice-over:
Choose “Record a voiceover” on the Record menu. It would be better to connect a microphone to your Mac for a better result. Hit the Record button, and it leaves you 3 seconds to get ready.
All media files recorded are automatically saved in the “Media Library”, in case of further editing, you can drag them to the timeline.

company, user or members of the same household. Action! - screen and game recorder</a>
Part 2. How to Make YouTube Clip Online
The application lets you trim your YouTube videos without having to have an account. It provides you with a quick way to either cut the beginning or end of a YouTube video. YouTube Trimmer will let you trim the video in a couple of seconds with just a few clicks. To use the app, you just need to copy and paste the earl and you are on your way to editing. You don’t have to be worried about downloading or installing the application for you to use it.
Steps on How to Use YouTube Trimmer
Step 1:
Import
Copy the YouTube link that you want to work on and paste it into the field indicated on the application.
Step 2:
Trim and Edit
You can drag the video at the edges to trim it. You can also move the playhead with your mouse and manually make cuts by clicking on the cut button.
Step 3:
Export
Once you are done editing and happy with the outcome, select the Export button to start rendering the video. Here you can choose to publish it on YouTube or save it for other uses.

Part 3. YouTube Clip Maker for Android and iPhone
KineMaster
It is a simple-to-use application that lets you create professional-quality videos in very short minutes. It enables you to edit pre-made videos or lets you make fresh ones by combining your video with several visual and sound effects. After you are done with the editing, you can save your video or share it out there.
Steps on How to Use Kinemater
Step 1:Create
It lets you import videos, audio, and images from your device. After which you can cut, rearrange, and transition between your images and videos using the KineMaster’s video layering support. This is highly dependent on your computer’s hardware capabilities.
Step 2:Edit
Adjust your video’s appearance parameters by blending color modes, adding light and sound effects, overlaying graphics, and text, or rather directly drawing on the video by using the handwriting layers.
Step 3:Share
You can export your project up to 4k and 60fps. The app saves directly to your camera’s roll besides letting you share to social media.
 OtsAV TV Webcaster
Part 4: Related FAQs
**How to Make a Clip from a YouTube Video ?
First, sign in to YouTube and start playing a video. Under the video click on the Clip, this will create a clip box after which you will select the part of the video that you want to clip. Give the clip a title then click share after which you will be prompted to choose an option for sharing.
**How to Clip Parts of a YouTube Video ?
Start by sign-in and opening YouTube then proceed by watching a video. If clips are available, you will see a clips icon in the bar at the bottom of the video. Click on the clip icon and select that part of the video you are interested in, give the clip a title, and select Share Clip. Choose whether you want to share the clip or save it for later use.
**What YouTubers Use to Get Clips ?
YouTubers use several video editors for their work. Some of the most popular editors are iMovie, Final Cut Pro X, and Premier Pro CC. These YouTube editing apps vary in technicalities of use and features whereby you will find that some are easy to use and have varying features. Some of the editors are free while others require payments for one to use.
For macOS 10.12 or later
Steps on How to Use Filmora
This is an app that is best suited to those starting in video editing and requires the use of an easy-to-use app that can as well deliver quality work. Filmora is an application that was made with the armature editors in mind and is one they should consider while looking for a program to work with. It features some of the essential tools one would require and it is easy to learn how to navigate through it.
Installation Steps
- Click the icon in the center of the Media Library to add files directly.
- Go File > Import Media > Import Media Files.
- Drag and drop to the ‘media library’ directly.
When importing a media file and Filmora asks you to create a proxy file to speed up the editing process. Select “Yes” to have a fast video editing experience.
You can also import video clips using your Touch Bar controls if your computer has Touch Bar.
Record a media file
Apart from the videos shot by your digital devices, you can also directly import media files by recording video from your webcam, screen recording your computer, and a voice-over recording.
Computer screen recording:
Click the “Record” option, and choose “Record PC Screen” to get the built-in Wondershare Screen Recorder. Hit the red button to get started. To finish recording click on F9
Record videos from webcam:
Also, click the “Record” option, and choose “Record from Webcam”. In the recording pop-up window, select the red button, it will start the recording process and is also the button to choose when you want to stop recording. You will then select OK to save the recorded video clip.
Record voice-over:
Choose “Record a voiceover” on the Record menu. It would be better to connect a microphone to your Mac for a better result. Hit the Record button, and it leaves you 3 seconds to get ready.
All media files recorded are automatically saved in the “Media Library”, in case of further editing, you can drag them to the timeline.
Part 2. How to Make YouTube Clip Online
The application lets you trim your YouTube videos without having to have an account. It provides you with a quick way to either cut the beginning or end of a YouTube video. YouTube Trimmer will let you trim the video in a couple of seconds with just a few clicks. To use the app, you just need to copy and paste the earl and you are on your way to editing. You don’t have to be worried about downloading or installing the application for you to use it.
Steps on How to Use YouTube Trimmer
Step 1:
Import
Copy the YouTube link that you want to work on and paste it into the field indicated on the application.
Step 2:
Trim and Edit
You can drag the video at the edges to trim it. You can also move the playhead with your mouse and manually make cuts by clicking on the cut button.
Step 3:
Export
Once you are done editing and happy with the outcome, select the Export button to start rendering the video. Here you can choose to publish it on YouTube or save it for other uses.
Part 3. YouTube Clip Maker for Android and iPhone
KineMaster
It is a simple-to-use application that lets you create professional-quality videos in very short minutes. It enables you to edit pre-made videos or lets you make fresh ones by combining your video with several visual and sound effects. After you are done with the editing, you can save your video or share it out there.
Steps on How to Use Kinemater
Step 1:Create
It lets you import videos, audio, and images from your device. After which you can cut, rearrange, and transition between your images and videos using the KineMaster’s video layering support. This is highly dependent on your computer’s hardware capabilities.
Step 2:Edit
Adjust your video’s appearance parameters by blending color modes, adding light and sound effects, overlaying graphics, and text, or rather directly drawing on the video by using the handwriting layers.
Step 3:Share
You can export your project up to 4k and 60fps. The app saves directly to your camera’s roll besides letting you share to social media.
Part 4: Related FAQs
**How to Make a Clip from a YouTube Video ?
First, sign in to YouTube and start playing a video. Under the video click on the Clip, this will create a clip box after which you will select the part of the video that you want to clip. Give the clip a title then click share after which you will be prompted to choose an option for sharing.
**How to Clip Parts of a YouTube Video ?
Start by sign-in and opening YouTube then proceed by watching a video. If clips are available, you will see a clips icon in the bar at the bottom of the video. Click on the clip icon and select that part of the video you are interested in, give the clip a title, and select Share Clip. Choose whether you want to share the clip or save it for later use.
**What YouTubers Use to Get Clips ?
YouTubers use several video editors for their work. Some of the most popular editors are iMovie, Final Cut Pro X, and Premier Pro CC. These YouTube editing apps vary in technicalities of use and features whereby you will find that some are easy to use and have varying features. Some of the editors are free while others require payments for one to use.
Channel Name Inspiration: Strategies for Success
Best YouTube Names Generators [+ How to Brainstorm]

Liza Brown
Oct 26, 2023• Proven solutions
It’s important to have a good name for your YouTube channel – something that people will remember. The following is a list of the 3 best YouTube name generators, an easy step-by-step for brainstorming, and instructions for updating your YouTube name.
Whether you’re a YouTuber beginner or want to improve your YouTube videos to the next level, a good YouTube video editing software will be a good helper. Wondershare Filmora is a video editor for all YouTube creators with plentiful effects and templates, and you can download it directly and have a try before purchasing.


- YouTube Name Generators
- How to Come Up With a Good YouTube Name
- How to Change Your YouTube Name
- Requesting a Custom URL for YouTube
Part 1: 3 Awesome YouTube Name Generators
Need some help brainstorming your channel name? Here are 3 tools for getting started. Even if you don’t use one of the names you generate you’ll get some great inspiration.
1. SpinXO
Key points:
- Lots of options
- Checks availability
This is a great generator. If you were brainstorming yourself, you’d probably write out a bunch of words related to yourself and the kinds of videos you want to make and see what goes together. SpinXO does that for you, and mixes in other words that sound good in usernames.
Here’s what happened when I tried to name a hypothetical baking channel:
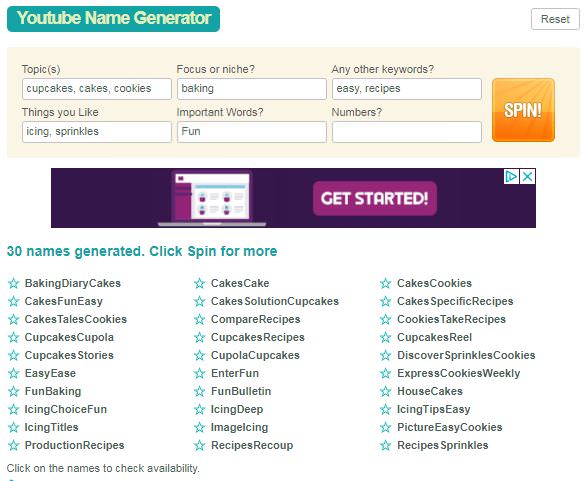
Not all of the results are great, but there are some cool sounding options in there.
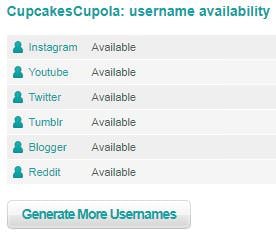
One of the most useful features of SpinXO is that you can check the availability of the usernames. I liked the sound of CupcakesCupola, and when I clicked on it I was able to see that nobody else was using it on other sites.

2. Name Generator
Key points:
- Can be hilarious
- Names tend to be a bit long
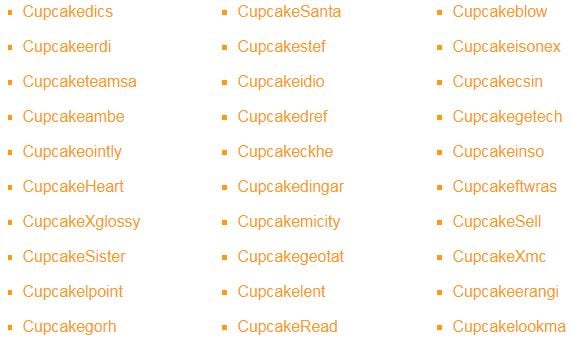
This is a fairly limited generator. You plunk in a prefix and a suffix, and it generates a random word or term to stuff between them. Here’s what I got for my fictional cupcake channel:
 The Tube Sites Submitter is a fast and efficient tool for anyone who needs to upload videos quickly, easily and automatically to hundreds of tube sites in mere minutes .
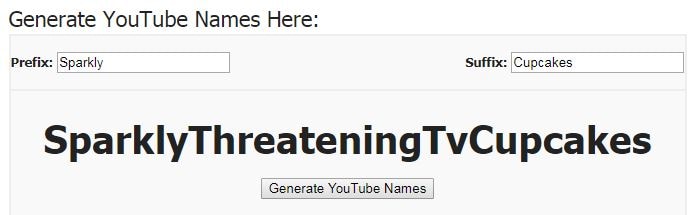
So, on one hand - that’s hilarious and I’m considering legally changing my name. On the other hand, all of the results look exactly like this (which means they’re all a bit too long). It shows you a longer list if you scroll down:
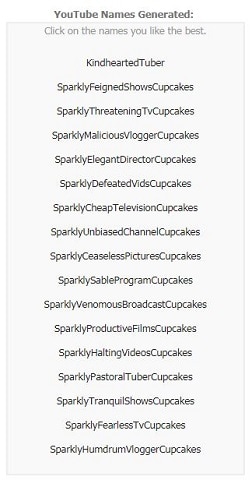
You can pick your favorite names and it’ll list them out so you can easily copy them into a word document. That’ll be useful if you’re collecting options from several sites.
3. Username Generator
Key points:
- Can generate a huge number of names at once
- You only input one word
For this name generator, you type in one important word and choose how many results you want to see. You can see up to 300 at once.


The generator will take your keyword and add endings (and occasional beginnings) to it. Some endings are words, and some are just suffixes. Here’s what I got:
Part 2: How to Come Up With a Good YouTube Name – 3 Easy Steps
The name of your YouTube channel needs to accomplish two things:
- Tell viewers what your channel is about
- Stick in viewer’s heads by being catchy and unique
Here’s how you can brainstorm the perfect name for your channel!
Step 1: Gather up relevant words
Open up a journal (or a word document) and start writing down words that relate to you and your channel.
You may want to make one list of ‘you’ words (personality traits, nicknames, titles, etc.) and another of words related to your channel’s category (i.e. gaming, makeup, or baking).
Step 2: Combinations
Start combining your ‘you’ words with your category words to see what sounds good. You may want to use one of the name generators above (anchor) for this part.
Try to keep your name fairly short (3 words or less) so it’s easier for people to remember. Don’t include numbers if you can avoid it.
Step 3: Say it out loud
Once you have a shortlist of potential names, read them aloud to yourself to make sure they sound good. Ideally, you want to get that ‘oh, that has a nice ring to it!’ feeling.
 Greeting Card Builder
Part 3: How to Change Your YouTube Name
In the early days of YouTube, you couldn’t change your name, but now you can!
- Click on your account icon in the top right corner of YouTube and choose settings.
- Click Edit on Google.
- Update your name and click OK.
Part 4: Requesting a Custom URL for YouTube
Here are several types of YouTube channel URL , wouldn’t it be nice if, instead of a string of numbers and letters, your channel URL included your name? YouTube can do that for you!
You need…
- 100 Subscribers
- to have been on YouTube for 30 days
- use a photo as your channel icon/profile picture
- have uploaded channel art
Here’s how to get your custom URL:
- Click on your icon in the top right corner of YouTube and choose Advanced under Settings / the gear icon.
- If you meet the qualifications above, you’ll see ‘You’re eligible for a custom URL’ under Channel Settings.
- YouTube will show you the custom URL you’re approved for in the Get a custom URL box. You can’t change what’s there, but you can add to the end of it.
- Click Change URL after reading the terms of use.
You can delete your custom URL and claim a new one, but doing this might be confusing for your followers.
If you already have a YouTube channel name – are you happy with it? How did you choose it?
Liza Brown
Liza Brown is a writer and a lover of all things video.
Follow @Liza Brown
Liza Brown
Oct 26, 2023• Proven solutions
It’s important to have a good name for your YouTube channel – something that people will remember. The following is a list of the 3 best YouTube name generators, an easy step-by-step for brainstorming, and instructions for updating your YouTube name.
Whether you’re a YouTuber beginner or want to improve your YouTube videos to the next level, a good YouTube video editing software will be a good helper. Wondershare Filmora is a video editor for all YouTube creators with plentiful effects and templates, and you can download it directly and have a try before purchasing.
- YouTube Name Generators
- How to Come Up With a Good YouTube Name
- How to Change Your YouTube Name
- Requesting a Custom URL for YouTube
Part 1: 3 Awesome YouTube Name Generators
Need some help brainstorming your channel name? Here are 3 tools for getting started. Even if you don’t use one of the names you generate you’ll get some great inspiration.
1. SpinXO
Key points:
- Lots of options
- Checks availability
This is a great generator. If you were brainstorming yourself, you’d probably write out a bunch of words related to yourself and the kinds of videos you want to make and see what goes together. SpinXO does that for you, and mixes in other words that sound good in usernames.
Here’s what happened when I tried to name a hypothetical baking channel:
Not all of the results are great, but there are some cool sounding options in there.
One of the most useful features of SpinXO is that you can check the availability of the usernames. I liked the sound of CupcakesCupola, and when I clicked on it I was able to see that nobody else was using it on other sites.
2. Name Generator
Key points:
- Can be hilarious
- Names tend to be a bit long
This is a fairly limited generator. You plunk in a prefix and a suffix, and it generates a random word or term to stuff between them. Here’s what I got for my fictional cupcake channel:
So, on one hand - that’s hilarious and I’m considering legally changing my name. On the other hand, all of the results look exactly like this (which means they’re all a bit too long). It shows you a longer list if you scroll down:
You can pick your favorite names and it’ll list them out so you can easily copy them into a word document. That’ll be useful if you’re collecting options from several sites.
3. Username Generator
Key points:
- Can generate a huge number of names at once
- You only input one word
For this name generator, you type in one important word and choose how many results you want to see. You can see up to 300 at once.
 KoolReport Pro is an advanced solution for creating data reports and dashboards in PHP. Equipped with all extended packages , KoolReport Pro is able to connect to various datasources, perform advanced data analysis, construct stunning charts and graphs and export your beautiful work to PDF, Excel, JPG or other formats. Plus, it includes powerful built-in reports such as pivot report and drill-down report which will save your time in building ones.
 It will help you to write dynamic data reports easily, to construct intuitive dashboards or to build a whole business intelligence cockpit.
KoolReport Pro package goes with Full Source Code, Royal Free, ONE (1) Year Priority Support, ONE (1) Year Free Upgrade and 30-Days Money Back Guarantee.
Developer License allows Single Developer to create Unlimited Reports, deploy on Unlimited Servers and able deliver the work to Unlimited Clients.
The generator will take your keyword and add endings (and occasional beginnings) to it. Some endings are words, and some are just suffixes. Here’s what I got:
Part 2: How to Come Up With a Good YouTube Name – 3 Easy Steps
The name of your YouTube channel needs to accomplish two things:
- Tell viewers what your channel is about
- Stick in viewer’s heads by being catchy and unique
Here’s how you can brainstorm the perfect name for your channel!
Step 1: Gather up relevant words
Open up a journal (or a word document) and start writing down words that relate to you and your channel.
You may want to make one list of ‘you’ words (personality traits, nicknames, titles, etc.) and another of words related to your channel’s category (i.e. gaming, makeup, or baking).
Step 2: Combinations
Start combining your ‘you’ words with your category words to see what sounds good. You may want to use one of the name generators above (anchor) for this part.
Try to keep your name fairly short (3 words or less) so it’s easier for people to remember. Don’t include numbers if you can avoid it.
Step 3: Say it out loud
Once you have a shortlist of potential names, read them aloud to yourself to make sure they sound good. Ideally, you want to get that ‘oh, that has a nice ring to it!’ feeling.
Part 3: How to Change Your YouTube Name
In the early days of YouTube, you couldn’t change your name, but now you can!
- Click on your account icon in the top right corner of YouTube and choose settings.
- Click Edit on Google.
- Update your name and click OK.
Part 4: Requesting a Custom URL for YouTube
Here are several types of YouTube channel URL , wouldn’t it be nice if, instead of a string of numbers and letters, your channel URL included your name? YouTube can do that for you!
You need…
- 100 Subscribers
- to have been on YouTube for 30 days
- use a photo as your channel icon/profile picture
- have uploaded channel art
Here’s how to get your custom URL:
- Click on your icon in the top right corner of YouTube and choose Advanced under Settings / the gear icon.
- If you meet the qualifications above, you’ll see ‘You’re eligible for a custom URL’ under Channel Settings.
- YouTube will show you the custom URL you’re approved for in the Get a custom URL box. You can’t change what’s there, but you can add to the end of it.
- Click Change URL after reading the terms of use.
You can delete your custom URL and claim a new one, but doing this might be confusing for your followers.
If you already have a YouTube channel name – are you happy with it? How did you choose it?
Liza Brown
Liza Brown is a writer and a lover of all things video.
Follow @Liza Brown
Liza Brown
Oct 26, 2023• Proven solutions
It’s important to have a good name for your YouTube channel – something that people will remember. The following is a list of the 3 best YouTube name generators, an easy step-by-step for brainstorming, and instructions for updating your YouTube name.
Whether you’re a YouTuber beginner or want to improve your YouTube videos to the next level, a good YouTube video editing software will be a good helper. Wondershare Filmora is a video editor for all YouTube creators with plentiful effects and templates, and you can download it directly and have a try before purchasing.

- YouTube Name Generators
- How to Come Up With a Good YouTube Name
- How to Change Your YouTube Name
- Requesting a Custom URL for YouTube

Part 1: 3 Awesome YouTube Name Generators
Need some help brainstorming your channel name? Here are 3 tools for getting started. Even if you don’t use one of the names you generate you’ll get some great inspiration.
1. SpinXO
Key points:
- Lots of options
- Checks availability
This is a great generator. If you were brainstorming yourself, you’d probably write out a bunch of words related to yourself and the kinds of videos you want to make and see what goes together. SpinXO does that for you, and mixes in other words that sound good in usernames.
Here’s what happened when I tried to name a hypothetical baking channel:
 SwifDoo PDF Perpetual (1 PC) Free upgrade. No monthly fees ever.
Not all of the results are great, but there are some cool sounding options in there.
One of the most useful features of SpinXO is that you can check the availability of the usernames. I liked the sound of CupcakesCupola, and when I clicked on it I was able to see that nobody else was using it on other sites.
2. Name Generator
Key points:
- Can be hilarious
- Names tend to be a bit long
This is a fairly limited generator. You plunk in a prefix and a suffix, and it generates a random word or term to stuff between them. Here’s what I got for my fictional cupcake channel:
So, on one hand - that’s hilarious and I’m considering legally changing my name. On the other hand, all of the results look exactly like this (which means they’re all a bit too long). It shows you a longer list if you scroll down:
You can pick your favorite names and it’ll list them out so you can easily copy them into a word document. That’ll be useful if you’re collecting options from several sites.
3. Username Generator
Key points:
- Can generate a huge number of names at once
- You only input one word
For this name generator, you type in one important word and choose how many results you want to see. You can see up to 300 at once.
The generator will take your keyword and add endings (and occasional beginnings) to it. Some endings are words, and some are just suffixes. Here’s what I got:
 CollageIt Pro
Part 2: How to Come Up With a Good YouTube Name – 3 Easy Steps
The name of your YouTube channel needs to accomplish two things:
- Tell viewers what your channel is about
- Stick in viewer’s heads by being catchy and unique
Here’s how you can brainstorm the perfect name for your channel!
Step 1: Gather up relevant words
Open up a journal (or a word document) and start writing down words that relate to you and your channel.
You may want to make one list of ‘you’ words (personality traits, nicknames, titles, etc.) and another of words related to your channel’s category (i.e. gaming, makeup, or baking).
Step 2: Combinations
Start combining your ‘you’ words with your category words to see what sounds good. You may want to use one of the name generators above (anchor) for this part.
Try to keep your name fairly short (3 words or less) so it’s easier for people to remember. Don’t include numbers if you can avoid it.
Step 3: Say it out loud
Once you have a shortlist of potential names, read them aloud to yourself to make sure they sound good. Ideally, you want to get that ‘oh, that has a nice ring to it!’ feeling.
Part 3: How to Change Your YouTube Name
In the early days of YouTube, you couldn’t change your name, but now you can!
- Click on your account icon in the top right corner of YouTube and choose settings.
- Click Edit on Google.
- Update your name and click OK.
 Glarysoft File Recovery Pro - Helps to recover your lost file/data, even permanently deleted data.
Part 4: Requesting a Custom URL for YouTube
Here are several types of YouTube channel URL , wouldn’t it be nice if, instead of a string of numbers and letters, your channel URL included your name? YouTube can do that for you!
You need…
- 100 Subscribers
- to have been on YouTube for 30 days
- use a photo as your channel icon/profile picture
- have uploaded channel art
Here’s how to get your custom URL:
- Click on your icon in the top right corner of YouTube and choose Advanced under Settings / the gear icon.
- If you meet the qualifications above, you’ll see ‘You’re eligible for a custom URL’ under Channel Settings.
- YouTube will show you the custom URL you’re approved for in the Get a custom URL box. You can’t change what’s there, but you can add to the end of it.
- Click Change URL after reading the terms of use.
You can delete your custom URL and claim a new one, but doing this might be confusing for your followers.
If you already have a YouTube channel name – are you happy with it? How did you choose it?
Liza Brown
Liza Brown is a writer and a lover of all things video.
Follow @Liza Brown
Liza Brown
Oct 26, 2023• Proven solutions
It’s important to have a good name for your YouTube channel – something that people will remember. The following is a list of the 3 best YouTube name generators, an easy step-by-step for brainstorming, and instructions for updating your YouTube name.
Whether you’re a YouTuber beginner or want to improve your YouTube videos to the next level, a good YouTube video editing software will be a good helper. Wondershare Filmora is a video editor for all YouTube creators with plentiful effects and templates, and you can download it directly and have a try before purchasing.
 Any DRM Removal for Mac: Remove DRM from Adobe, Kindle, Sony eReader, Kobo, etc, read your ebooks anywhere.
- YouTube Name Generators
- How to Come Up With a Good YouTube Name
- How to Change Your YouTube Name
- Requesting a Custom URL for YouTube

Part 1: 3 Awesome YouTube Name Generators
Need some help brainstorming your channel name? Here are 3 tools for getting started. Even if you don’t use one of the names you generate you’ll get some great inspiration.
1. SpinXO
Key points:
- Lots of options
- Checks availability
This is a great generator. If you were brainstorming yourself, you’d probably write out a bunch of words related to yourself and the kinds of videos you want to make and see what goes together. SpinXO does that for you, and mixes in other words that sound good in usernames.
Here’s what happened when I tried to name a hypothetical baking channel:
Not all of the results are great, but there are some cool sounding options in there.
One of the most useful features of SpinXO is that you can check the availability of the usernames. I liked the sound of CupcakesCupola, and when I clicked on it I was able to see that nobody else was using it on other sites.
2. Name Generator
Key points:
- Can be hilarious
- Names tend to be a bit long
This is a fairly limited generator. You plunk in a prefix and a suffix, and it generates a random word or term to stuff between them. Here’s what I got for my fictional cupcake channel:
 NeoDownloader - Fast and fully automatic image/video/music downloader.
So, on one hand - that’s hilarious and I’m considering legally changing my name. On the other hand, all of the results look exactly like this (which means they’re all a bit too long). It shows you a longer list if you scroll down:

You can pick your favorite names and it’ll list them out so you can easily copy them into a word document. That’ll be useful if you’re collecting options from several sites.
3. Username Generator
Key points:
- Can generate a huge number of names at once
- You only input one word
For this name generator, you type in one important word and choose how many results you want to see. You can see up to 300 at once.

The generator will take your keyword and add endings (and occasional beginnings) to it. Some endings are words, and some are just suffixes. Here’s what I got:
Part 2: How to Come Up With a Good YouTube Name – 3 Easy Steps
The name of your YouTube channel needs to accomplish two things:
- Tell viewers what your channel is about
- Stick in viewer’s heads by being catchy and unique
Here’s how you can brainstorm the perfect name for your channel!
Step 1: Gather up relevant words
Open up a journal (or a word document) and start writing down words that relate to you and your channel.
You may want to make one list of ‘you’ words (personality traits, nicknames, titles, etc.) and another of words related to your channel’s category (i.e. gaming, makeup, or baking).
Step 2: Combinations
Start combining your ‘you’ words with your category words to see what sounds good. You may want to use one of the name generators above (anchor) for this part.
Try to keep your name fairly short (3 words or less) so it’s easier for people to remember. Don’t include numbers if you can avoid it.
Step 3: Say it out loud
Once you have a shortlist of potential names, read them aloud to yourself to make sure they sound good. Ideally, you want to get that ‘oh, that has a nice ring to it!’ feeling.
Part 3: How to Change Your YouTube Name
In the early days of YouTube, you couldn’t change your name, but now you can!
- Click on your account icon in the top right corner of YouTube and choose settings.
- Click Edit on Google.
- Update your name and click OK.
Part 4: Requesting a Custom URL for YouTube
Here are several types of YouTube channel URL , wouldn’t it be nice if, instead of a string of numbers and letters, your channel URL included your name? YouTube can do that for you!
You need…
- 100 Subscribers
- to have been on YouTube for 30 days
- use a photo as your channel icon/profile picture
- have uploaded channel art
Here’s how to get your custom URL:
- Click on your icon in the top right corner of YouTube and choose Advanced under Settings / the gear icon.
- If you meet the qualifications above, you’ll see ‘You’re eligible for a custom URL’ under Channel Settings.
- YouTube will show you the custom URL you’re approved for in the Get a custom URL box. You can’t change what’s there, but you can add to the end of it.
- Click Change URL after reading the terms of use.
You can delete your custom URL and claim a new one, but doing this might be confusing for your followers.
If you already have a YouTube channel name – are you happy with it? How did you choose it?
Liza Brown
Liza Brown is a writer and a lover of all things video.
Follow @Liza Brown
- Title: [New] NanoFilm Whiz
- Author: Steven
- Created at : 2024-07-31 01:45:38
- Updated at : 2024-08-01 01:45:38
- Link: https://facebook-record-videos.techidaily.com/new-nanofilm-whiz/
- License: This work is licensed under CC BY-NC-SA 4.0.