![[New] In 2024, Avoiding the Blank Thumbnail Scenario in Shorts](https://thmb.techidaily.com/bbd20210fc5074f713b02b244d2b1993bd6b418eec110dce123959527009d1b5.png)
[New] In 2024, Avoiding the Blank Thumbnail Scenario in Shorts
Avoiding the Blank Thumbnail Scenario in Shorts
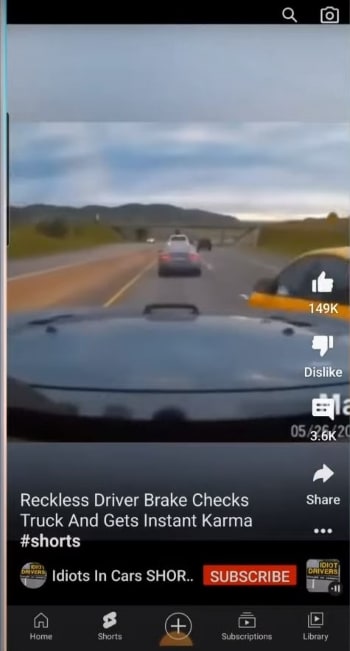
Video thumbnails are important since they encourage people to click and watch the video. But what if your set YouTube Shorts thumbnail is not showing? YouTube will use a random part of the video as the thumbnail. It may be an unflattering or uninteresting shot. Then, your Shorts video is doomed.
That said, it is a problem you want to solve. Here are 7 FAQs about YouTube Shorts thumbnails. They may help you with fixing this issue.
Q1. Can I Customize YouTube Shorts Thumbnails?
Yes, you can. YouTube did allow short-form video creators to upload custom thumbnails for their Shorts. However, they aren’t that optimized. For instance, some people may not see them on the Shorts shelf. Also, if you share a link to the video somewhere else, the old video thumbnail may show instead of the new one.
Adding a custom thumbnail for YouTube Shorts is the same as adding one for long-form videos on the platform. Follow these steps:
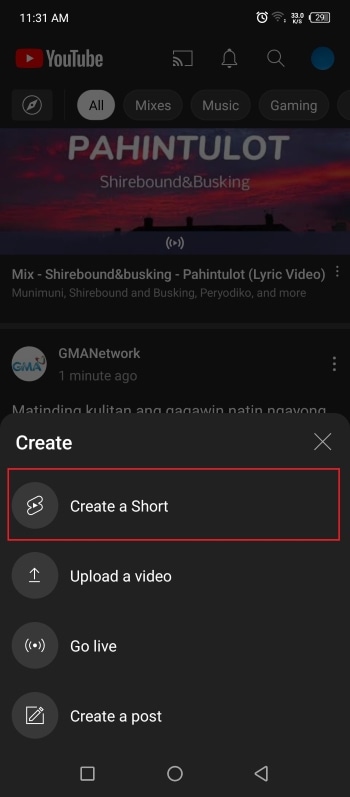
- Open the YouTube mobile app. Click the “Plus” icon at the bottom center > “Create Short.” Upload, edit, and post your video.
- Get to your desktop computer or laptop. Open your channel’s YouTube Studio.

- On the left navigation menu, click “Content.”


- Click the “pencil” icon next to the Shorts you just uploaded. This video should be at the top of the list.
- Navigate to the Thumbnail section. Click “Create Thumbnail.”

Q2. Why Are YouTube Shorts Thumbnails Not Showing?
It’s not you who’s the only one with Shorts thumbnails not showing. Many short-form content creators on the platform are also facing this issue. A YouTuber took to Reddit to complain about how he uploaded custom thumbnails for all his videos. The thumbnails are correct in the editor. However, YouTube still displays a random frame as the thumbnail on the Shorts shelf.
“They ALL have randomly selected different parts of each video I have uploaded & somehow generated a new/unknown thumbnail that was neither what I uploaded as the custom option nor 1 of the 3 that YouTube auto populated.”
The reason behind this is the difference in the thumbnail size. Regular YouTube video thumbnails are in the ratio of 16:9. Meanwhile, Shorts uses a ratio of 9:16. The thing is that YouTube does not yet allow you to upload 9:16 thumbnails. Thus, the thumbnail for Shorts may show correctly on the video section but not on the Shorts shelf.

Q3. How to Fix YouTube Shorts Thumbnail Problem?
Unfortunately, there is no reliable fix to this problem yet. YouTubers have tried different things in hopes that YouTube will display the correct thumbnail for their Shorts.
Some YouTubers have tried using different images. Others have experimented with changing the aspect ratio of the thumbnail or using Adobe editor for ratios. Clearing histories and cache, using different browsers, resizing, and changing the images’ resolution have also been done. Sadly, these are all failed attempts.
 KoolReport Pro is an advanced solution for creating data reports and dashboards in PHP. Equipped with all extended packages , KoolReport Pro is able to connect to various datasources, perform advanced data analysis, construct stunning charts and graphs and export your beautiful work to PDF, Excel, JPG or other formats. Plus, it includes powerful built-in reports such as pivot report and drill-down report which will save your time in building ones.
 It will help you to write dynamic data reports easily, to construct intuitive dashboards or to build a whole business intelligence cockpit.
KoolReport Pro package goes with Full Source Code, Royal Free, ONE (1) Year Priority Support, ONE (1) Year Free Upgrade and 30-Days Money Back Guarantee.
Developer License allows Single Developer to create Unlimited Reports, deploy on Unlimited Servers and able deliver the work to Unlimited Clients.
Q4. How To Boost Views When I Have no Control Over YouTube Shorts Thumbnails?
Attracting viewers on Shorts is the same as attracting viewers on the main YouTube. You use interesting thumbnails and video titles. Since thumbnails are out of the options, selecting great video titles has become even more important.
Here are some pointers. Your title should be at most 40 characters. Also, it should be concise and irresistible. And forget about SEO since no one is searching for YouTube Shorts anyway. People consume what they see in their feeds. So instead, the title should be “snappy.” It should intrigue, entertain, or enlighten the viewers. That will net you some views for your Shorts content.
Q5. How To Get More Views on YouTube Shorts?
Forgoing the intro is the way to go. An intro will just prolong the video when people are in Shorts to find bite-sized videos. So jump right into the video content. You can also start the video with a still frame instead. Using hashtags, captions, and text effects are also recommended. And interacting with your audience through comments and pinned comments will keep them coming back to your Shorts channel.
Of course, ensuring that the video quality is high is key to getting more views. For that, you need a good video editor. You can try Wondershare Filmora , a powerful and easy-to-use video editor.
Free Download For Win 7 or later(64-bit)
Free Download For macOS 10.14 or later
The best thing is that you don’t need to transfer the video from your phone to your computer and back. Wondershare Filmora is available on mobile. And it’s one of the best tools for enhancing a short-form video.
Short-form video watchers love filters, transitions, and effects. And Filmora gives you access to all of that. It provides you with fun and amazing filters, effects, transitions, and stamps that can add a wow factor to your short-form video.
Q6. Do YouTube Shorts Make Money?
Making money from YouTube Shorts was challenging. The platform pays content creators who are doing well through the Creator Fund. However, as Shorts grew, the payout became smaller.
Luckily, that’s going to change. Starting this year, Shorts will be a part of the YouTube Partner Program. This means that you can make money from the ads that people watch on Shorts. According to YouTube, creators will keep 45% of the revenue. It will be distributed based on your share of total Shorts views.
YouTube also adjusted the requirements to qualify for the YPP. They made it easier for Shorts content creators to get into the program.
Q7. How Do You Make YouTube Shorts Play Normal?
You can watch Shorts like normal YouTube videos where you can rewind when you want to. Follow these steps.
On a Desktop Computer
- Open a Shorts video on YouTube.

- Pause the video.

- Click “Library” on the left panel.

- Select the Shorts you just watched. It should be on the top and first on the list.

On a Mobile Phone
- Open the YouTube app. Watch a Shorts video.
- Like the Shorts video.

- Tap “Library”

- Scroll down to find “Liked Videos.” Click on it.

- Select the Shorts video you just watched. It should be at the top of the list.

Conclusion
Unfortunately, custom thumbnails not showing on Shorts does not have a fix yet. So to attract viewers, you must leverage the things in your control. You must title your videos in a way that will make users click the video. Also, adding effects and filters on the video using an editor like Wondershare Filmora can help.
Users can subscribe to Shorts channels. And if they see that your videos are well-edited and high-quality, they’ll be more likely to do so. Once they are subscribed, they will see and watch your videos more often.
Free Download For macOS 10.14 or later
The best thing is that you don’t need to transfer the video from your phone to your computer and back. Wondershare Filmora is available on mobile. And it’s one of the best tools for enhancing a short-form video.
Short-form video watchers love filters, transitions, and effects. And Filmora gives you access to all of that. It provides you with fun and amazing filters, effects, transitions, and stamps that can add a wow factor to your short-form video.
Q6. Do YouTube Shorts Make Money?
Making money from YouTube Shorts was challenging. The platform pays content creators who are doing well through the Creator Fund. However, as Shorts grew, the payout became smaller.
Luckily, that’s going to change. Starting this year, Shorts will be a part of the YouTube Partner Program. This means that you can make money from the ads that people watch on Shorts. According to YouTube, creators will keep 45% of the revenue. It will be distributed based on your share of total Shorts views.
YouTube also adjusted the requirements to qualify for the YPP. They made it easier for Shorts content creators to get into the program.
Q7. How Do You Make YouTube Shorts Play Normal?
You can watch Shorts like normal YouTube videos where you can rewind when you want to. Follow these steps.
On a Desktop Computer
- Open a Shorts video on YouTube.
Parental Control Software
- Pause the video.
 DLNow Video Downloader
- Click “Library” on the left panel.
- Select the Shorts you just watched. It should be on the top and first on the list.

WPS Office Premium ( File Recovery, Photo Scanning, Convert PDF)–Yearly
On a Mobile Phone
- Open the YouTube app. Watch a Shorts video.
- Like the Shorts video.
- Tap “Library”
 PDF application, powered by AI-based OCR, for unified workflows with both digital and scanned documents.
- Scroll down to find “Liked Videos.” Click on it.
- Select the Shorts video you just watched. It should be at the top of the list.
Conclusion
Unfortunately, custom thumbnails not showing on Shorts does not have a fix yet. So to attract viewers, you must leverage the things in your control. You must title your videos in a way that will make users click the video. Also, adding effects and filters on the video using an editor like Wondershare Filmora can help.
Users can subscribe to Shorts channels. And if they see that your videos are well-edited and high-quality, they’ll be more likely to do so. Once they are subscribed, they will see and watch your videos more often.

Easy OBS YouTube Live Streaming Guide
Live stream to youtube with OBS step by step guide for beginners

Richard Bennett
Mar 27, 2024• Proven solutions
- Part1. Stream Now set up
- Part2. Set up Your Live Streaming Encoder
- Part3. Youtube Events set up
- Part4. Video tutorial
1. Stream Now set up
Follow these steps to live stream your impressive videos to YouTube using Stream Now tool:
Step 1: First of all you need to login with your account and then move to Creator Studio option directly.


Step 2: Choose the Video Manager option from top most toolbar.

Step 3: From the drop down menu, simply select Live Streaming option to begin with.
 PDF application, powered by AI-based OCR, for unified workflows with both digital and scanned documents.
Step 4: Now hot the steam now option on your screen.

Step 5: Change or Upload your thumbnail as per need.


Step 6: It is time to provide an eye catching title to your video, add description and finally choose category from the drop down menu.

Step 7: While using stream option, never forget to click on ‘make archive unlisted when complete’ option so that you can save as well as watch your content on YouTube at later stage.

Step 8: You can monetize your ads as per need.


Step 9: It also provides options to add cards.

Step 10: Now move to encoder setup and then simply copy and paste these details to your streaming software.

Step 11: Now you can set your live chat option as per your requirement.

Step 12: The analysis window will help you to know about how many viewers are connected to your video as well as the message updates will be reflected.

Step 13: Stream health can be monitored directly.

Step 14: One can also use the social media button for live shares.

2.Set up Your Live Streaming Encoder
As soon as you have completed the above set up then next task is to adjust settings of your streaming encoder. It is possible to make easy selection out of wide range of live streaming encoders. The details below are provided with reference to OBS too that is open source type free to access software.
Step 1: First of all you need to visit official website of OBS and get your software tool installed on your system.
Step 2: Now launch OBS on your device and directly go to settings option.

Step 3: It is time to copy the stream key from YouTube and then paste it directly in the specified field of OBS.

Step 4: Users can now add their sources and scenes.


Step 5: Once all these settings are done then you can simply hit the option for start streaming and it will bring your content to YouTube directly.

3. Youtube Events set up
Live stream is little different from Stream Now platform as it allows users to schedule the streams as well as a connectivity to Google Hangouts is provided. These easy to follow steps will assist you to handle all settings for your events using Live Stream tool:
Step 1: Simply click on the schedule event option on screen.
.png) Kanto Player Professional
Kanto Player Professional
Step 2: It is much easier to make settings for basic information as well as audience type. Make some desired changes to SNS platform. If you select the Quick type then it will directly select your webcam and you need not to make additional complicated settings whereas the custom type option provides easy set up options with OBS.

Step 3: The advance settings option works same as that of stream now features and users can adjust most of these settings as per their streaming needs.

Step 4: Users can turn monetization On or Off as per their preferences.

Step 5: As soon as you finish all above settings then simply click on the create event option.

Step 6: One more window will appear on your screen and here you can make adjustment for preferred bit rate. Also put your dedicated stream key with encoder.

Step 7: When all above steps are completed then you need to hit the option for save changes so that your tool can act accordingly.


Step 8: Now click on events and here you will be able to find your event. Move to live control room if you want to access complete details about this event and you can easily delete it.

Step 9: Users can set privacy terms or simple delete the event that is currently in action.

Video tutorial
Richard Bennett
Richard Bennett is a writer and a lover of all things video.
Follow @Richard Bennett
Richard Bennett
Mar 27, 2024• Proven solutions
- Part1. Stream Now set up
- Part2. Set up Your Live Streaming Encoder
- Part3. Youtube Events set up
- Part4. Video tutorial
Follow these steps to live stream your impressive videos to YouTube using Stream Now tool:
Step 1: First of all you need to login with your account and then move to Creator Studio option directly.
Step 2: Choose the Video Manager option from top most toolbar.
Step 3: From the drop down menu, simply select Live Streaming option to begin with.
Step 4: Now hot the steam now option on your screen.
 SwifDoo PDF 2-Year Plan
Step 5: Change or Upload your thumbnail as per need.

WPS Office Premium ( File Recovery, Photo Scanning, Convert PDF)–Yearly
Step 6: It is time to provide an eye catching title to your video, add description and finally choose category from the drop down menu.
Step 7: While using stream option, never forget to click on ‘make archive unlisted when complete’ option so that you can save as well as watch your content on YouTube at later stage.

Step 8: You can monetize your ads as per need.

Step 9: It also provides options to add cards.
Step 10: Now move to encoder setup and then simply copy and paste these details to your streaming software.
Step 11: Now you can set your live chat option as per your requirement.
Step 12: The analysis window will help you to know about how many viewers are connected to your video as well as the message updates will be reflected.
Step 13: Stream health can be monitored directly.

Step 14: One can also use the social media button for live shares.
2.Set up Your Live Streaming Encoder
As soon as you have completed the above set up then next task is to adjust settings of your streaming encoder. It is possible to make easy selection out of wide range of live streaming encoders. The details below are provided with reference to OBS too that is open source type free to access software.
Step 1: First of all you need to visit official website of OBS and get your software tool installed on your system.
Step 2: Now launch OBS on your device and directly go to settings option.
 OtsAV DJ Pro
Step 3: It is time to copy the stream key from YouTube and then paste it directly in the specified field of OBS.
Step 4: Users can now add their sources and scenes.

Step 5: Once all these settings are done then you can simply hit the option for start streaming and it will bring your content to YouTube directly.
3. Youtube Events set up
Live stream is little different from Stream Now platform as it allows users to schedule the streams as well as a connectivity to Google Hangouts is provided. These easy to follow steps will assist you to handle all settings for your events using Live Stream tool:
Step 1: Simply click on the schedule event option on screen.
Step 2: It is much easier to make settings for basic information as well as audience type. Make some desired changes to SNS platform. If you select the Quick type then it will directly select your webcam and you need not to make additional complicated settings whereas the custom type option provides easy set up options with OBS.
Step 3: The advance settings option works same as that of stream now features and users can adjust most of these settings as per their streaming needs.
Step 4: Users can turn monetization On or Off as per their preferences.
 TubeDigger - online video downloader from mostly any site
Step 5: As soon as you finish all above settings then simply click on the create event option.
Step 6: One more window will appear on your screen and here you can make adjustment for preferred bit rate. Also put your dedicated stream key with encoder.
Step 7: When all above steps are completed then you need to hit the option for save changes so that your tool can act accordingly.
Step 8: Now click on events and here you will be able to find your event. Move to live control room if you want to access complete details about this event and you can easily delete it.

Step 9: Users can set privacy terms or simple delete the event that is currently in action.
Video tutorial

Richard Bennett
Richard Bennett is a writer and a lover of all things video.
Follow @Richard Bennett
Richard Bennett
Mar 27, 2024• Proven solutions
- Part1. Stream Now set up
- Part2. Set up Your Live Streaming Encoder
- Part3. Youtube Events set up
- Part4. Video tutorial
1. Stream Now set up
Follow these steps to live stream your impressive videos to YouTube using Stream Now tool:
Step 1: First of all you need to login with your account and then move to Creator Studio option directly.
Step 2: Choose the Video Manager option from top most toolbar.
 Project Manager - Asset Browser for 3Ds Max
Step 3: From the drop down menu, simply select Live Streaming option to begin with.
Step 4: Now hot the steam now option on your screen.
Step 5: Change or Upload your thumbnail as per need.
 WinUtilities Pro
Step 6: It is time to provide an eye catching title to your video, add description and finally choose category from the drop down menu.
Step 7: While using stream option, never forget to click on ‘make archive unlisted when complete’ option so that you can save as well as watch your content on YouTube at later stage.

Step 8: You can monetize your ads as per need.
Step 9: It also provides options to add cards.

Step 10: Now move to encoder setup and then simply copy and paste these details to your streaming software.
Step 11: Now you can set your live chat option as per your requirement.
Step 12: The analysis window will help you to know about how many viewers are connected to your video as well as the message updates will be reflected.
Step 13: Stream health can be monitored directly.
Step 14: One can also use the social media button for live shares.
2.Set up Your Live Streaming Encoder
As soon as you have completed the above set up then next task is to adjust settings of your streaming encoder. It is possible to make easy selection out of wide range of live streaming encoders. The details below are provided with reference to OBS too that is open source type free to access software.
Step 1: First of all you need to visit official website of OBS and get your software tool installed on your system.
Step 2: Now launch OBS on your device and directly go to settings option.
Step 3: It is time to copy the stream key from YouTube and then paste it directly in the specified field of OBS.
Step 4: Users can now add their sources and scenes.
Step 5: Once all these settings are done then you can simply hit the option for start streaming and it will bring your content to YouTube directly.
3. Youtube Events set up
Live stream is little different from Stream Now platform as it allows users to schedule the streams as well as a connectivity to Google Hangouts is provided. These easy to follow steps will assist you to handle all settings for your events using Live Stream tool:
Step 1: Simply click on the schedule event option on screen.
Step 2: It is much easier to make settings for basic information as well as audience type. Make some desired changes to SNS platform. If you select the Quick type then it will directly select your webcam and you need not to make additional complicated settings whereas the custom type option provides easy set up options with OBS.
Step 3: The advance settings option works same as that of stream now features and users can adjust most of these settings as per their streaming needs.
Step 4: Users can turn monetization On or Off as per their preferences.
Step 5: As soon as you finish all above settings then simply click on the create event option.
Step 6: One more window will appear on your screen and here you can make adjustment for preferred bit rate. Also put your dedicated stream key with encoder.
Step 7: When all above steps are completed then you need to hit the option for save changes so that your tool can act accordingly.
Step 8: Now click on events and here you will be able to find your event. Move to live control room if you want to access complete details about this event and you can easily delete it.
Step 9: Users can set privacy terms or simple delete the event that is currently in action.
 WonderFox DVD Ripper Pro
Video tutorial
Richard Bennett
Richard Bennett is a writer and a lover of all things video.
Follow @Richard Bennett
Richard Bennett
Mar 27, 2024• Proven solutions
- Part1. Stream Now set up
- Part2. Set up Your Live Streaming Encoder
- Part3. Youtube Events set up
- Part4. Video tutorial
1. Stream Now set up
Follow these steps to live stream your impressive videos to YouTube using Stream Now tool:
Step 1: First of all you need to login with your account and then move to Creator Studio option directly.
Step 2: Choose the Video Manager option from top most toolbar.
Step 3: From the drop down menu, simply select Live Streaming option to begin with.
Step 4: Now hot the steam now option on your screen.
Step 5: Change or Upload your thumbnail as per need.
Step 6: It is time to provide an eye catching title to your video, add description and finally choose category from the drop down menu.
Step 7: While using stream option, never forget to click on ‘make archive unlisted when complete’ option so that you can save as well as watch your content on YouTube at later stage.
Step 8: You can monetize your ads as per need.

Step 9: It also provides options to add cards.
Step 10: Now move to encoder setup and then simply copy and paste these details to your streaming software.
 EmEditor Professional (Lifetime License, non-store app)
Step 11: Now you can set your live chat option as per your requirement.
Step 12: The analysis window will help you to know about how many viewers are connected to your video as well as the message updates will be reflected.
Step 13: Stream health can be monitored directly.
Step 14: One can also use the social media button for live shares.
2.Set up Your Live Streaming Encoder
As soon as you have completed the above set up then next task is to adjust settings of your streaming encoder. It is possible to make easy selection out of wide range of live streaming encoders. The details below are provided with reference to OBS too that is open source type free to access software.
Step 1: First of all you need to visit official website of OBS and get your software tool installed on your system.
Step 2: Now launch OBS on your device and directly go to settings option.
Step 3: It is time to copy the stream key from YouTube and then paste it directly in the specified field of OBS.
Step 4: Users can now add their sources and scenes.
Step 5: Once all these settings are done then you can simply hit the option for start streaming and it will bring your content to YouTube directly.
3. Youtube Events set up
Live stream is little different from Stream Now platform as it allows users to schedule the streams as well as a connectivity to Google Hangouts is provided. These easy to follow steps will assist you to handle all settings for your events using Live Stream tool:
Step 1: Simply click on the schedule event option on screen.
Step 2: It is much easier to make settings for basic information as well as audience type. Make some desired changes to SNS platform. If you select the Quick type then it will directly select your webcam and you need not to make additional complicated settings whereas the custom type option provides easy set up options with OBS.
Step 3: The advance settings option works same as that of stream now features and users can adjust most of these settings as per their streaming needs.

Step 4: Users can turn monetization On or Off as per their preferences.
 Easy GIF Animator is a powerful animated GIF editor and the top tool for creating animated pictures, banners, buttons and GIF videos. You get extensive animation editing features, animation effects, unmatched image quality and optimization for the web. No other GIF animation software matches our features and ease of use, that’s why Easy GIF Animator is so popular.
Step 5: As soon as you finish all above settings then simply click on the create event option.

Step 6: One more window will appear on your screen and here you can make adjustment for preferred bit rate. Also put your dedicated stream key with encoder.
Step 7: When all above steps are completed then you need to hit the option for save changes so that your tool can act accordingly.
Step 8: Now click on events and here you will be able to find your event. Move to live control room if you want to access complete details about this event and you can easily delete it.

Step 9: Users can set privacy terms or simple delete the event that is currently in action.
 SwifDoo PDF Perpetual (2-PC) Free upgrade. No monthly fees ever.
Video tutorial
Richard Bennett
Richard Bennett is a writer and a lover of all things video.
Follow @Richard Bennett
- Title: [New] In 2024, Avoiding the Blank Thumbnail Scenario in Shorts
- Author: Steven
- Created at : 2024-07-30 23:05:45
- Updated at : 2024-07-31 23:05:45
- Link: https://facebook-record-videos.techidaily.com/new-in-2024-avoiding-the-blank-thumbnail-scenario-in-shorts/
- License: This work is licensed under CC BY-NC-SA 4.0.