![[New] Effortless Video Streams YouTube Loops for Television Viewers for 2024](https://www.lifewire.com/thmb/8VYsYYrfyGRkzFtE5GDtnXvVBP4=/400x300/filters:no_upscale():max_bytes(150000):strip_icc()/oura-ring-2-6e4a655bf1204877b33c125fe0f2fff4.jpg)
"[New] Effortless Video Streams YouTube Loops for Television Viewers for 2024"
Effortless Video Streams: YouTube Loops for Television Viewers
Loop is a YouTube video format that allows viewers to watch a continuous sequence of videos. Loop is similar to traditional YouTube videos, but it can be played on a TV screen like a traditional TV show. Loop is a great way to keep viewers engaged with your content. It’s like a one-stop shop for all your content needs. You can use it to promote your latest video series.
Why looping YouTube videos on a TV is a great idea? First, it can be a fun way to watch your favorite videos without having to worry about the time. Second, it can be a way to save money on your cable. By watching your favorite videos on loop, you can cut down on the number of times you need to watch them.
If you are watching a series of videos, for example, looping them can help you to remember what happened in each one. Secondly, it can help you to learn new information more easily. If you are watching a tutorial or a video about a new topic, looping can help you to remember the details better.
Free Download For Win 7 or later(64-bit)
Free Download For macOS 10.14 or later


Part 1: How to Create a Loop Video for YouTube
There is a lot of debate around whether or not creating a loop video is necessary for success on YouTube. Some people believe that it’s not necessary, while others believe that it is a must. The main benefit of creating a loop video is that it helps to keep your audience engaged. It also helps to create a sense of continuity between your videos.
Creating a loop video for your YouTube channel increases engagement because viewers can watch the video over and over again. This can lead to more clicks on your ads, which can lead to more revenue. It can also increase your subscribers and views. Maybe some people want to watch the same video multiple times in a row without having to keep pressing the play button on the remote.
Filmora is the best video loop editor:
If you need a powerful video editing tool that will let you create high-quality clips with multiple loops, look no further than Filmora . This software allows you to make various loops of your videos for use in social media, on your website or wherever desired. Plus, with Filmora, there is no limit on the number of loops you can create.
Loop video works well for corporate presentations, tutorials, explainer videos, and much more. You can create looping videos by choosing from one of Filmora’s many templates or creating your own. It’s easy to get started with looping video editing in Filmora! Some people want to watch a video while they do other things, like work on the computer.
Filmora is incredibly easy to use. You can quickly create videos by importing footage, editing and adding effects, and exporting your videos. Plus, the software has several built-in tools that let you customize your videos further. It has many features that make it an excellent choice for anyone looking to create high-quality videos quickly and easily.
How can we loop a video on Filmora? Follow these steps to create a looping video on Filmora:
Step 1 Download the Filmora and create a project
Free Download For Win 7 or later(64-bit)
Free Download For macOS 10.14 or later
You can download the Filmora for free. After installation of this software open it and click on Create New Project. Filmora is not only the video maker or editor, you can also add text and music to your videos, and share them on social media or with friends.

Step 2 Open the video and make copies
Open the video in your timeline. All you need to do is right-click on the video and click on copy. Then simply click or press Ctrl+V on your keyboard and do that for times. You can make as many copies as you want. Then you will have the same clip over and over again which creates the loop effect.
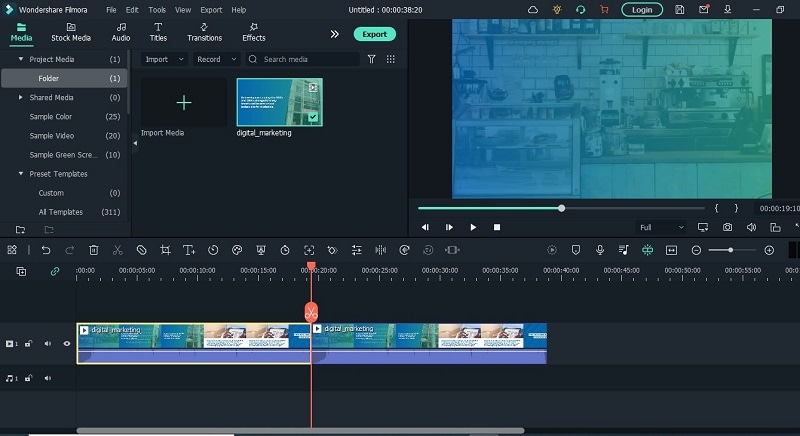
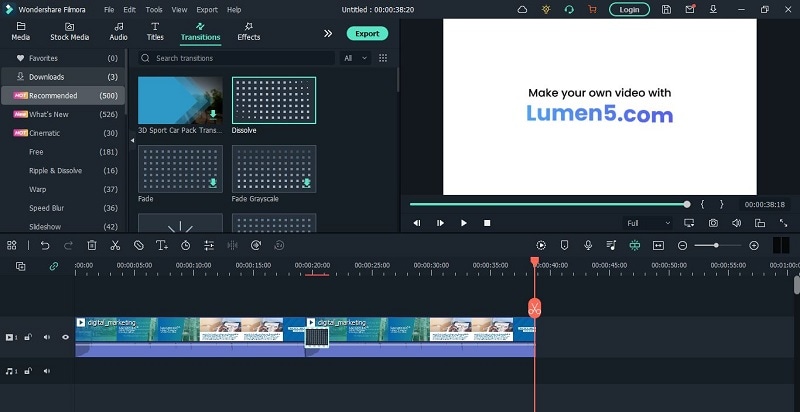
Step 3 Add Transition or any title in the video
After making copies of your video. Add some transitions in your video. Adding transitions to videos can help to keep your videos looking polished and professional. Not only do transitions add an extra layer of visual interest, but they can also help to underscore specific points in your video.
Benefits to create loop video on Filmora
There are many benefits to creating looping videos, especially when using a tool like Filmora. Loop videos are great for social media since they can be set to play on a loop and are viewable without sound. They’re also perfect for short attention spans since you can watch them over and over again without getting bored.
This can be useful for marketing purposes, as it can keep people interested in your video content. Additionally, looping can create a more engaging video experience for viewers, as it keeps them engaged by playing the same clip over and over again. You can easily add captions, and titles to your loop video.
When viewers can pause, rewind, and playback a video over and over again, they are more engaged with it. This increases the chances that they will watch the entire video, and may even share it with friends. You can create a sense of community and connection with your customers. And best of all? You can keep the magic going by adding sound effects and music!
Part 2: Loop a YouTube Video on TV from a Mobile
One of the great features of YouTube is that you can loop YouTube videos on your TV. This means that you can watch a video over and over again without having to fast forward through it. This is great for kids who are constantly asking to watch the same video over and over again. You can also use this feature to watch videos that you have missed.
There is something about relaxing music on the loop that can help to take the edge off. Whether it’s to help you wind down before bed, or to help you relax after a long day, there’s no doubt that looping YouTube on TV can be helpful. Whether you’re looking for something light and calming, or something to help you wind down after a long day, there’s sure to be something on YouTube that can fit the bill.
Let’s have a look at some steps that how to repeat YouTube videos on smart TV.
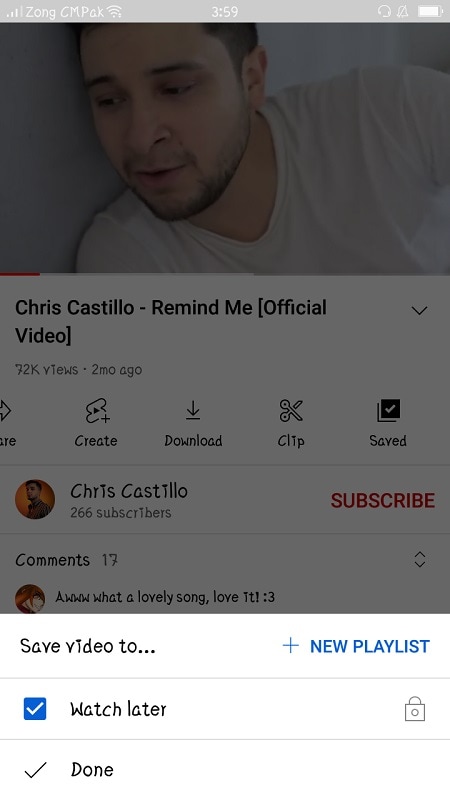
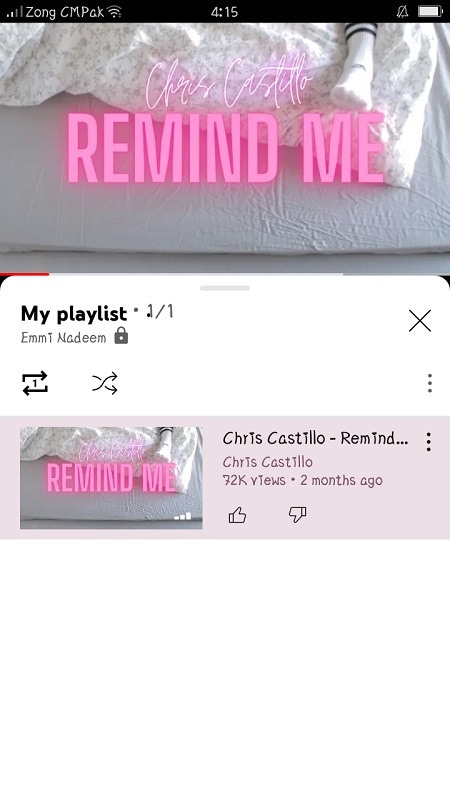
Step 1 Create a Playlist of one or multiple videos
The YouTube app is available on the google play store. You can easily download it from your mobile phones, android, etc. When you open a video on YouTube, several options will appear (like, share, subscribe). You can save the video in your existing playlist or you can create a new playlist.
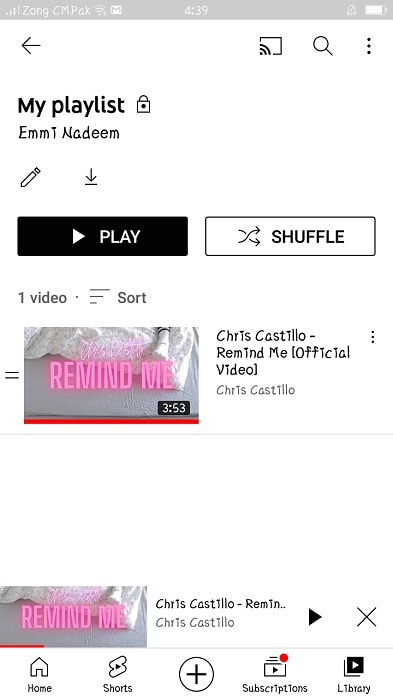
Step 2 Go to the library and select the loop symbol
Click on library this will take you to a list of libraries that have YouTube collections. This can be a great way to find new material to watch, or to find old material that you may have missed. Play back the playlist that you want to loop on the smart TV.
Step 3 Loop the playlist and send the list to the TV
Play the list and click on the loop symbol. At last, launch the YouTube video on your TV. The video will start playing in a loop. It can only be stopped from your mobile phone on which you start playing the list.
Why you might want to loop a YouTube video on a smart TV?
Some people want to watch a video over and over again without having to wait for it to load each time. Looping in a YouTube video can help you do this. Another reason to loop a YouTube video on your TV is if you want to watch it while you are doing something else. YouTube only loops the playlist.
Looping a YouTube video on your TV can also be useful if you have a lot of videos that you want to watch but don’t have enough time for. Looping YouTube videos on your television is a great way to keep your young ones entertained and engaged. Not only are they getting their daily dose of educational content, but they are also being kept enertained.
Wondershare Filmora Loop YouTube videos on PC and Mac with simple clicks.
Free Download Free Download Learn More
 Any DRM Removal for Win:Remove DRM from Adobe, Kindle, Sony eReader, Kobo, etc, read your ebooks anywhere.
![]()
Conclusion
Looping YouTube videos on smart TV is an excellent way to watch the content you love, no matter where you are. While it may be true that loop YouTube videos on a smart TV are not imminent, there are some major benefits to be gained from implementing the new technology.
It’s easy to do, and it can be a great way to spend time with family members and friends. Looping YouTube videos on a smart TV is a great way to add some fun and excitement to your experience. The best part is, there are no limitations or restrictions you can loop as many videos as you want, and watch them in any order!
Free Download For Win 7 or later(64-bit)
Free Download For macOS 10.14 or later
 Easy GIF Animator is a powerful animated GIF editor and the top tool for creating animated pictures, banners, buttons and GIF videos. You get extensive animation editing features, animation effects, unmatched image quality and optimization for the web. No other GIF animation software matches our features and ease of use, that’s why Easy GIF Animator is so popular.
Part 1: How to Create a Loop Video for YouTube
There is a lot of debate around whether or not creating a loop video is necessary for success on YouTube. Some people believe that it’s not necessary, while others believe that it is a must. The main benefit of creating a loop video is that it helps to keep your audience engaged. It also helps to create a sense of continuity between your videos.
Creating a loop video for your YouTube channel increases engagement because viewers can watch the video over and over again. This can lead to more clicks on your ads, which can lead to more revenue. It can also increase your subscribers and views. Maybe some people want to watch the same video multiple times in a row without having to keep pressing the play button on the remote.
Filmora is the best video loop editor:
If you need a powerful video editing tool that will let you create high-quality clips with multiple loops, look no further than Filmora . This software allows you to make various loops of your videos for use in social media, on your website or wherever desired. Plus, with Filmora, there is no limit on the number of loops you can create.
Loop video works well for corporate presentations, tutorials, explainer videos, and much more. You can create looping videos by choosing from one of Filmora’s many templates or creating your own. It’s easy to get started with looping video editing in Filmora! Some people want to watch a video while they do other things, like work on the computer.
Filmora is incredibly easy to use. You can quickly create videos by importing footage, editing and adding effects, and exporting your videos. Plus, the software has several built-in tools that let you customize your videos further. It has many features that make it an excellent choice for anyone looking to create high-quality videos quickly and easily.
How can we loop a video on Filmora? Follow these steps to create a looping video on Filmora:
Step 1 Download the Filmora and create a project
Free Download For Win 7 or later(64-bit)
Free Download For macOS 10.14 or later
You can download the Filmora for free. After installation of this software open it and click on Create New Project. Filmora is not only the video maker or editor, you can also add text and music to your videos, and share them on social media or with friends.
Step 2 Open the video and make copies
Open the video in your timeline. All you need to do is right-click on the video and click on copy. Then simply click or press Ctrl+V on your keyboard and do that for times. You can make as many copies as you want. Then you will have the same clip over and over again which creates the loop effect.

Step 3 Add Transition or any title in the video
After making copies of your video. Add some transitions in your video. Adding transitions to videos can help to keep your videos looking polished and professional. Not only do transitions add an extra layer of visual interest, but they can also help to underscore specific points in your video.

Benefits to create loop video on Filmora
There are many benefits to creating looping videos, especially when using a tool like Filmora. Loop videos are great for social media since they can be set to play on a loop and are viewable without sound. They’re also perfect for short attention spans since you can watch them over and over again without getting bored.
This can be useful for marketing purposes, as it can keep people interested in your video content. Additionally, looping can create a more engaging video experience for viewers, as it keeps them engaged by playing the same clip over and over again. You can easily add captions, and titles to your loop video.
When viewers can pause, rewind, and playback a video over and over again, they are more engaged with it. This increases the chances that they will watch the entire video, and may even share it with friends. You can create a sense of community and connection with your customers. And best of all? You can keep the magic going by adding sound effects and music!
Part 2: Loop a YouTube Video on TV from a Mobile
One of the great features of YouTube is that you can loop YouTube videos on your TV. This means that you can watch a video over and over again without having to fast forward through it. This is great for kids who are constantly asking to watch the same video over and over again. You can also use this feature to watch videos that you have missed.
There is something about relaxing music on the loop that can help to take the edge off. Whether it’s to help you wind down before bed, or to help you relax after a long day, there’s no doubt that looping YouTube on TV can be helpful. Whether you’re looking for something light and calming, or something to help you wind down after a long day, there’s sure to be something on YouTube that can fit the bill.
Let’s have a look at some steps that how to repeat YouTube videos on smart TV.
Step 1 Create a Playlist of one or multiple videos
The YouTube app is available on the google play store. You can easily download it from your mobile phones, android, etc. When you open a video on YouTube, several options will appear (like, share, subscribe). You can save the video in your existing playlist or you can create a new playlist.
Step 2 Go to the library and select the loop symbol
Click on library this will take you to a list of libraries that have YouTube collections. This can be a great way to find new material to watch, or to find old material that you may have missed. Play back the playlist that you want to loop on the smart TV.
Step 3 Loop the playlist and send the list to the TV
Play the list and click on the loop symbol. At last, launch the YouTube video on your TV. The video will start playing in a loop. It can only be stopped from your mobile phone on which you start playing the list.
Why you might want to loop a YouTube video on a smart TV?
Some people want to watch a video over and over again without having to wait for it to load each time. Looping in a YouTube video can help you do this. Another reason to loop a YouTube video on your TV is if you want to watch it while you are doing something else. YouTube only loops the playlist.
Looping a YouTube video on your TV can also be useful if you have a lot of videos that you want to watch but don’t have enough time for. Looping YouTube videos on your television is a great way to keep your young ones entertained and engaged. Not only are they getting their daily dose of educational content, but they are also being kept enertained.
Wondershare Filmora Loop YouTube videos on PC and Mac with simple clicks.
Free Download Free Download Learn More
![]()
Conclusion
Looping YouTube videos on smart TV is an excellent way to watch the content you love, no matter where you are. While it may be true that loop YouTube videos on a smart TV are not imminent, there are some major benefits to be gained from implementing the new technology.
It’s easy to do, and it can be a great way to spend time with family members and friends. Looping YouTube videos on a smart TV is a great way to add some fun and excitement to your experience. The best part is, there are no limitations or restrictions you can loop as many videos as you want, and watch them in any order!
 Easy and Safe Partition Software & Hard Disk Manager
Streamline Your Slides with YouTube Videos - A Beginner’s Guide
Create High-Quality Video - Wondershare Filmora
An easy and powerful YouTube video editor
Numerous video and audio effects to choose from
Detailed tutorials provided by the official channel
Google Slide presentation is a powerful tool for creators to keep their audience engaged. This online platform lets you create and demonstrate your ideas. It will capture your viewers’ attention from the very beginning. It also doesn’t matter whatever learning style you engage. Adding YouTube videos to Google Slide will appeal to all levels of individuals.
More so, it is the best way to provide a break for both the audience and the creator. You can break Google Slide presentations with videos to offer some break. Viewers and the presenter get a breather in the process. The presenter can take a short break from speaking while the video plays. Let’s now dive into how to embed a YouTube video in Google Slides.

In this article
01 Why should we add a video to Google Slides?
02 How to add a YouTube video to Google Slide
03 How to choose the right video for your Slides?
Why should we add a video to Google Slides?
There is a great impact of adding video to Google Slides.
For attention
Videos will automatically awaken you, especially if your thoughts have started to sway during a presentation. A video has a direct way of showing creativity. The audience automatically connects the dots between the video and the presentation lines alike.
To stimulate discussion
A picture is worth a thousand words. There is a way that an added video will help the audience connect to the day’s topic. It will bring up several ideas and stir up discussion with the presenter.
Easy following
With videos embedded in Google Slide, viewers will find it easy to understand and digest. Videos automatically eliminate boredom and make any topic interesting.
How to add a YouTube video to Google Slide
Use these two methods to add a YouTube video to Google Slides. Via the Search and Direct link.
Method 1. Embed YouTube video to Google Slide by search and selection
Google has owned YouTube since the year 2006. You can, therefore, integrate Google’s products with YouTube easily.
Step 1. First, go to the slide where you want to embed your video.
Step 2. Then choose the “Insert” option from the menu bar and hit the “Video” option.

Step 3. It would be best if you now viewed the “YouTube” search bar to type in the video you want to embed. You can use keywords to search for the video in question and view instant search results.
Step 4. Then select the video you want to embed, and you’ll see it appear on the “Slide.”

Step 5. Format your video. Remember that the entire video will be embedded. You don’t necessarily need the whole video. It is time to select just a brief but relevant clip from the video to use. Then position your video to the right point using the axes from the exact starting point to the finished part you want the video to appear in.
Method 2. Embed YouTube video to Google Slide by direct link
You can engage this method if you want to include the entire video.
Step 1. Get the URL of the specific YouTube video that you want to use.

Step 2. Then go to your browser’s “Address bar” to copy the YouTube link.
Step 3. Next, open the “Presentation” slide to put your video to.
Step 4. Choose the “Insert” tab from the menu bar.
Step 5. Then hit on the “Video” option from the drop-down menu that appears.
Step 6. A new window will open automatically. Choose the “By URL” tab.
Step 7. Then paste the YouTube video URL in the “Paste YouTube URL Here” bar section.

Step 8. Wait for the video file to load and press the “Select” option. The video will immediately appear in the presentation slide. Just drag and drop the video in your preferred position.
Note: You can do a few edits inside the application. Set the timer when your video should start and when to stop. You can also adjust the video player size.
 DEX 3 RE is Easy-To-Use DJ Mixing Software for MAC and Windows Designed for Today’s Versatile DJ.
Mix from your own library of music, iTunes or use the Pulselocker subsciprtion service for in-app access to over 44 million songs. Use with over 85 supported DJ controllers or mix with a keyboard and mouse.
DEX 3 RE is everything you need without the clutter - the perfect 2-deck mixing software solution for mobile DJs or hard-core hobbiests.
PCDJ DEX 3 RE (DJ Software for Win & MAC - Product Activation For 3 Machines)
How to choose the right video for your Slides?
Not all videos will make an impact on your Google Slide. You need to use the best shot that adds value to your presentation. These guidelines will help you to settle on the best video.
Be Professional – choose the best video for your presentation. Remember that the video is part of the presentation and carries more weight. Settling for quality video will bring out the professionalism in you.
Relevant – how do you know that what you are showing your audience corresponds to the presentation piece? Ensure that the video you add has something to do with the Google Slide presentation topic. The two should naturally flow to make it easy to understand the whole concept.
Precise – your presentation is not about the video. The ideal length should not exceed 60 seconds. The longer the video, the greater the chance for your audience to lose track along the way.
Know every footage you are working with – this will help you pick the best shots for your presentation. So, learn every aspect of the video before settling down to use it.
Add new content – even though one content may suit several presentations, don’t rely on the same piece each time. Your audience will want to feel something fresh each time you are presenting. So, compose different videos for different scenarios to make that big impact.
Create an eye-catching video for your Slides with Filmora
The video quality matters when it comes to creating your Slides. The best video creator – Filmora – works in simple steps to give you an eye-catching video. It will create videos for all scenarios like marketing, tutorial, gaming, etc.
Key features of Filmora
- It offers you advanced video effects like filters, motion elements, etc
- You can multiply your fun with multiple screens with the Split Screen feature
- Easily change backgrounds using the Green Screen feature
- The speed control lets you fast forward or slow down a special moment
- Import your video clips to social media platforms
- You can also adjust the audio of your tracks using the Audio Mixer feature
Follow this guide to create a video for your slide with Filmora
Step 1. Launch Filmora
First, begin by downloading and installing Filmora on your computer device. Once installed, launch it and allow it to run. You can either create a new project or open an existing project to work on.
Step 2. Create a new project
Here, click on the “New Project” tab on the app’s welcome screen. The editor should load immediately. Then proceed to register the product. Just hit on the “Register” tab.
Step 3. Import video
Check the upper left corner of your screen to see the “Import” tab. Click on it and choose the “Import Media Files” option. Next, navigate to the location of your computer’s local list to select the clip or video you want to edit. Then, hit the “Import” button to add the video to the timeline for editing.
Step 4. Edit video
Drag and drop the raw footage to Filmora’s timeline to begin editing. Here, you can trim, add other video clips, merge, and add effects as you wish. Likewise, you can add opening titles, subtitles, and end credits to your video. More so, this tool offers different templates to use. Just drag and drop the templates you wish to use to a specific location on the timeline.
Step 5. Preview your file
Last but not least, you can preview your files. Click on the “Play” tab to start previewing your video clips. The main essence of this part is to allow you to make the necessary changes to your clips if there is a need.
Step 6. Export and Share
With Filmora, you can export your file to various social media platforms. But first, go to the “Output window” and select the video file format to use. This software supports several output formats to apply to any platform and device. Just click on the “Format” tab and choose the file format to use. Then also change the resolution and other parameters like frame rate and channel of your video in the “Settings” section. Finally, share your video to your YouTube channel and get ready to add the video to the Google Slide presentation.
For Win 7 or later (64-bit)
For macOS 10.12 or later
Conclusion
● You now know how to put a YouTube video in Google Slides the simple way. You can search for your YouTube videos or directly use the URL link. Whatever the case, remember that it’s the quality of your video that carries more weight. Thanks to the availability of third-party apps that you can use to create and improve the quality of your videos.
● Filmora is at your service to create high-resolution videos that you can export in any format to your YouTube channel. The tool is intuitive, and it won’t matter whether you haven’t tried it before. It is a perfect choice for both professionals and first-time users.
Google Slide presentation is a powerful tool for creators to keep their audience engaged. This online platform lets you create and demonstrate your ideas. It will capture your viewers’ attention from the very beginning. It also doesn’t matter whatever learning style you engage. Adding YouTube videos to Google Slide will appeal to all levels of individuals.
More so, it is the best way to provide a break for both the audience and the creator. You can break Google Slide presentations with videos to offer some break. Viewers and the presenter get a breather in the process. The presenter can take a short break from speaking while the video plays. Let’s now dive into how to embed a YouTube video in Google Slides.
In this article
01 Why should we add a video to Google Slides?
02 How to add a YouTube video to Google Slide
03 How to choose the right video for your Slides?

WPS Office Premium ( File Recovery, Photo Scanning, Convert PDF)–Yearly
Why should we add a video to Google Slides?
There is a great impact of adding video to Google Slides.
For attention
Videos will automatically awaken you, especially if your thoughts have started to sway during a presentation. A video has a direct way of showing creativity. The audience automatically connects the dots between the video and the presentation lines alike.
To stimulate discussion
A picture is worth a thousand words. There is a way that an added video will help the audience connect to the day’s topic. It will bring up several ideas and stir up discussion with the presenter.
Easy following
With videos embedded in Google Slide, viewers will find it easy to understand and digest. Videos automatically eliminate boredom and make any topic interesting.

How to add a YouTube video to Google Slide
Use these two methods to add a YouTube video to Google Slides. Via the Search and Direct link.
Method 1. Embed YouTube video to Google Slide by search and selection
Google has owned YouTube since the year 2006. You can, therefore, integrate Google’s products with YouTube easily.
Step 1. First, go to the slide where you want to embed your video.
Step 2. Then choose the “Insert” option from the menu bar and hit the “Video” option.
Step 3. It would be best if you now viewed the “YouTube” search bar to type in the video you want to embed. You can use keywords to search for the video in question and view instant search results.
Step 4. Then select the video you want to embed, and you’ll see it appear on the “Slide.”
 Video Converter Factory Pro
Step 5. Format your video. Remember that the entire video will be embedded. You don’t necessarily need the whole video. It is time to select just a brief but relevant clip from the video to use. Then position your video to the right point using the axes from the exact starting point to the finished part you want the video to appear in.
Method 2. Embed YouTube video to Google Slide by direct link
You can engage this method if you want to include the entire video.
Step 1. Get the URL of the specific YouTube video that you want to use.
Step 2. Then go to your browser’s “Address bar” to copy the YouTube link.
Step 3. Next, open the “Presentation” slide to put your video to.
Step 4. Choose the “Insert” tab from the menu bar.
Step 5. Then hit on the “Video” option from the drop-down menu that appears.
Step 6. A new window will open automatically. Choose the “By URL” tab.
Step 7. Then paste the YouTube video URL in the “Paste YouTube URL Here” bar section.
 Epubor Audible Converter for Win: Download and convert Audible AAXC/AA/AAX to MP3 with 100% original quality preserved.
Step 8. Wait for the video file to load and press the “Select” option. The video will immediately appear in the presentation slide. Just drag and drop the video in your preferred position.
Note: You can do a few edits inside the application. Set the timer when your video should start and when to stop. You can also adjust the video player size.
How to choose the right video for your Slides?
Not all videos will make an impact on your Google Slide. You need to use the best shot that adds value to your presentation. These guidelines will help you to settle on the best video.
Be Professional – choose the best video for your presentation. Remember that the video is part of the presentation and carries more weight. Settling for quality video will bring out the professionalism in you.
Relevant – how do you know that what you are showing your audience corresponds to the presentation piece? Ensure that the video you add has something to do with the Google Slide presentation topic. The two should naturally flow to make it easy to understand the whole concept.
Precise – your presentation is not about the video. The ideal length should not exceed 60 seconds. The longer the video, the greater the chance for your audience to lose track along the way.
Know every footage you are working with – this will help you pick the best shots for your presentation. So, learn every aspect of the video before settling down to use it.
Add new content – even though one content may suit several presentations, don’t rely on the same piece each time. Your audience will want to feel something fresh each time you are presenting. So, compose different videos for different scenarios to make that big impact.
Create an eye-catching video for your Slides with Filmora
The video quality matters when it comes to creating your Slides. The best video creator – Filmora – works in simple steps to give you an eye-catching video. It will create videos for all scenarios like marketing, tutorial, gaming, etc.
Key features of Filmora
- It offers you advanced video effects like filters, motion elements, etc
- You can multiply your fun with multiple screens with the Split Screen feature
- Easily change backgrounds using the Green Screen feature
- The speed control lets you fast forward or slow down a special moment
- Import your video clips to social media platforms
- You can also adjust the audio of your tracks using the Audio Mixer feature
Follow this guide to create a video for your slide with Filmora
Step 1. Launch Filmora
First, begin by downloading and installing Filmora on your computer device. Once installed, launch it and allow it to run. You can either create a new project or open an existing project to work on.
Step 2. Create a new project
Here, click on the “New Project” tab on the app’s welcome screen. The editor should load immediately. Then proceed to register the product. Just hit on the “Register” tab.
Step 3. Import video
Check the upper left corner of your screen to see the “Import” tab. Click on it and choose the “Import Media Files” option. Next, navigate to the location of your computer’s local list to select the clip or video you want to edit. Then, hit the “Import” button to add the video to the timeline for editing.
Step 4. Edit video
Drag and drop the raw footage to Filmora’s timeline to begin editing. Here, you can trim, add other video clips, merge, and add effects as you wish. Likewise, you can add opening titles, subtitles, and end credits to your video. More so, this tool offers different templates to use. Just drag and drop the templates you wish to use to a specific location on the timeline.
Step 5. Preview your file
Last but not least, you can preview your files. Click on the “Play” tab to start previewing your video clips. The main essence of this part is to allow you to make the necessary changes to your clips if there is a need.
Step 6. Export and Share
With Filmora, you can export your file to various social media platforms. But first, go to the “Output window” and select the video file format to use. This software supports several output formats to apply to any platform and device. Just click on the “Format” tab and choose the file format to use. Then also change the resolution and other parameters like frame rate and channel of your video in the “Settings” section. Finally, share your video to your YouTube channel and get ready to add the video to the Google Slide presentation.
For Win 7 or later (64-bit)
For macOS 10.12 or later
Conclusion
● You now know how to put a YouTube video in Google Slides the simple way. You can search for your YouTube videos or directly use the URL link. Whatever the case, remember that it’s the quality of your video that carries more weight. Thanks to the availability of third-party apps that you can use to create and improve the quality of your videos.
● Filmora is at your service to create high-resolution videos that you can export in any format to your YouTube channel. The tool is intuitive, and it won’t matter whether you haven’t tried it before. It is a perfect choice for both professionals and first-time users.
Google Slide presentation is a powerful tool for creators to keep their audience engaged. This online platform lets you create and demonstrate your ideas. It will capture your viewers’ attention from the very beginning. It also doesn’t matter whatever learning style you engage. Adding YouTube videos to Google Slide will appeal to all levels of individuals.
More so, it is the best way to provide a break for both the audience and the creator. You can break Google Slide presentations with videos to offer some break. Viewers and the presenter get a breather in the process. The presenter can take a short break from speaking while the video plays. Let’s now dive into how to embed a YouTube video in Google Slides.
In this article
01 Why should we add a video to Google Slides?
02 How to add a YouTube video to Google Slide
03 How to choose the right video for your Slides?
Why should we add a video to Google Slides?
There is a great impact of adding video to Google Slides.
For attention
Videos will automatically awaken you, especially if your thoughts have started to sway during a presentation. A video has a direct way of showing creativity. The audience automatically connects the dots between the video and the presentation lines alike.
To stimulate discussion
A picture is worth a thousand words. There is a way that an added video will help the audience connect to the day’s topic. It will bring up several ideas and stir up discussion with the presenter.
Easy following
With videos embedded in Google Slide, viewers will find it easy to understand and digest. Videos automatically eliminate boredom and make any topic interesting.
How to add a YouTube video to Google Slide
Use these two methods to add a YouTube video to Google Slides. Via the Search and Direct link.
Method 1. Embed YouTube video to Google Slide by search and selection
Google has owned YouTube since the year 2006. You can, therefore, integrate Google’s products with YouTube easily.
Step 1. First, go to the slide where you want to embed your video.
Step 2. Then choose the “Insert” option from the menu bar and hit the “Video” option.

Step 3. It would be best if you now viewed the “YouTube” search bar to type in the video you want to embed. You can use keywords to search for the video in question and view instant search results.
Step 4. Then select the video you want to embed, and you’ll see it appear on the “Slide.”
Step 5. Format your video. Remember that the entire video will be embedded. You don’t necessarily need the whole video. It is time to select just a brief but relevant clip from the video to use. Then position your video to the right point using the axes from the exact starting point to the finished part you want the video to appear in.
Method 2. Embed YouTube video to Google Slide by direct link
You can engage this method if you want to include the entire video.
Step 1. Get the URL of the specific YouTube video that you want to use.
Step 2. Then go to your browser’s “Address bar” to copy the YouTube link.
Step 3. Next, open the “Presentation” slide to put your video to.
Step 4. Choose the “Insert” tab from the menu bar.
Step 5. Then hit on the “Video” option from the drop-down menu that appears.
Step 6. A new window will open automatically. Choose the “By URL” tab.
Step 7. Then paste the YouTube video URL in the “Paste YouTube URL Here” bar section.
Step 8. Wait for the video file to load and press the “Select” option. The video will immediately appear in the presentation slide. Just drag and drop the video in your preferred position.
Note: You can do a few edits inside the application. Set the timer when your video should start and when to stop. You can also adjust the video player size.
How to choose the right video for your Slides?
Not all videos will make an impact on your Google Slide. You need to use the best shot that adds value to your presentation. These guidelines will help you to settle on the best video.
Be Professional – choose the best video for your presentation. Remember that the video is part of the presentation and carries more weight. Settling for quality video will bring out the professionalism in you.
Relevant – how do you know that what you are showing your audience corresponds to the presentation piece? Ensure that the video you add has something to do with the Google Slide presentation topic. The two should naturally flow to make it easy to understand the whole concept.
Precise – your presentation is not about the video. The ideal length should not exceed 60 seconds. The longer the video, the greater the chance for your audience to lose track along the way.
Know every footage you are working with – this will help you pick the best shots for your presentation. So, learn every aspect of the video before settling down to use it.
Add new content – even though one content may suit several presentations, don’t rely on the same piece each time. Your audience will want to feel something fresh each time you are presenting. So, compose different videos for different scenarios to make that big impact.
Create an eye-catching video for your Slides with Filmora
The video quality matters when it comes to creating your Slides. The best video creator – Filmora – works in simple steps to give you an eye-catching video. It will create videos for all scenarios like marketing, tutorial, gaming, etc.
Key features of Filmora
- It offers you advanced video effects like filters, motion elements, etc
- You can multiply your fun with multiple screens with the Split Screen feature
- Easily change backgrounds using the Green Screen feature
- The speed control lets you fast forward or slow down a special moment
- Import your video clips to social media platforms
- You can also adjust the audio of your tracks using the Audio Mixer feature
Follow this guide to create a video for your slide with Filmora
Step 1. Launch Filmora
First, begin by downloading and installing Filmora on your computer device. Once installed, launch it and allow it to run. You can either create a new project or open an existing project to work on.
Step 2. Create a new project
Here, click on the “New Project” tab on the app’s welcome screen. The editor should load immediately. Then proceed to register the product. Just hit on the “Register” tab.
Step 3. Import video
Check the upper left corner of your screen to see the “Import” tab. Click on it and choose the “Import Media Files” option. Next, navigate to the location of your computer’s local list to select the clip or video you want to edit. Then, hit the “Import” button to add the video to the timeline for editing.
Step 4. Edit video
Drag and drop the raw footage to Filmora’s timeline to begin editing. Here, you can trim, add other video clips, merge, and add effects as you wish. Likewise, you can add opening titles, subtitles, and end credits to your video. More so, this tool offers different templates to use. Just drag and drop the templates you wish to use to a specific location on the timeline.
Step 5. Preview your file
Last but not least, you can preview your files. Click on the “Play” tab to start previewing your video clips. The main essence of this part is to allow you to make the necessary changes to your clips if there is a need.
Step 6. Export and Share
With Filmora, you can export your file to various social media platforms. But first, go to the “Output window” and select the video file format to use. This software supports several output formats to apply to any platform and device. Just click on the “Format” tab and choose the file format to use. Then also change the resolution and other parameters like frame rate and channel of your video in the “Settings” section. Finally, share your video to your YouTube channel and get ready to add the video to the Google Slide presentation.
For Win 7 or later (64-bit)
For macOS 10.12 or later
Conclusion
● You now know how to put a YouTube video in Google Slides the simple way. You can search for your YouTube videos or directly use the URL link. Whatever the case, remember that it’s the quality of your video that carries more weight. Thanks to the availability of third-party apps that you can use to create and improve the quality of your videos.
● Filmora is at your service to create high-resolution videos that you can export in any format to your YouTube channel. The tool is intuitive, and it won’t matter whether you haven’t tried it before. It is a perfect choice for both professionals and first-time users.
Google Slide presentation is a powerful tool for creators to keep their audience engaged. This online platform lets you create and demonstrate your ideas. It will capture your viewers’ attention from the very beginning. It also doesn’t matter whatever learning style you engage. Adding YouTube videos to Google Slide will appeal to all levels of individuals.
More so, it is the best way to provide a break for both the audience and the creator. You can break Google Slide presentations with videos to offer some break. Viewers and the presenter get a breather in the process. The presenter can take a short break from speaking while the video plays. Let’s now dive into how to embed a YouTube video in Google Slides.
In this article
01 Why should we add a video to Google Slides?
02 How to add a YouTube video to Google Slide
03 How to choose the right video for your Slides?

Why should we add a video to Google Slides?
There is a great impact of adding video to Google Slides.
For attention
Videos will automatically awaken you, especially if your thoughts have started to sway during a presentation. A video has a direct way of showing creativity. The audience automatically connects the dots between the video and the presentation lines alike.
To stimulate discussion
A picture is worth a thousand words. There is a way that an added video will help the audience connect to the day’s topic. It will bring up several ideas and stir up discussion with the presenter.
Easy following
With videos embedded in Google Slide, viewers will find it easy to understand and digest. Videos automatically eliminate boredom and make any topic interesting.

How to add a YouTube video to Google Slide
Use these two methods to add a YouTube video to Google Slides. Via the Search and Direct link.
Method 1. Embed YouTube video to Google Slide by search and selection
Google has owned YouTube since the year 2006. You can, therefore, integrate Google’s products with YouTube easily.
Step 1. First, go to the slide where you want to embed your video.
Step 2. Then choose the “Insert” option from the menu bar and hit the “Video” option.
Step 3. It would be best if you now viewed the “YouTube” search bar to type in the video you want to embed. You can use keywords to search for the video in question and view instant search results.
Step 4. Then select the video you want to embed, and you’ll see it appear on the “Slide.”
Step 5. Format your video. Remember that the entire video will be embedded. You don’t necessarily need the whole video. It is time to select just a brief but relevant clip from the video to use. Then position your video to the right point using the axes from the exact starting point to the finished part you want the video to appear in.
Method 2. Embed YouTube video to Google Slide by direct link
You can engage this method if you want to include the entire video.
Step 1. Get the URL of the specific YouTube video that you want to use.
Step 2. Then go to your browser’s “Address bar” to copy the YouTube link.
Step 3. Next, open the “Presentation” slide to put your video to.
Step 4. Choose the “Insert” tab from the menu bar.
Step 5. Then hit on the “Video” option from the drop-down menu that appears.
Step 6. A new window will open automatically. Choose the “By URL” tab.
Step 7. Then paste the YouTube video URL in the “Paste YouTube URL Here” bar section.
Step 8. Wait for the video file to load and press the “Select” option. The video will immediately appear in the presentation slide. Just drag and drop the video in your preferred position.
Note: You can do a few edits inside the application. Set the timer when your video should start and when to stop. You can also adjust the video player size.
How to choose the right video for your Slides?
Not all videos will make an impact on your Google Slide. You need to use the best shot that adds value to your presentation. These guidelines will help you to settle on the best video.
Be Professional – choose the best video for your presentation. Remember that the video is part of the presentation and carries more weight. Settling for quality video will bring out the professionalism in you.
Relevant – how do you know that what you are showing your audience corresponds to the presentation piece? Ensure that the video you add has something to do with the Google Slide presentation topic. The two should naturally flow to make it easy to understand the whole concept.
Precise – your presentation is not about the video. The ideal length should not exceed 60 seconds. The longer the video, the greater the chance for your audience to lose track along the way.
Know every footage you are working with – this will help you pick the best shots for your presentation. So, learn every aspect of the video before settling down to use it.
Add new content – even though one content may suit several presentations, don’t rely on the same piece each time. Your audience will want to feel something fresh each time you are presenting. So, compose different videos for different scenarios to make that big impact.
 dotConnect for Oracle is an ADO.NET data provider for Oracle with Entity Framework Support.
Create an eye-catching video for your Slides with Filmora
The video quality matters when it comes to creating your Slides. The best video creator – Filmora – works in simple steps to give you an eye-catching video. It will create videos for all scenarios like marketing, tutorial, gaming, etc.
Key features of Filmora
- It offers you advanced video effects like filters, motion elements, etc
- You can multiply your fun with multiple screens with the Split Screen feature
- Easily change backgrounds using the Green Screen feature
- The speed control lets you fast forward or slow down a special moment
- Import your video clips to social media platforms
- You can also adjust the audio of your tracks using the Audio Mixer feature
Follow this guide to create a video for your slide with Filmora
Step 1. Launch Filmora
First, begin by downloading and installing Filmora on your computer device. Once installed, launch it and allow it to run. You can either create a new project or open an existing project to work on.
Step 2. Create a new project
Here, click on the “New Project” tab on the app’s welcome screen. The editor should load immediately. Then proceed to register the product. Just hit on the “Register” tab.
Step 3. Import video
Check the upper left corner of your screen to see the “Import” tab. Click on it and choose the “Import Media Files” option. Next, navigate to the location of your computer’s local list to select the clip or video you want to edit. Then, hit the “Import” button to add the video to the timeline for editing.
Step 4. Edit video
Drag and drop the raw footage to Filmora’s timeline to begin editing. Here, you can trim, add other video clips, merge, and add effects as you wish. Likewise, you can add opening titles, subtitles, and end credits to your video. More so, this tool offers different templates to use. Just drag and drop the templates you wish to use to a specific location on the timeline.
Step 5. Preview your file
Last but not least, you can preview your files. Click on the “Play” tab to start previewing your video clips. The main essence of this part is to allow you to make the necessary changes to your clips if there is a need.
Step 6. Export and Share
With Filmora, you can export your file to various social media platforms. But first, go to the “Output window” and select the video file format to use. This software supports several output formats to apply to any platform and device. Just click on the “Format” tab and choose the file format to use. Then also change the resolution and other parameters like frame rate and channel of your video in the “Settings” section. Finally, share your video to your YouTube channel and get ready to add the video to the Google Slide presentation.
For Win 7 or later (64-bit)
For macOS 10.12 or later
Conclusion
● You now know how to put a YouTube video in Google Slides the simple way. You can search for your YouTube videos or directly use the URL link. Whatever the case, remember that it’s the quality of your video that carries more weight. Thanks to the availability of third-party apps that you can use to create and improve the quality of your videos.
● Filmora is at your service to create high-resolution videos that you can export in any format to your YouTube channel. The tool is intuitive, and it won’t matter whether you haven’t tried it before. It is a perfect choice for both professionals and first-time users.
- Title: [New] Effortless Video Streams YouTube Loops for Television Viewers for 2024
- Author: Steven
- Created at : 2024-07-31 01:17:49
- Updated at : 2024-08-01 01:17:49
- Link: https://facebook-record-videos.techidaily.com/new-effortless-video-streams-youtube-loops-for-television-viewers-for-2024/
- License: This work is licensed under CC BY-NC-SA 4.0.