![[New] Constructing Captivating Valorant YouTube Thumbnails for 2024](https://thmb.techidaily.com/6193b23bc0e674c0853b0708bb0c2b43a5237bddcffe969ab0d29845fe4343ae.jpg)
[New] Constructing Captivating Valorant YouTube Thumbnails for 2024
Constructing Captivating Valorant YouTube Thumbnails
As a content creator on YouTube, you know how important it is to have a strong thumbnail that stands out from the competition. Not only does a thumbnail help attract viewers to your video, but it’s also the first thing people see when they come across your content on the platform. That’s why it’s crucial to put effort into designing an eye-catching thumbnail that accurately represents your video.
When creating a thumbnail for your Valorant video, it’s important to remember that the recommended size is 1280 x 720 pixels. This will ensure that your thumbnail looks clear and professional on all devices. In addition to size, it’s also essential to consider the composition of your thumbnail. In this article, we’ll provide tips and tricks for creating professional Valorant thumbnails that will help boost your views and engagement.

What Is Valorant?
Valorant is a free-to-play tactical first-person shooter video game developed and published by Riot Games. The game was released in June 2020 and has quickly gained popularity due to its high-stakes, team-based gameplay and unique characters.
In Valorant, players choose from a roster of agents, each with their abilities and playstyle, and compete in 5v5 objective-based matches. The game has a variety of game modes, including the popular “Spike Rush” mode, which features a shorter round time and special abilities for all players. Valorant is available on Microsoft Windows and will soon be available on other platforms.

Why Create Thumbnails for Your Valorant YouTube Videos?
Creating a thumbnail for your Valorant YouTube video is an important step in the video creation process. A thumbnail is a visual representation of your video and can help attract viewers to your content.
When someone comes across your video in their feed, the thumbnail is often the first thing they see, so it’s crucial to make it as eye-catching and compelling as possible. A strong thumbnail can help increase your views and engagement and establish your brand as a content creator. By putting effort into designing a professional and relevant thumbnail, you can set your video apart from the competition and entice viewers to click and watch.
How To Make a Valorant Thumbnail for Free?
If you want to create a Valorant thumbnail for your YouTube videos but don’t want to spend any money, you still have plenty of options. One way to create a thumbnail for free is by using a free online design tool or thumbnail maker. Or, you can try Wondershare Filmora .
Free Download For Win 7 or later(64-bit)
Free Download For macOS 10.14 or later
Not only is Filmora a powerful video editing software, and it has a range of features and tools that make it easy to design and create custom thumbnails. Even better, you can use the trial version of Filmora to create a thumbnail for free. You need to download the trial version and start experimenting with the various design tools and templates to create a thumbnail that reflects your style and brand.
Creating a Valorant thumbnail for YouTube using Filmora can be very easy. Just follow these steps:
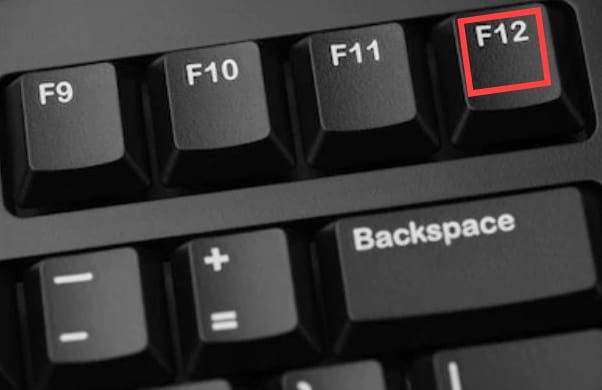
Step1 Take a screenshot of your gameplay by pressing the “F12“ key on your keyboard while in the game. This will save the screenshot to your computer.
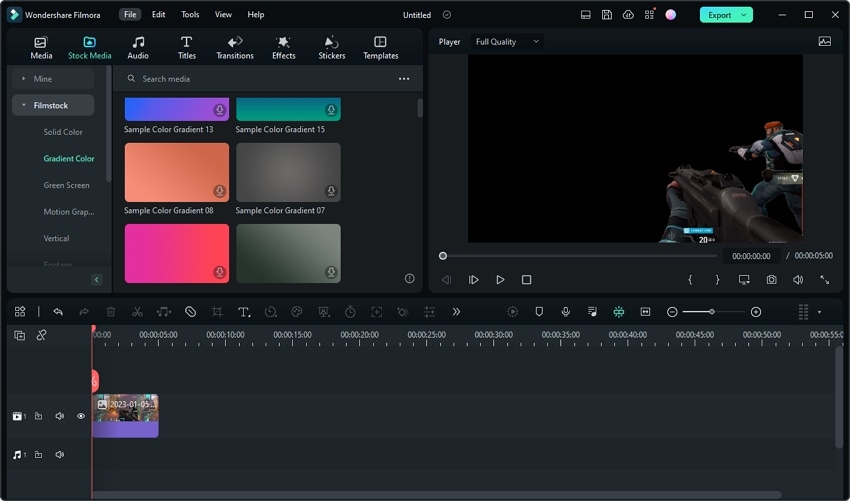
Step2 Launch Filmora and create a new project.

Step3 Import the screenshot into the media library by clicking the “Import“ button.

Step4 Drag the screenshot from the media library into the timeline.

Step5 Use the “Smart Cutout“ feature to select and cut out specific elements from the screenshot.

Step6 Choose the elements of the screenshot that you want to keep.

Step7 Remove any parts of the screenshot that you do not want to include in the thumbnail.

Step8 Extract the selected elements from the screenshot. You can resize the elements as desired.
Step9 Add a background to the track below the screenshot by dragging a background image from the media library into the timeline. Alternatively, you can import your image as a background by clicking the “Import“ button and selecting the image file from your computer.

Step10 Add an effect, such as a gun effect, by searching for the desired effect in the “Effects“ tab and dragging it into the timeline.


Step11 Adjust the opacity of the effect as desired.

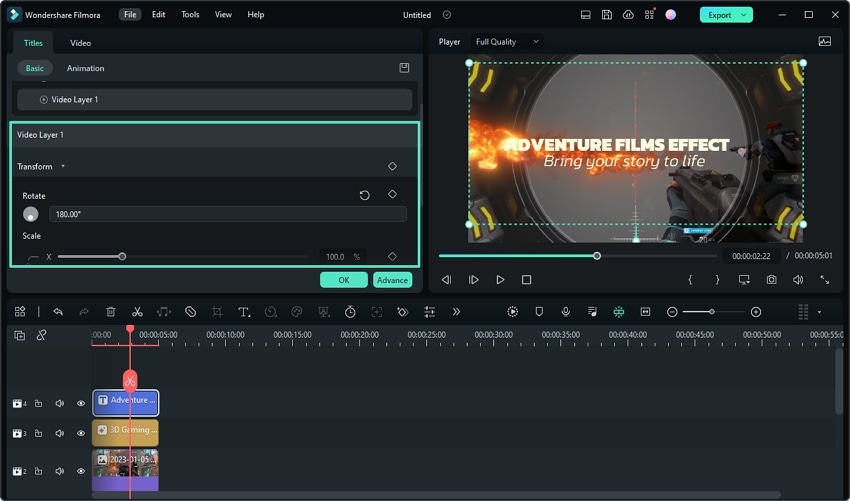
Step12 Add some titles and texts for your thumbnail.

Step13 Customize the appearance and rotation of the fire effect as desired.
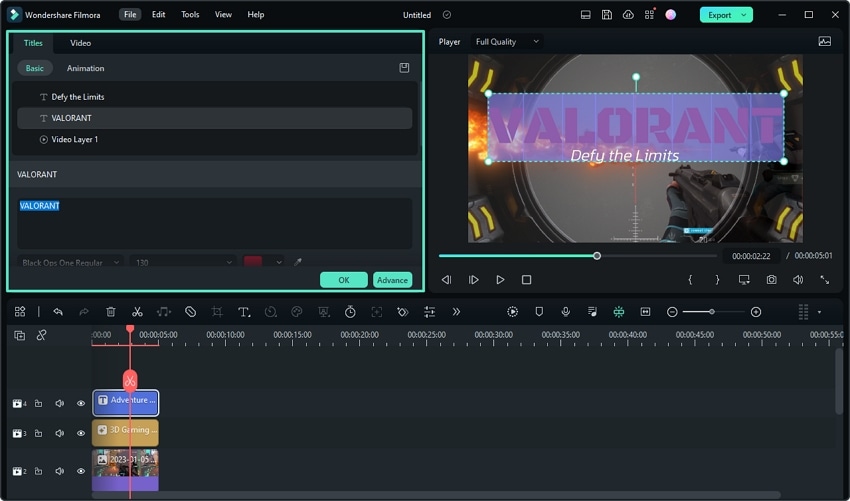
Step14 Edit the texts and adjust the appearance of the texts in the Titles window.
Step15 Choose a still frame that you like and take a snapshot of it.

Step16 Select the snapshot format and storage path. The snapshot will appear in the media library.

Step17 Right-click on the snapshot and select “Reveal in Explorer“ to find the file on your computer. You can now use it as your Valorant thumbnail.

Please note that while using the trial version of Filmora, a watermark will be added to the exported video. However, the watermark will not be added to the snapshot, so you can use the snapshot as your Valorant thumbnail without any issues.

Tips for Making Awesome Thumbnails for Your YouTube Valorant Videos
By following these tips, you can create an eye-catching and effective thumbnail for your Valorant YouTube videos that will help boost your views and engagement.
- Use high-quality images and graphics: A thumbnail with low-quality or pixelated images will not be as effective as a thumbnail with clear, high-resolution graphics.
- Use bold, eye-catching colors: Bright colors can help your thumbnail stand out in a crowded feed.
- Include relevant text: Use text to give viewers an idea of what to expect from your video and to entice them to click.
- Use clear, legible fonts: Make sure the text on your thumbnail is easy to read and doesn’t distract from the overall design.
- Keep it simple: Avoid overcrowding your thumbnail with too many elements or text. A clean, simple design is often more effective.
- Make it relevant: Your thumbnail should accurately represent the content of your video.
- Test different designs: Be bold and experiment with design elements and layouts to find what works best for your brand.
Want To Be a Valorant YouTuber? Learn From These 5 Ones
If you’re interested in becoming a Valorant YouTuber, there are many successful content creators in the Valorant community whom you can learn from. Here are five Valorant YouTubers that are worth checking out:
1. Shroud – Well-Known Valorant YouTuber With 6.8M Subscribers
Shroud is a well-known and respected content creator and player in the Valorant community. He has a strong background in professional CS:GO and has continued to thrive in the competitive Valorant scene despite being older than many other eSports players.
He is known for his gameplay videos and relaxed, easygoing personality, contributing to his widespread popularity and admiration among fans. In addition to his professional gameplay, Shroud is highly skilled and continues to compete at a high level, further solidifying his reputation as a top Valorant player.

2. TenZ – Popular Valorant Player With 1.6M Subscribers
TenZ is a highly skilled and popular Valorant player and content creator known for his exceptional ability in the game. He has achieved a high level of success and has been recognized as one of the best Valorant players in the world.
In addition to his full matches and 1v1 videos, TenZ also produces educational content, providing tips and tricks to his viewers. Despite facing some challenges and setbacks, TenZ has remained a prominent figure in the Valorant community and continues to be highly respected for his skills and contributions.

3. n0ted – Prolific Valorant YouTuber With 614k Subscribers
n0ted is a dedicated and prolific Valorant content creator, consistently uploading new videos to his YouTube channel daily. He offers a wide range of content, including gameplay highlights, funny moments, helpful tips, and updates on the latest happenings in the Valorant community.
His channel is a reliable source for those looking for consistently fresh and diverse Valorant content on YouTube. Whether you’re interested in learning new strategies, having a few laughs, or staying up to date with the latest developments in the game, n0ted’s channel has something for everyone.

4. Hiko - Valorant Content Creator With 382k YouTube Subscrbers
Hiko is a well-known Valorant content creator and former player of Counter-Strike: Global Offensive (CS:GO). He is known for his skill in first-person shooter games and his expertise in Valorant, which he shares through tips and gameplay videos on his channels on Twitch and YouTube.
Hiko is currently a content creator for 100 Thieves, a gaming organization he represents in various tournaments and competitions. He is a reliable source of high-quality Valorant content and regularly uploads new videos for his followers.

5. C9 meL – Professional Valorant Player With 33.6K YouTube Subscribers
C9 meL is a highly respected professional Valorant player and leader of the team Cloud 9 White. She is known for her sense of humor, helpful tips, and Agent tutorials and montages. As the in-game leader for her team, MeL has developed exceptional game sense and strategic skills, making her a valuable teacher and resource for other players.
In addition to her instructional content, MeL’s videos often feature a mix of comedy and skill, making them enjoyable for entertainment and improvement purposes. Overall, MeL is a talented and well-respected member of the Valorant community.

Conclusion
Creating a Valorant thumbnail for your YouTube videos can be important for promoting and attracting views to your content. Using Filmora, you can easily create a thumbnail for free by following the steps outlined in this article.
Additionally, there are many successful Valorant YouTubers who offer a range of content and can serve as inspiration for those interested in starting their channel. Creating visually appealing and engaging thumbnails ensures that your videos stand out and draw in viewers.
Free Download For macOS 10.14 or later
Not only is Filmora a powerful video editing software, and it has a range of features and tools that make it easy to design and create custom thumbnails. Even better, you can use the trial version of Filmora to create a thumbnail for free. You need to download the trial version and start experimenting with the various design tools and templates to create a thumbnail that reflects your style and brand.
Creating a Valorant thumbnail for YouTube using Filmora can be very easy. Just follow these steps:
Step1 Take a screenshot of your gameplay by pressing the “F12“ key on your keyboard while in the game. This will save the screenshot to your computer.
Step2 Launch Filmora and create a new project.
Step3 Import the screenshot into the media library by clicking the “Import“ button.
Step4 Drag the screenshot from the media library into the timeline.
Step5 Use the “Smart Cutout“ feature to select and cut out specific elements from the screenshot.
Step6 Choose the elements of the screenshot that you want to keep.
Step7 Remove any parts of the screenshot that you do not want to include in the thumbnail.
Step8 Extract the selected elements from the screenshot. You can resize the elements as desired.
Step9 Add a background to the track below the screenshot by dragging a background image from the media library into the timeline. Alternatively, you can import your image as a background by clicking the “Import“ button and selecting the image file from your computer.
Step10 Add an effect, such as a gun effect, by searching for the desired effect in the “Effects“ tab and dragging it into the timeline.
Step11 Adjust the opacity of the effect as desired.
Step12 Add some titles and texts for your thumbnail.
Step13 Customize the appearance and rotation of the fire effect as desired.
Step14 Edit the texts and adjust the appearance of the texts in the Titles window.
Step15 Choose a still frame that you like and take a snapshot of it.
Step16 Select the snapshot format and storage path. The snapshot will appear in the media library.
Step17 Right-click on the snapshot and select “Reveal in Explorer“ to find the file on your computer. You can now use it as your Valorant thumbnail.
Please note that while using the trial version of Filmora, a watermark will be added to the exported video. However, the watermark will not be added to the snapshot, so you can use the snapshot as your Valorant thumbnail without any issues.
Tips for Making Awesome Thumbnails for Your YouTube Valorant Videos
By following these tips, you can create an eye-catching and effective thumbnail for your Valorant YouTube videos that will help boost your views and engagement.
- Use high-quality images and graphics: A thumbnail with low-quality or pixelated images will not be as effective as a thumbnail with clear, high-resolution graphics.
- Use bold, eye-catching colors: Bright colors can help your thumbnail stand out in a crowded feed.
- Include relevant text: Use text to give viewers an idea of what to expect from your video and to entice them to click.
- Use clear, legible fonts: Make sure the text on your thumbnail is easy to read and doesn’t distract from the overall design.
- Keep it simple: Avoid overcrowding your thumbnail with too many elements or text. A clean, simple design is often more effective.
- Make it relevant: Your thumbnail should accurately represent the content of your video.
- Test different designs: Be bold and experiment with design elements and layouts to find what works best for your brand.
Want To Be a Valorant YouTuber? Learn From These 5 Ones
If you’re interested in becoming a Valorant YouTuber, there are many successful content creators in the Valorant community whom you can learn from. Here are five Valorant YouTubers that are worth checking out:
1. Shroud – Well-Known Valorant YouTuber With 6.8M Subscribers
Shroud is a well-known and respected content creator and player in the Valorant community. He has a strong background in professional CS:GO and has continued to thrive in the competitive Valorant scene despite being older than many other eSports players.
He is known for his gameplay videos and relaxed, easygoing personality, contributing to his widespread popularity and admiration among fans. In addition to his professional gameplay, Shroud is highly skilled and continues to compete at a high level, further solidifying his reputation as a top Valorant player.
2. TenZ – Popular Valorant Player With 1.6M Subscribers
TenZ is a highly skilled and popular Valorant player and content creator known for his exceptional ability in the game. He has achieved a high level of success and has been recognized as one of the best Valorant players in the world.
In addition to his full matches and 1v1 videos, TenZ also produces educational content, providing tips and tricks to his viewers. Despite facing some challenges and setbacks, TenZ has remained a prominent figure in the Valorant community and continues to be highly respected for his skills and contributions.
3. n0ted – Prolific Valorant YouTuber With 614k Subscribers
n0ted is a dedicated and prolific Valorant content creator, consistently uploading new videos to his YouTube channel daily. He offers a wide range of content, including gameplay highlights, funny moments, helpful tips, and updates on the latest happenings in the Valorant community.
His channel is a reliable source for those looking for consistently fresh and diverse Valorant content on YouTube. Whether you’re interested in learning new strategies, having a few laughs, or staying up to date with the latest developments in the game, n0ted’s channel has something for everyone.
4. Hiko - Valorant Content Creator With 382k YouTube Subscrbers
Hiko is a well-known Valorant content creator and former player of Counter-Strike: Global Offensive (CS:GO). He is known for his skill in first-person shooter games and his expertise in Valorant, which he shares through tips and gameplay videos on his channels on Twitch and YouTube.
Hiko is currently a content creator for 100 Thieves, a gaming organization he represents in various tournaments and competitions. He is a reliable source of high-quality Valorant content and regularly uploads new videos for his followers.
5. C9 meL – Professional Valorant Player With 33.6K YouTube Subscribers
C9 meL is a highly respected professional Valorant player and leader of the team Cloud 9 White. She is known for her sense of humor, helpful tips, and Agent tutorials and montages. As the in-game leader for her team, MeL has developed exceptional game sense and strategic skills, making her a valuable teacher and resource for other players.
In addition to her instructional content, MeL’s videos often feature a mix of comedy and skill, making them enjoyable for entertainment and improvement purposes. Overall, MeL is a talented and well-respected member of the Valorant community.
Conclusion
Creating a Valorant thumbnail for your YouTube videos can be important for promoting and attracting views to your content. Using Filmora, you can easily create a thumbnail for free by following the steps outlined in this article.
Additionally, there are many successful Valorant YouTubers who offer a range of content and can serve as inspiration for those interested in starting their channel. Creating visually appealing and engaging thumbnails ensures that your videos stand out and draw in viewers.
Stream-to-Script Service
Captions, like subtitles, can be a great way to improve the engagement of your video by reaching more and more audiences. But adding captions to your video is not an easy thing to do and without the right video caption maker, it can seem like an impossible task.
But it is important to add captions to your video, not just so you can target people who don’t understand the language or those who prefer to read rather than watch the video, but also to improve SEO and visibility.
Here, we will be looking at some of the best tools that you can use to add captions to your video.
Filmora Audio Recorder
Record computer system audio
Capture microphone audio
Customize recording volume
Record screen and webcam as well
Best Video Caption Makers
The following are the top video caption makers that you can choose from;
YouTube Automatic Caption
If you already have your own YouTube channel, you can use the built-in speech recognition feature to generate accurate captions for your video. This feature can generate captions in a number of languages including English, Portuguese, German, Spanish, Korean, French, Italian, and Dutch which is more than some of the premium caption generators in the market.
The main reason most people choose this solution is that it is fairly simple to use. You don’t have to do much; just upload the video and the automatic caption generator will create the captions you need.
Key Features
- It is easy to use and freely accessible
- You can use it to generate captions in a number of different languages
- It is very accurate
- You can use it to generate transcripts for the video
Kapwing Auto-Subtitle Maker
Kapwing is an online solution that will generate subtitles and captions for most videos. But it does limit the size of the video that it can generate subtitles on to about 500 MB. There is a free version of the program that although limited in functionality will not add a watermark to the generated captions file. But free users can only get captions for up to 7 minutes of video, making it a less ideal solution when you have a longer video.
Key Features
- You can generate captions and subtitles for free
- It is accessible online and you don’t have to install software on your computer to get the captions
- It has a very simple user interface, making the caption generation process quick and easy
- In addition to generating subtitles and captions, you can edit existing files.
Adobe Premiere Pro CC
You may know Adobe Premiere as one of the most popular video editing programs on the market, but most people are unaware that it can also be used to generate captions for the video. This tool can be very useful in the creation of high-quality videos and you can generate an accurate caption or subtitle for the video as well.
But Adobe Premiere is not an easy solution to use for both video editing and adding captions, particularly for beginner users. But it is certainly one of the best ways to create and edit videos on your computer.
Key Features
- Even though the interface is not easy to use, it is clear and flexible
- You have numerous options to add the captions including font style and color
- The captions that you add using this tool will be very accurate
- It can also be used to edit existing subtitle and caption files
Amara Subtitle Editor
Amara subtitle editor will not be able to help you create or generate captions for your video, but it can be a good solution to edit a subtitle file that you already have. It can be very useful in syncing the subtitles with the video and you can use it to make minor changes to the subtitle.
While editing the subtitle file is easy, creating a caption file using Amara can be a lengthy process since you would have to type in the text.
Key Features
- It can be used to edit caption and subtitles files easily
- The user interface is pleasant and easy to use
- It is completely free
Aegisubs
Aegisubs is another tool that you can use to create subtitles for your video. But we must warn you right off the bat that this tool is not very user-friendly and you may find that you will spend a lot of time trying to generate subtitles for your video. But it is a free solution and widely accessible on most platforms.
Key Features
- It can be used to create subtitles and captions in different languages
- It supports numerous video and audio formats
- It has a simple user interface that is easy to navigate
- It doesn’t have speech recognition and you’ll have to enter all the text manually
AHD Subtitle Maker
AHD subtitle maker is a Windows program that can be used to create subtitles and captions for your video in a variety of formats such as SRT. It is a completely free solution that can also be used to edit subtitle files in numerous ways, even changing the format of the file.
Among other things, you can use AHD subtitle maker to translate, change, copy and delete selected text from a subtitle file and even replace the text with something else.
Key Features
- It is a free program that works on all versions of Windows
- It can generate subtitle and caption files in a variety of formats
- You can use it to generate subtitle files or edit existing files in various ways
- It can also be used to generate various types of content including ID3 tags for music files
Videocaptionmaker.com
To generate captions and subtitles on your Mac for free, the best option is Video Caption Maker. The full version of the program is available for free and it can be used to create a subtitle file or make changes to a subtitle file you already have.
Key Features
- You can use it to add text to a video in a simple and straightforward way
- It can also be used to make changes to existing subtitles by changing the fonts, styles, backgrounds, positions, and more
- It will also add a visual waveform to an audio file to identify the start and end time
- It supports numerous video formats including .mov, .mp4, .mpeg, .3gpp, .3gpp2
Jubler
Jubler is a program that can edit subtitles and captions for videos. It can also be used to create new subtitles although it doesn’t automatically generate the captions and you will have to type them in. But when it comes to editing subtitles, this tool is very effective, allowing you to change the font style, color, and even positioning of the subtitles.
Key Features
- It works on all platforms including Windows, Mac, and Linux
- It will graphically display the subtitles so you can easily move them to the desired location
- It supports all subtitle and caption file formats
- It allows you to edit the subtitles in many ways
- It can be used to translate the subtitles to various languages
Related FAQs
**How Do I Make a Caption for a Video?
Making a caption for your video can be easy depending on the type of program you choose to use. A good rule of thumb is to choose solutions that auto generates the captions as they save you a lot of time. If there are issues after the captions have been generated, you can then use a subtitled editor to fix them, more preferable to typing in the subtitles or captions yourself.
**How Do I Get Automatic Captions for my Video?
If you are uploading your video on YouTube, you can easily generate automatic captions from the YouTube studio. Just use these simple steps;
Step 1: Sign in to YouTube Studio and in the left menu, select “Subtitles.”
Step 2: Click on the video that you want to add subtitles
Step 3: Select “More” under Subtitles and then go through the captions to make sure they are correct. If not, you can edit them on this page.
If you are not using YouTube to share your video, you can use one of the solutions we have outlined in this article to generate automatic captions.
**How Long Does It Take to Caption a Video?
The amount of time that you spend creating a caption for your video is entirely dependent on the captioning tool that you use. Automatic caption generators can create captions in a few seconds but manual subtitle tools can lengthen the process, especially for a longer video.
Conclusion
Captions are a great way to get users to engage with your videos. Studies have shown that a captioned video is far more likely to get more engagements and shares on social media. And since it can be very easy to make caption for you video, why not utilize this little known resource and get your videos to stand out a little bit more.
Also read:
- [New] 2024 Approved Avoid Mainstream Underrated Movies of the Year
- [New] 2024 Approved Prime Choices Cheap PC Capture Software Listed
- [New] Amplify Watcher Count Simplified Tactics Exposed for 2024
- [New] IPhone/Android Choose Great Focus Shots for 2024
- 10 High-Quality Camera Gimbals IPhone/Android/DSLR Reconnaissance for 2024
- Finding The Right Moment For A New Smartphone – How Often Is Enough?
- How To Unlock Apple iPhone 7 Plus 3 Ways To Unlock
- In 2024, How to Mirror PC Screen to Asus ROG Phone 7 Ultimate Phones? | Dr.fone
- In 2024, Will Pokémon Go Ban the Account if You Use PGSharp On Google Pixel 8 | Dr.fone
- In 2024, YouTube Sub4Sub Does It Really Work?
- Simplified Techniques for Reordering YT Videos for 2024
- Timed Tales Modifying Video Playback Speed
- Transform Your Social Media Voice with High-Def Streams
- Title: [New] Constructing Captivating Valorant YouTube Thumbnails for 2024
- Author: Steven
- Created at : 2024-10-24 16:18:25
- Updated at : 2024-10-29 18:19:58
- Link: https://facebook-record-videos.techidaily.com/new-constructing-captivating-valorant-youtube-thumbnails-for-2024/
- License: This work is licensed under CC BY-NC-SA 4.0.